Upgrade Versa Networks Operating System to Ubuntu 18.04
![]() For supported software information, click here.
For supported software information, click here.
The Versa Operating SystemTM (VOSTM) software runs on an Ubuntu base operating system (OS). Initial releases of the VOS software are based on the Ubuntu 14.04 (Trusty) OS. This version of Ubuntu reached its end of life (EOL) in April 2019, and it has been replaced with Ubuntu 18.04 (Bionic). This article describes how to upgrade the base operating system on VOS headend and branch devices from Ubuntu 14.04 to Ubuntu 18.04.
Note: Releases 22.1.1 and later support only Ubuntu 18.04. For any VOS devices running Ubuntu 14.04 (Trusty), you must upgrade them to Ubuntu 18.04 (Bionic) before you can use Releases 22.1.1 and later.
Upgrade Orchestrator Overview
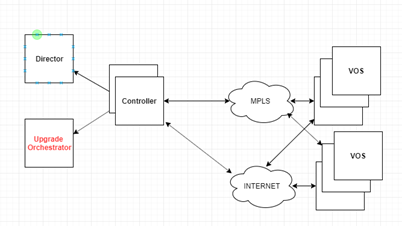
To facilitate the upgrade of the Ubuntu OS, Versa Networks has introduced an upgrade orchestrator network node, which uses the management network to communicate with Versa Director and Analytics nodes and to orchestrate the upgrade. The upgrade orchestrator uses the control network to communicate with and upgrade the remote VOS device nodes. The upgrade orchestrator is a standalone node that you must install in the headend network in which the Versa Director node is installed. You can instantiate the upgrade orchestrator on a bare-metal device or as a KVM or an ESXi virtual machine (VM). The following network diagram illustrates the placement of the upgrade orchestrator in the headend.
The upgrade orchestrator provides a graphical user interface (GUI) web application that you can use to manage the upgrade of the base OS to Ubuntu 18.04 (Bionic) for Versa Director, Versa Analytics, and all VOS nodes, including Controller nodes and any standalone VOS nodes. The upgrade process also upgrades the VOS software version to the Ubuntu 18.04 version of Release 21.2.2 or later. The upgrade orchestrator communicates with the Versa Director using application programming interfaces (REST APIs) to fetch the software-defined WAN (SD-WAN) asset information, and it then communicates with these assets using the secure shell (SSH) protocol. The upgrade orchestrator manages all the software images that are used to upgrade the SD-WAN devices. It also allows you to initiate and monitor the upgrade of multiple VOS and Analytics nodes at the same time.
The upgrade orchestrator software is available in ISO, OVA, and QCOW2 formats.
The upgrade orchestrator requires two network interfaces—a northbound interface for management (HTTPS access) and a southbound interface to reach the SD-WAN overlay IP addresses of the VOS devices that you are upgrading. The management network of the Director and Analytics nodes should be reachable over either the northbound or southbound interface.
The upgrade orchestrator backend uses Ansible and Python scripts that use SSH and rsync/SCP to transfer files and execute the series of actions required to upgrade the OS.
Minimum Supported Software Releases
To perform the Ubuntu OS upgrade, the Versa devices must be running the following software releases:
- Analytics nodes—Release 20.2.3 or later.
- Director nodes—Release 21.2.2 or later. For more information, see Prerequisites for the Upgrade Orchestrator, below.
- VOS devices—Release 20.2.3 or later.
Prerequisites for the Upgrade Orchestrator
- The upgrade orchestrator must have internet access so that it can check the Ubuntu package repositories. The internet access can be direct access or access through a proxy for HTTP/HTTPS.
- The following table lists the ports that must be open for the OS upgrade process to operate.
Purpose Traffic Direction Protocol Interface Port Numbers Standard SSH from management network to upgrade orchestrator Inbound TCP Northbound/management 22 HTTPS/REST for upgrade orchestrator user interface (UI) Inbound TCP Northbound/management 443 Standard SSH from Upgrade Orchestrator to Versa devices
Outbound TCP Southbound 22 REST API to Director node from Upgrade Orchestrator Outbound TCP Southbound 9183 HTTP/HTTPS internet access to fetch Ubuntu packages Outbound TCP Southbound/internet 80, 443 SSH tunneling from Versa devices to upgrade orchestrator, and vice versa Both TCP Southbound 3142 ICMP to test reachability of Versa devices from upgrade orchestrator Outbound ICMP Southbound — - You must transfer all the Ubuntu 18.04 (Bionic) firmware images (names with the –B notation) to the upgrade orchestrator, including the Director, Analytics (and Analytics lite), and VOS images (both WSM and non-WSM). You can transfer the images using SCP, and a common location for them is the /var/tmp directory.
- Ubuntu 14.04 (Trusty) hotfix images dated 2022-05-10 and later have been qualified for use for Director nodes running Release 21.2.2 or later.
- Before the upgrade orchestrator can communicate with the Versa Director node, you must upgrade the Director node to the Ubuntu 14.04 (Trusty) version of a qualified VOS Release 21.2.2 or later qualified VOS release. For an HA setup, ensure that you upgrade both the active and standby Director nodes. To find the link to the latest software on the support portal, go to the Versa Networks Customer Support website and then select the GENERAL > SDWAN Software folder.
Install and Perform Initial Configuration of the Upgrade Orchestrator
You can install the upgrade orchestrator ISO on a bare-metal device or as a KVM or an ESXi virtual machine (VM). The bare-metal server must have an Intel CPU (Sandy Bridge or later that supports the AVX instruction set) that has minimum of 8 cores, 8 GB of memory, and 150 GB of storage. The VM instance must have a minimum of 8 CPUs, 8 GB of memory, and 150 GB of storage.
You can download the upgrade orchestrator image from the Versa Networks Customer Support portal. For more information about downloading the image, see the Ubuntu upgrade article in the Versa Networks Knowledge Base (KB).
After you perform the initial configuration of the upgrade orchestrator software, connect to the upgrade orchestrator through the console, and then log in using the default credentials. Please consult Versa technical support for default credentials.
Then, edit the /etc/network/interfaces file and identify the northbound and southbound interfaces and configure the network properties of the interfaces. The following shows a sample /etc/network/interfaces file:
$ cat /etc/network/interfaces
    # interfaces(5) file used by ifup(8) and ifdown(8)
    # Include files from /etc/network/interfaces.d:
    source-directory /etc/network/interfaces.d

    auto lo
    iface lo inet loopback

    auto eth0
    iface eth0 inet static
        address 10.40.40.70
        netmask 255.255.0.0
        gateway 10.40.0.1
    dns-nameserver 10.48.0.99
    dns-nameserver 10.42.75.114
    dns-search xx.yourdomain.net

    auto eth1
    iface eth1 inet static
       address 192.168.1.10
        netmask 255.255.255.0
    # Route to the overlay network(s)
    up route add -net 172.16.0.0/16 gw 192.168.1.2
Note that the next-hop gateway is typically the same next-hop router that your active Director node uses. This router can be a service router or another router that you can depend on to reach the Controller node.
Then activate the interface configuration:
$ sudo ifup eth0
$ sudo ifup eth1
Finally, ping the Director and Analytics nodes and a few test VOS nodes to check for reachability and to confirm that the network configuration is valid. To do this, ensure that you can resolve and ping external domains such as google.com and ubuntu.com and test HTTP and HTTPS access to the external web sites by issuing the following commands:
$ ping www.google.com
$ ping www.ubuntu.com
$ wget http://download.docker.com/linux/ubuntu
$ wget https://download.docker.com/linux/ubuntu/gpg
The web interface of the upgrade orchestrator should be reachable over the northbound IP address by accessing through https://
Upgrade the Upgrade Orchestrator Software
To upgrade to a later version of the upgrade orchestrator software:
- Copy the binary package to the /home/versa/packages directory on upgrade orchestrator.
- Initiate the software upgrade:
$ vsh upgrade-package upgrade-filename.bin
For example:
$ vsh upgrade-package versa-os-upgrade-20220920-120021-27089ab-1.0.bin
The upgrade logs are displayed on the console and are saved in the /var/log/versa/versa-pkg-upgrade.log file.
Prepare the Upgrade Orchestrator
This section provides the procedures to prepare to use the upgrade orchestrator.
Change the Password of the Versa User
Please consult Versa technical support for default SSH login and password on the upgrade orchestrator.
To change the password of the versa user:
- Issue the following command:
$ sudo passwd versa
Enter new UNIX password:
Retype new UNIX password:
passwd: password updated successfully
- Log out of the upgrade orchestrator.
- SSH back into the upgrade orchestrator as the user versa, using the new password.
Install a Certificate Authority (CA) Certificate for the Upgrade Orchestrator
The upgrade orchestrator has a self-signed server certificates for the user interface (UI). However, you can optionally choose to generate and load CA-signed certificates. If you do so, ensure that you generate the new server certificate and keys in PEM format.
To load the new certificate into the UI:
- If you need to generate a certificate signing request (CSR), use the following helper script. Then send the CSR to the CA to receive the server certificates. In this script, pass the parameters as indicated in the help output of the following command:
$ sudo /opt/versa/os-upgrade/versa/util/uo-csr-gen.sh -h
- If you have already generated a server certificate and key, issue the following command to load the new certificate for UI. As part of this command, you need to restart the Versa services. For example:
$ vsh conf-ui-cert
 Please enter the complete path to server certificate file:  /opt/versa/var/certs/cert.pem
 Please enter the complete path to server certificate key file:  /opt/versa/var/certs/certkey.pem
 Is the certificate key file encrypted with password (y/n)? n
 Restart of services is needed for change to take into effect. Restart (y/n)? y
 Stopping all Services ...
 Starting all Services ...
Configure a Proxy
If access to the internet is through a proxy server, you can optionally configure the upgrade orchestrator to use the proxy by executing one of the following shell scripts:
- If the same server acts as an HTTP and HTTPS proxy and it has authentication, issue a command in the following format, typing it on a single line. If you do not need proxy authentication, omit the –u and –s options.
$ sudo /opt/versa/os-upgrade/versa/util/configure_proxy.sh -a configure -h proxy-server-ip
-p proxy-server-port -u proxy-authentication-username -s proxy-authentication-password
- To configure only an HTTP or HTTPS proxy and it has authentication, issue a command in the following format, typing it on a single line. If you do not need proxy authentication, omit the –u and –s options.
$ sudo /opt/versa/os-upgrade/versa/util/configure_proxy.sh -a configure -h proxy-server-ip
-p proxy-server-port -u proxy-authentication-username -s proxy-authentication-password
-t (http | https)
To remove the proxy configuration, issue the following command:
$ sudo /opt/versa/os-upgrade/versa/util/configure_proxy.sh -a remove
Ensure that the upgrade orchestrator has access to the following domains:
- http://apt-archive.postgresql.org/
- http://download.docker.com/
- https://download.docker.com/
- http://security.ubuntu.com/
- http://us.archive.ubuntu.com/
- https://www.postgresql.org/
Finally, to test connectivity with the public servers and the ablity of the orchestrator to download various software packages, issue the following command:
$ vsh test-connectivity
Configure TACACS+
Optionally, you can configure TACACS+ on the upgrade orchestrator. Note that you can configure any number of TACACS+ servers, but because the software checks the reachability and status of the TACACS+ servers serially, configuring a large number of servers may introduce delay when a number of the TACACS+ servers are unreachable.
Note that for users who authenticate with TACACS+, the upgrade orchestrator does not support any distinction between an admin and an oper user.
To configure TACACS+:
- To configure a TACACS+ server:
$ vsh external-auth enable add-server tacacs-server-ip-address authentication-key
- To change the order of authentication, issue the following command. The default option is local-then-remote.
$ vsh external-auth enable auth-order [ local-then-remote | remote-only | remote-then-local ]
- To disable TACACS+ on the upgrade orchestrator:
$ vsh external-auth disable
Are you sure you want to disable TACACS+? [N/y]: y
TACACS+ disabled
- To delete a TACACS+ server:
$ vsh external-auth enable delete-server tacacs-server-ip-address
- To display the TACACS+ server configuration:
$ vsh external-auth show
TACACS+ servers (1):
        1.1.1.1     password123
Order: local-then-remote
Inventory the Firmware Images
You need to build an inventory of firmware images to use to upgrade the Versa nodes to Ubuntu 18.04.
- Copy all the relevant bin files (*-x.x.x-B.bin) to the local disk on the upgrade orchestrator, to a subdirectory in the /var/tmp/ directory. Make sure to use only the Versa-recommended software version for the upgrade and not any previously released software.
- From your browser, log in to the UI of the upgrade orchestrator using the northbound IP address. Log in as the user “versa,” and enter the password of the “versa” user.
- Click the Image inventory menu in the left panel, and then click the + Add icon to add an image. In the Add Image popup window, enter information for the following fields.
- Image Name—Enter a name for the image.
- Image Path—Enter the full path of the bin file on the upgrade orchestrator that you copied in Step 1.
- Product—Select the appropriate product.
- Default Image—Move the slider to the right to designate the selected image as the default image to use to upgrade all nodes of this product type. Make sure that you designate at least one image as the default image.
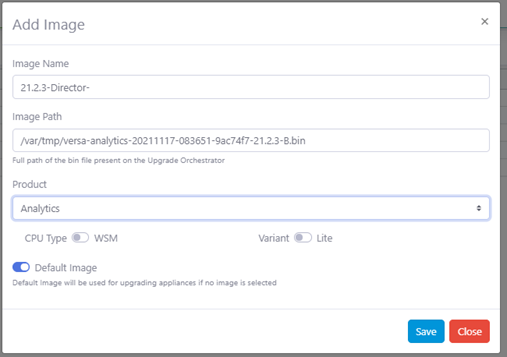
- Click Save.
- Repeat Steps 2 and 3 for all three product types, including any WSM images that are populated in the inventory.
Overview of the Process of Upgrading the Versa Devices
The following is the recommended sequence for performing the OS upgrade:
Warning: When upgrading the OS on Versa devices, disable any power monitor that reboots the Versa device, modems, switches, or any routers. If a power monitor reboots the Versa device or any devices that result in connectivity loss to the OS upgrade orchestrator, the Versa device might enter into an inconsistent state and will require manual, out-of-band access to recover.
- Upgrade one of the nodes in an Analytics cluster.
- Upgrade the remaining nodes in the Analytics cluster, one at a time.
- Upgrade the standby Director node.
- Upgrade the active Director node.
- Upgrade one of the Controller nodes. If you have more than one Controller node, upgrade half of them.
- Upgrade some or all the hubs.
- Verify that the control, management, and data planes are interworking among the upgraded and yet-to-be upgraded SD-WAN nodes.
- Upgrade the remaining Controller nodes.
- Upgrade all the other SD-WAN VOS devices.
Warning: Do not run any apt or dpkg commands on any Versa node unless explicitly instructed to do by the Versa Networks support team.
Prepare for Headend and Branch Upgrade
Before you begin the actual OS upgrade, you must perform a series of actions, including disabling external authentication and using local authentication for the period of the upgrade, and creating a local Linux user to enable access for the automated scripts. The main reason to disable the TACACS+ configuration is that it creates an impediment for the installation of many system packages.
Confirm the Software Package State
Before you perform the OS upgrade process, it is strongly recommended that you confirm that all the software packages are in a valid state. Doing this is critical so that the upgrade can be successful and so that you can use time efficiently during the maintenance window. You can confirm the package state well before you perform the OS upgrade.
To confirm that all the packages are in a valid state, issue the following commands on the VOS device:
$ sudo apt-get check
$ dpkg -l | grep -v ^ii
If these commands generate any output that lists package names, you must fix the package errors before proceeding with the OS upgrade. To fix any package issues, install the latest Trusty OS SPack, and then issue the commands again to check whether any package is in an inconsistent state.
Before You Upgrade Director Nodes
During the OS upgrade process, the Versa Director software version is not upgraded to Release 21.2.2 or later, but rather its software version remains unchanged. That is, the OS upgrade process installs the Bionic flavor of the same version package that is already running, and it does not upgrade the Versa Director software version. Therefore, you must pre-upgrade the Director nodes to the Trusty flavor of the desired Versa Director software version before you begin the OS upgrade process. For more information about how to upgrade Versa Director software, see Upgrade Software on Headend and Branch.
Before you upgrade the Director nodes:
- If external authentication is enabled on the Director node, you must disable it for the duration of the Director upgrade. To disable it:
- In the Director GUI, select the Administration tab in the top menu bar.
- Select Connectors > Authentication in the left menu bar. The authentication connectors display.
- On the top right, if a Default Connector is configured, click on the Delete icon. You are then prompted to log out. Choose Yes to continue.
- You are out. Log back in with local password and to next step.
- To allow the upgrade orchestrator to SSH and SCP, a local Linux user must be created on the Director nodes. To do this, run one of the following scripts from the shell of the upgrade orchestrator. The shell script creates a user named "os-upgrade" on the Director node.
For on-premises nodes, issue a command in the following format. In the –u option, specify the username you use to SSH to the Director node. It is not the username of the new Linux user that is created.
$ /opt/versa/os-upgrade/versa/util/osu-user.sh -u username -i director-management-ip-address
For public cloud–based nodes, issue a command in the following, providing the name of PEM file to get SSH access to the node:
$ /opt/versa/os-upgrade/versa/util/osu-user.sh -u username -i director-ip-address -p /path-of-pem-file
Alternatively, on the upgrade orchestrator, you can create a file with the SSH login credentials of all the nodes to be updated, with one entry per line, and then pass this file to the user-creation script. For example:
$ cat /var/tmp/VD1-Login.txt
10.40.44.51 admin  MyPassWord%

$ /opt/versa/os-upgrade/versa/util/osu-user.sh -f /var/tmp/VD1-Login.txt
Follow the same procedure to create a local Linux user "os-upgrade" on the standby Director node.
- If secure mode is enabled on the Director nodes, disable it:
cli> request system secure-mode disable
- Ensure that the date and time on the Director node are as accurate as possible so that the upgrade can finish successfully. If you need to set the date and time, you can configure NTP in the Director GUI, configuring one or more NTP servers. In Director view, select Administration > System > NTP Server.

Alternatively, you can set the local time manually by issuing the following commands in the Director node’s shell. If you set the time manually, try to set it to be as close as possible to the actual time.
admin@Director:~$ sudo timedatectl set-timezone timezone
admin@Director:~$ sudo timedatectl set-ntp no
admin@Director:~$ sudo timedatectl set-time "yyyy-mm-dd hh:mm:ss"
For example:
admin@Director:~$ sudo timedatectl set-timezone Europe/Paris
admin@Director:~$ sudo timedatectl set-ntp no
admin@Director:~$ sudo timedatectl set-time "2023-01-20 13:15:02"
Before You Upgrade Analytics Nodes
You cannot upgrade the OS on Analytics nodes that use the DSE database. You must upgrade to the Fusion database before performing the OS upgrade.
Before you upgrade Analytics nodes:
- If external authentication is enabled on the Versa Analytics, disable it for the duration of the Analytics upgrade. On Analytics nodes, you cannot deactivate the external authentication. Instead, you need to delete the entire configuration and then add it back after the upgrade:
analytics-cli% delete system external-aaa
analytics-cli% commit
- To allow the upgrade orchestrator to SSH and SCP, create a local Linux user on the Analytics nodes by executing one of the following shell scripts from the shell on the upgrade orchestrator.
For public cloud–based nodes, issue a command in the following format, providing the name of PEM file to get SSH access to the node:
$ /opt/versa/os-upgrade/versa/util/osu-user.sh -u ssh-user -i analytics-management-ip-address -p /path-of-pem-file
For non-cloud–based nodes, issue a command in the following format. In the –u option, specify the username you use to SSH to the Analytics node. It is not the username of the new Linux user that is created.
$ /opt/versa/os-upgrade/versa/util/osu-user.sh -u ssh-user -i analytics-ip-address
Alternatively, on the upgrade orchestrator, you can create a file with the SSH login credentials of all the nodes to be updated, with one entry per line, and then pass this file to the user-creation script. For example:
$ cat /var/tmp/VAN-Login.txt
10.40.44.72 versa password123

$ /opt/versa/os-upgrade/versa/util/osu-user.sh -f /var/tmp/VAN-Login.txt
- If secure mode is enabled on the Analytics nodes, disable it:
cli> request system secure-mode disable
- Ensure that the date and time on the Analytics nodes are as accurate as possible so that the upgrade can finish successfully. You can do this by configuring NTP on all the nodes. To do this add the following line to the /etc/ntp.conf file:
server your.ntp.server.local prefer iburst
Then, issue the following command to verify that the NTP time server is correct:
admin@Analytics:~$ ntpq -pn
Repeat this process on all Analytics nodes.
Alternatively, you can set the local time manually by issuing the following commands in the Analytics node’s shell. If you set the time manually, try to set it to be as close as possible to the actual time.admin@Analytics:~$ sudo timedatectl set-timezone timezone admin@Analytics:~$ sudo timedatectl set-ntp no admin@Analytics:~$ sudo timedatectl set-time "yyyy-mm-dd hh:mm:ss"
For example:
admin@Analytics:~$ sudo timedatectl set-timezone Europe/Paris
admin@Analytics:~$ sudo timedatectl set-ntp no
admin@Analytics:~$ sudo timedatectl set-time "2023-01-20 13:15:02"
Before You Upgrade VOS Devices
- Add the southbound IP address of the upgrade orchestrator to the VOS device’s VNF manager list of IP addresses so that the upgrade orchestrator can SSH to the VOS device. To edit the list and add the IP address to the VNF Manager in the template, select the Configuration tab, select Others in the left menu bar, and then select System > Configuration > Configuration. In the VNF Manager pane, click the Edit icon and add the southbound IP address of the upgrade orchestrator. To push the change to the devices being upgraded, commit the template.

- Disable TACACS+ on the VOS devices. To do this, either select the external authentication device and then click the
 Delete icon, or enter the delete system external-aaa command from the CLI on the VOS device.

- Make sure that the latest OS SPack is installed on the VOS devices.
- If the premium SPack is installed on that VOS device, make sure that the SPack version is at least 1928. If the installed SPack is a sample version, no SPack upgrade is necessary. To check the SPack version, issue the following CLI command:
cli> show security security-package information
- If secure mode is enabled on the VOS device, disable it:
cli> request system secure-mode disable
- For standalone VOS devices, such as PE routers and standalone firewall instances, that are not managed by the Versa Director attached to the upgrade orchestrator, create a local user by executing the osu-user.sh shell script from the shell on the upgrade orchestrator.
Note: You do not need to run the osu-user.sh shell script on VOS nodes managed by the Director node.
For public cloud–based nodes, issue a command in the following format, providing the name of PEM file to get SSH access to the node:
$ /opt/versa/os-upgrade/versa/util/osu-user.sh -u ssh-user -i vos-management-ip-address -p /path-of-pem-file
For non-cloud–based nodes that are not managed by the Director node, issue a command in the following format:
$ /opt/versa/os-upgrade/versa/util/osu-user.sh -u ssh-user -i vos-ip-address
- For public cloud–based VOS nodes on which password-based SSH is disabled, create a local Linux user. To do this, execute the following script from the shell of the upgrade orchestrator, providing the name of PEM file to get SSH access to the node:
$ /opt/versa/os-upgrade/versa/util/osu-user.sh -i vos-ip-address -p /path-of-pem-file
- Ensure that the date and time on the VOS device are as accurate as possible so that the upgrade can finish successfully. You can do this by configuring NTP on all the VOS device. For more information, see Configure Time Settings.
Alternatively, you can set the local time manually by issuing the following commands in the VOS device’s shell. If you set the time manually, try to set it to be as close as possible to the actual time.
admin@versa-vos:~$ sudo timedatectl set-timezone timezone
admin@versa-vos:~$ sudo timedatectl set-ntp no
admin@versa-vos:~$ sudo timedatectl set-time "yyyy-mm-dd hh:mm:ss"
For example:
admin@versa-vos:~$ sudo timedatectl set-timezone Europe/Paris
admin@versa-vos:~$ sudo timedatectl set-ntp no
admin@versa-vos:~$ sudo timedatectl set-time "2023-01-20 13:15:02"
Perform the Upgrade
This section provides the procedures to perform the upgrade on the Versa Networks devices.
Connect the Upgrade Orchestrator to the Versa Headend
Note: If the Director node that you are connecting to the upgrade orchestrator has a standby Director node, ensure that the active and standby Director nodes are in sync with each other and that high availability (HA) is active. HA needs to be enabled so that the Orchestrator can discover both the active and standby Directors. However, during the actual upgrade of the Director, HA needs to be disabled. This is explained later in Upgrade The Director Nodes.
Note: Ensure that you have already upgraded the Director node to the Trusty (14.04) version of the new release you plan to upgrade to.
To connect the upgrade orchestrator to the Versa headend components:
- Select Director in the left menu bar.
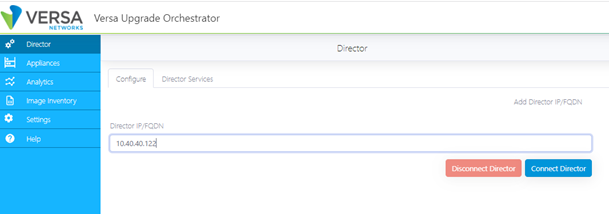
- In the Director IP/FQDN field, enter the northbound IP address of the active Director node.
- Click Connect Director.
- On the next screen, enter the username and password of any user who has REST API authorization to the Director node.
When the validation completes successfully, the list of appliances and Analytics nodes that are connected to the Director node is populated in the Appliances and Analytics tabs.
Upgrade the Analytics Nodes
- Select Analytics in the left menu bar. Verify that all the nodes of all the Analytics clusters are displayed.
- To change the image to which to upgrade the Analytics node, double-click the Target Release field and choose a different image.
- Select the node to upgrade, and then click Upgrade Selected to begin the upgrade.
When you are upgrading Analytics nodes, note the following:
- Upgrade one Analytics node at a time. It is recommended that you upgrade all the analytics-type nodes before you upgrade the search-type nodes.
- Upgrade one log forwarder node at a time.
- You cannot update Analytics Lite nodes in parallel.
- To upgrade log forwarder nodes, see Add Standalone Nodes, below.
Upgrade the Director Nodes
Note: Before you upgrade the Director nodes, disable HA redundancy between the Director nodes. After the upgrade completes on both nodes, you need to re-enable HA sync.
To upgrade the Director nodes:
- Select Director in the left menu bar. Verify that the information for the Director nodes is valid.
- In the Target Release field, select an image to upgrade to.
- Click Ping to ensure that the Director nodes are reachable.
- To begin the Director upgrade, click Upgrade Director for the standby Director node.

- To view the upgrade status and review the logs in real time, click Status.
- After you have upgraded the standby Director node, upgrade the active Director node.
Upgrade the VOS Nodes
Before you upgrade any VOS node, including Controller nodes, ensure that the Versa Director services are up and running, that the Director node is able to reach the VOS nodes, and that the southbound is not locked. Also ensure that the Director GUI shows that the VOS node is in-sync with the configuration.
To upgrade the VOS nodes:
- Click Appliances in the left menu bar.

- Select the appliances that you want to upgrade.
- To change the image to which to upgrade the VOS node, double-click the Target Release field and choose a different image.
- Click Upgrade Selected to begin the upgrade.
- To view the upgrade status and review the logs in real time, click Status.
Perform Post-Upgrade Tasks
This section provides the procedures you follow after you upgrade Director and Analytics nodes.
After You Upgrade Director Nodes
- If external authentication was enabled on the Director node, re-enable it:
- In the Director GUI, select the Administration tab in the top menu bar.
- Select Connectors > Authentication in the left menu bar to display the authentication connectors.
- Edit the Default Connector in the right corner of the screen and select a connector.
- Click OK.
- Enable HA on the Director nodes.
- Delete the Linux user that you created for performing the upgrade. To do this, execute one of the following scripts from the shell of the upgrade orchestrator:
For public cloud–based nodes, issue a command in the following format, specifying the –d option and providing the name of PEM file to use to obtain SSH access to the node:
$ /opt/versa/os-upgrade/versa/util/osu-user.sh -d -u ssh-user -i director-ip-address -p /path-of-pem-file
For on-premises nodes, issue a command in the following format, specifying the –d option:
$ /opt/versa/os-upgrade/versa/util/osu-user.sh -d -u ssh-user -i director-ip-address
- If you disabled secure mode before upgrading the OS, re-enable it:
cli> request system secure-mode enable
After You Upgrade Analytics Nodes
- If external authentication was enabled on the Versa Analytics, reconfigure it. For example:
analytics-cli% set system external-aaa  ...
analytics-cli% commit
- Delete the Linux user that you created for the purpose of the upgrade. To do this, execute one of the following scripts from the shell of the upgrade orchestrator.
For public cloud–based nodes, issue a command in the following format, specifying the –d option and providing the name of PEM file to use to obtain SSH access to the node:
$ /opt/versa/os-upgrade/versa/util/osu-user.sh -d -u ssh-user -i analytics-ip-address -p /path-of-pem-file
For on-premises nodes, issue a command in the following format, specifying the –d option:
$ /opt/versa/os-upgrade/versa/util/osu-user.sh -d -u ssh-user -i analytics-ip-address
- If you disabled secure mode before upgrading the OS, re-enable it:
cli> request system secure-mode enable
After You Upgrade VOS Devices
- If external authentication was enabled on the VOS device, reconfigure it. For example:
vos-cli% set system external-aaa  ...
vos-cli% commit
- If you disabled secure mode before upgrading the OS, re-enable it:
cli> request system secure-mode enable
- For standalone VOS devices, such as PE routers and standalone firewall instances, that are not managed by the Versa Director attached to the upgrade orchestrator, delete the Linux user that you created for the purpose of the upgrade. (Note that you do not need to delete the Linux user on VOS devices that are managed by a Director node.) To do this, execute one of the following scripts from the shell of the upgrade orchestrator.
For public cloud–based nodes, issue a command in the following format, specifying the –d option and providing the name of PEM file to use to obtain SSH access to the node:
$ /opt/versa/os-upgrade/versa/util/osu-user.sh -d -u ssh-user -i vos-ip-address -p /path-of-pem-file
For on-premises nodes, issue a command in the following format, specifying the –d option:
$ /opt/versa/os-upgrade/versa/util/osu-user.sh -d -u ssh-user -i vos-ip-address
Add Standalone Nodes
For standalone nodes that are not managed by the Versa Director node, such as provider edge (PE) routers, service gateways, service firewalls, and log forwarder Analytics nodes, add information about these devices to the upgrade orchestrator:
- On the upgrade orchestrator, select Miscellaneous in the left menu bar.
- Click the Add button.
- In the Add Appliance popup window, enter a name for the standalone node and enter the node's out-of-band management IP address, which is an address that is always reachable, even if Versa services are not running.

- Click Save.
- Repeat Steps 1 through 4 for each standalone node.
- Perform all the prerequisite steps listed in Before You Upgrade VOS Devices, above.
Known Issues
- AWS C4 instances are not supported. Before attempting the upgrade, upgrade to a C5 instance. For the procedure to change the instance type on AWS, see https://docs.aws.amazon.com/AWSEC2/latest/UserGuide/ec2-instance-resize.html.
- If the Versa software in installed on Microsoft Azure, disable all Extensions from the Azure portal:

Then uninstall those packages from the Versa nodes:
sudo dpkg --purge scx omsagent
- To upgrade to Releases 22.1 or later, first perform Steps 1 through 17, below, to upgrade to Release 21.2.x running Ubuntu 18.04 (Bionic) using a backup from Ubuntu 14.04 (Trusty) to the same Release 21.2.x release on the Director node. Then upgrade the Director node from Release 21.2.x Bionic to the Release 22.1 or later Bionic release.
- You cannot upgrade the Ubuntu OS on a Director node that was originally instantiated using a Release 20.2.2 or Release 21.1.1 ISO, OVA or QCOW2 image because of a disk-partitioning issue that occurred during the original installation of Release 20.2.2 or 21.1.1 on Director nodes. To check the original installation release, issue the lsblk command on Director shell and check for "system-root" as one of the LVMs. If this LVM is absent, the original installation was likely done using Release 20.2.2 or Release 21.1.1. In this situation, update the Director nodes from Ubuntu 14.04 (Trusty) to Ubuntu 18.04 (Bionic):
- Deploy two new Director nodes with Release 21.2.2 or later Bionic OVA or QCOW2 images in the same data center, network, or infrastructure where Trusty Director nodes are installed.
- Upgrade the Trusty Director nodes to Release 21.2.2 or later.
- Disable HA on the Trusty Director nodes.
- Make a backup of the active Trusty Director nodes, including the IP configuration, routes, and IP table rules, and save it in an external server.
- Make a backup of the standby Trusty Director nodes, including the IP configuration, routes, and IP table rules, and save it in an external server.
- Shut down the active Trusty Director node.
- Change the IP configuration of the active Bionic Director node to match that of the active Trusty Director node.
- Restore the routes and IP table rules on the active Bionic Director node to match those of the active Trusty Director node.
- Restore the backup from the active Trusty Director node to the active Bionic Director node.
- Start services on the active Bionic Director node.
- Verify that all branches are reachable from the active Bionic Director node.
- Perform Steps 6 through 11 for the standby Bionic Director node, restoring the IP configuration, routes, IP table rules, and Director backup from the standby Trusty Director node and verifying that all branches are reachable from the standby Bionic Director.
- If there is a CMS connector password on the active Bionic Director node, reset it.
- Enable HA between the two Bionic Director nodes.
- Verify the commit template operation on a few of the branches.
- Verify HA failover and then verify the commit template on few of the branches.
- Verify that you can onboard a new branch from the Bionic Director pair.
Frequently Asked Questions
This section provides answers to frequently asked questions (FAQs).
Could the Director node have been used to perform the upgrades instead of having a separate orchestrator node?
Yes, it was considered. However, the Director node itself needs to be upgraded, which cannot be done from within the Director node. Hence, the upgrade needed to be done from a another standalone server.
Can I use the upgrade orchestrator to upgrade VOS nodes attached to different Director nodes?
At any given time, you can use the orchestrator to upgrade the VOS nodes attached to a single Director node. The orchestrator uses the Director node to push the VOS configuration that creates and deletes the Linux user needed for the upgrade, and at the end of the upgrade, the orchestrator triggers a sync-from-appliance operation on the Director node. To upgrade VOS instances managed by another Director node, you must disconnect the orchestrator from the current Director node and connect it to the other Director node. You must ensure that the orchestrator has the routes required to reach the SD-WAN tunnel overlay IP addresses of the VOS instances.
What does the sync-from-director operation do?
The sync-from-director operation queries the Director node for current information about the state of the standby Director node, if any, information about the Analytics nodes, and information about VOS nodes. Then, the sync-from-director operation adds any new devices discovered from the Director node and updates the reachability and OS information of the VOS instances.
What does the upload-only option in the upgrade action do?
The upload-only option transfers the target Versa software to the device that is being upgraded. You can use this option to stage the required files in advance, for example, not during a maintenance window, to shorten the actual time required for perform the upgrade. You can also manually arrange to transfer the target .bin software file to the /var/tmp/ directory on the node before the upgrade.
Can I attach the orchestrator to the standby Director node to upgrade the VOS nodes?
No. Upgrading VOS nodes involves configuration changes that are passed from the Director node, and a standby Director node cannot perform configuration changes. All upgrades must be orchestrated through the active Director node.
Why do Analytics nodes need to be upgraded one at a time?
The Analytics cluster relies on the high availability (HA) of its components to maintain data consistency and to keep the Analytics cluster stable. Upgrading the OS one node at a time ensures that cluster remains stable and that the data is consistent at the end of the upgrade.
How many VOS instances can be upgraded concurrently?
There is no hard limit on the number of VOS instances that you can upgrade in parallel. However, you need to take into account the operational risk of multiple devices experiencing errors during the upgrade process and failing to upgrade. Manual intervention may be necessary to bring the VOS nodes back online.
How long does an upgrade take?
While the upgrade process is the same for all VOS nodes, the upgrade time can vary significantly depending on the type of device and the network throughput. For example, a high-end device with an SSD flash can complete the upgrade process in 30 minutes or less, while on a low-end device the upgrade may take 2.5 hours. A device's upgrade speed is determined by its CPU performance, disk I/O speed, the network bandwidth available for downloading files, and the speed at which packages can be decompressed and installed on the device. Even if you initiate multiple parallel upgrades on the orchestrator, the time required for each upgrade is defined by the transfer bandwidth and the time required to install the software on the individual remote device.
To ensure that an upgrade will be successful, it is strongly recommended that you first check for potential bottlenecks in the test environment, such as limited disk space or network access.
During the upgrade process, the CPE device requests the required packages from the orchestrator. The device performs two upgrades, one from Ubuntu 14.04 to Ubuntu 16.04 and then a second one from Ubuntu 16.04 to Ubuntu 18.04, followed by two reboots. The orchestrator must fetch the Linux packages from the internet, and it has a built-in cache to fulfill subsequent requests.
Why must external authentication be disabled on remote VOS devices before the upgrade?
The upgrade orchestrator performs all tasks on remote nodes using SSH. External authentication is implemented on VOS devices with the help of Linux packages, which themselves are upgraded as part of OS upgrade, thereby causing SSH connectivity issues for the upgrade orchestrator.
Should I install the latest OS SPack on VOS devices before the upgrade?
Yes, we strongly recommend that you install the latest OS SPack on VOS devices before you perform the upgrade. Doing this ensures that the Linux packages can be upgraded successfully as part of OS upgrade. For more information, see Use OS Security Packages.
How do you change the default timezone setting on the upgrade orchestrator?
To change the default timezone setting, first display the current timezone information and then list all available timezones:
versa@vs-OSU-orch:~$ timedatectl
versa@vs-OSU-orch:~$ timedatectl list-timezones
Identify the proper timezone, and then set the timezone on the orchestrator:
versa@vs-OSU-orch:~$ sudo timedatectl set-timezone timezone
For example:
versa@vs-OSU-orch:~$ sudo timedatectl set-timezone Europe/Paris
How do you set or change the time manually?
To set or change the date and time manually, issue the following commands:
versa@vs-OSU-orch:~$ sudo timedatectl set-ntp no
versa@vs-OSU-orch:~$ sudo timedatectl set-time yyyy-mm-dd hh:mm:ss
For example:
versa@vs-OSU-orch:~$ sudo timedatectl set-ntp no
versa@vs-OSU-orch:~$ sudo timedatectl set-time "2022-08-22 14:12:10"
Do I need to set the clock on the remote devices that I am upgrading?
The clock value on the remote device you you are upgrading should be value as close as possible to the actual date and time. Downloading a package during the upgrade process may fail if the system clock is earlier than the actual date and time. The timezone on the remote device does not matter.
Can I roll back (downgrade) Ubuntu versions when upgrading the OS?
No, rollback (downgrading) is not supported. The OS upgrade is an involved procedure, in which the underlying operating system is upgraded from Ubuntu Trusty (14.04) to Ubuntu Bionic (18.04), with an intermediate upgrade to Ubuntu Xenial (16.04), along with a Versa software upgrade. A rollback from the current Ubuntu version is not supported because of numerous dependency issues. If the process of upgrading the OS to Ubuntu Bionic (18.04) is disrupted, you must rectify any errors and then attempt the OS upgrade procedure again.
How can I re-trigger an upgrade for a device that has been RMA'ed and the new device is running Trusty version of Ubuntu?
We have introduced a new option called "Remove selected appliance". This option allows you to remove the device's entry from the orchestrator database. After that, you can use the "Sync From Director" option, which will pull in the updated OS type and allow you to upgrade the OS again.

Supported Software Information
Releases 21.2.2 and later support all content described in this article, except:
- Releases 22.1.1 and later support only Ubuntu 18.04 (Bionic).
Additional Information
Ubuntu upgrade article in the Versa Networks Knowledge Base
Upgrade Software on Headend and Branch
Use OS Security Packages
Use Security Packages