Install on Azure
![]() For supported software information, click here.
For supported software information, click here.
This article describes how to install, or instantiate, a Versa branch device on Microsoft Azure. To perform the installation, you upload the Versa Operating SystemTM (VOSTM) software image to the Azure portal and create an Azure Active Directory (AD) application for the software. Then, Versa Director does the following:
- Orchestrates the VOS software deployment.
- Applies and instantiates post staging configuration to the device to set it to be an SD-WAN gateway.
- Instantiates the device to set it to be a vCPE.
A Versa vCPE is a standalone virtual customer premises equipment device that performs Layer 3 through Layer 7 network functions.
An SD-WAN gateway is used as part of an SD-WAN branch to perform routing, firewall, and security functions as a part of an SD-WAN overlay network.
Releases 22.1.1 and later, which run on Ubuntu 18.04 (Bionic) platforms, support Azure accelerated networking. Releases 21.2 and earlier do not support Azure accelerated networking.
Upload Versa Image to Azure Portal
To install the VOS software on a branch device, you first upload the Versa software images to the Azure portal. To do this, follow the procedure in the Upload Versa Images to Azure Portal section in the Install Headend Components on Azure article.
Create an Azure AD Application
To allow the VOS software to access and modify Azure resources, you register the VOS software as an application in Azure AD, which is a cloud-based identity and access management service. In Azure AD, you define who can access the VOS software and which actions users are permitted to perform with the VOS software.
To create an Azure AD application for VOS software, first check that that you and your Azure subscription account have the proper permissions. Then create the Azure AD application.
Before you create an Azure AD application for the VOS software, ensure that you have the following:
- Permissions to register an application with Azure AD tenant
- Permissions to assign a role to an application in Azure subscription
Check Azure AD and Subscription Permissions
To create an Azure AD application, you must have an administrator role in Azure AD, and your Azure subscription account must have Microsoft.Authorization/*/Write access so that you can assign an AD application to a role.
To check your Azure AD and subscription permissions:
- Log in to the Azure portal.
- Select Azure Active Directory.
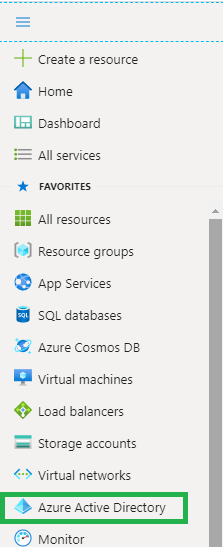
- In the Azure Active Directory Preview window, select User Settings.

- Check the setting in the App Registrations: Users Can Register Applications field.
If the field is set to Yes, any user in the Azure AD tenant can register an application. Continue with Step 11, to check your Azure subscription permissions.
If the field is set to No, only administrative users can register an application. Continue with Step 5, to assign permission to other users to register an application.

- In the left navigation bar, click Overview.
- In the Quick Tasks pane, click Find a User.

- In the search box, type the name of the person you want to assign registration permission to, and then click the name.

- In the left navigation bar, select Directory Role to view the Azure AD permissions for the user.

- Review the Azure AD permissions for the user. The user must have have either the global administrator or limited administrator role. If they do not, ask your administrator to assign the user to one of the administrator roles or to set the permissions such that the user can register applications.
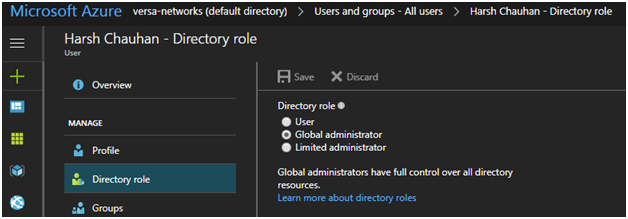
- In the left navigation bar, select Azure Resources to view the role assigned to the subscription account.

- Review the assigned role for the subscription account. The subscription account must have the role of either Owner or User Access Administrator. These roles grant Microsoft.Authorization/*/Write access, which is required to assign an AD application to a role. If the account does not have the appropriate permission, ask your subscription administrator to add you to the User Access Administrator role. For information about Azure roles, see the Built-in Roles for Azure Resources article on the Microsoft Azure website.
The following figure shows a user who is assigned Owner role:

Create an Azure AD Application
To create the Azure AD application for the VOS software:
- Log in to the Azure portal.
- Select the Azure Active Directory.
- In the left navigation bar, select App Registrations.

- Click New Registration.

- In the Register an Application pane, enter the following information:
- In the Name field, enter name of the application.
- In the Supported account types field, click Accounts in the organizational directory only (Default Directory Only–Single Tenant) option.
- In the Redirect URI field, select Web from the drop-down list.

- Click Register.
Get the Application ID, Tenant ID, and Client Secret
To sign in to the VOS application in the Azure AD, you need an application ID, a tenant ID, and a client secret. To get these:
- From App Registrations in Azure AD, select your application.

- Copy the application ID and directory ID, and save them for future use. Note that in Versa Director, the application ID is referred to as the client ID and the directory ID is referred to as the tenant ID.

- Select Certificates and Secrets, and then click New Client Secret to generate an authentication key.

- In the Add a Client Secret pane, enter the following information:
- In the Description field, enter a text description for the key.
- In the Expires field, select the duration of the key.

- Click Add to generate the client secret value for the application, which is shown in the Value field.
- Copy the client secret value and store it in a safe place. You cannot retrieve the key at a later time.

Assign a Role to the Azure AD Subscription
To access the resources in your Azure AD using the application you created, you must assign a role at your Azure subscription level for the application. For information about Azure roles, see the Built-in Roles for Azure Resources article on the Microsoft Azure website.
To assign a role to the Azure AD subscription:
- Log in to Azure portal.
- Select Subscriptions.

- To retrieve the Azure subscription ID, click subscription name in the Subscriptions pane.

- Select Overview in the left menu bar, and then copy the subscription ID.
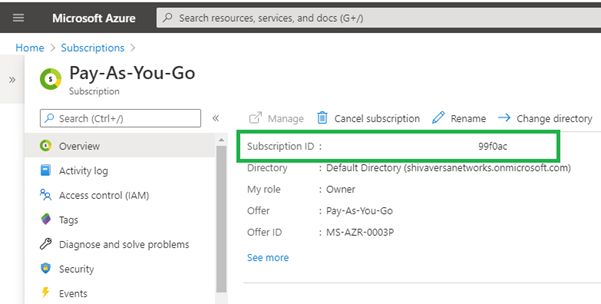
- Select Access Control (IAM), and then click the Add icon and select Add Role Assignment.

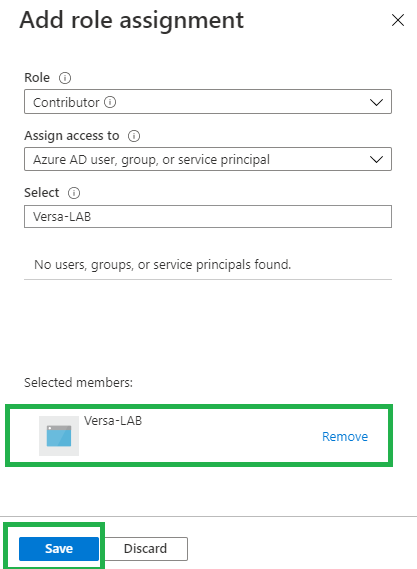
- In the Add Role Assignment pane, enter the following information:
- In the Role drop-down, select Contributor.
- In the Assign access to drop-down, select Azure AD User, Group, or Service Principal.
- In the Select field, search for the registered application and select the application.
- Click Save.

Connect a Versa Branch to Versa Director
The Versa Director orchestrates the installation of the VOS software image on the branch device and the configuration of the branch device. For this to happen, you must establish a cloud management system (CMS) connector between Versa Director and the VOS device in Azure.
Create Organizations
The CMS connector between the VOS device in Azure and Versa Director is associated with an organization. Ensure that you have created the necessary organizations. For more information, see the Configure Basic Features article.
Add a CMS Connector
- Log in to Versa Director.
- Select the Administration tab in the top menu bar.
- Select Connectors > CMS in the left menu bar. The CMS connectors table displays.
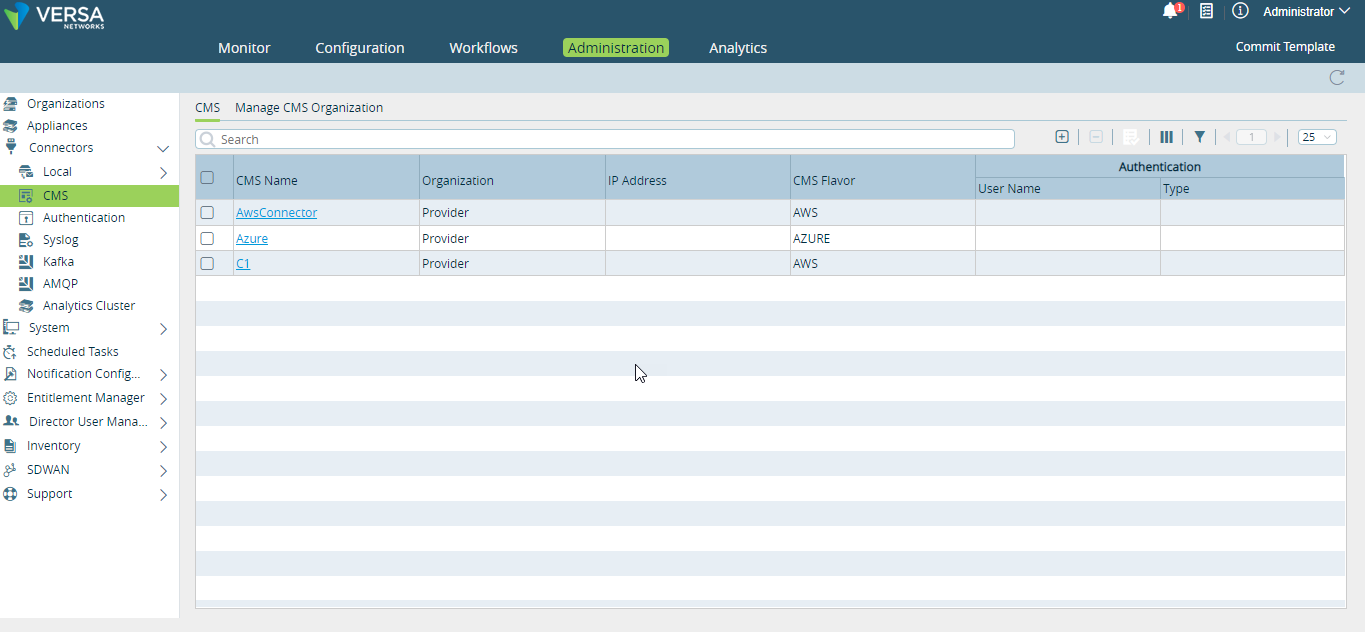
- Click the
 Add icon. In the Add CMS Connector window, enter information for the following fields.
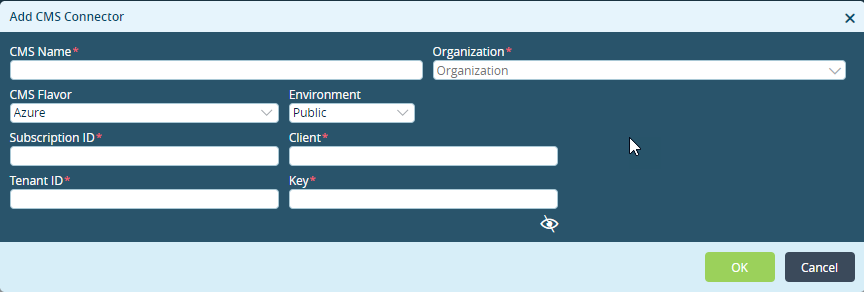
Field Description CMS Name Enter the name of the CMS connector. The name is a text string. Organization Select the organization CMS Flavor Select Azure. Environment Select the environment. For more information, see Create an Azure AD Application, above. Subscription ID Enter the Azure subscription ID. For more information, see Create an Azure AD Application, above. Client Enter the Azure application ID. For more information, see Create an Azure AD Application, above. Tenant ID Enter the Azure directory ID. For more information, see Create an Azure AD Application, above. Key Enter the Azure authentication key. For more information, see Create an Azure AD Application, above. - Click OK.
To test that the CMS connector is operating properly:
- Log in to Versa Director.
- In the top bar, click the Administration tab.
- In the left navigation bar, select Connectors > CMS.
- In the right pane, select the name of the CMS connector.
- Click the
 Validate Connector icon.

- For valid credentials, the message "Valid Credentials" displays at the bottom of the pane.

Associate a CMS Connector with an Organization
After you have added a CMS connector, you associate it with an organization that you have already configured on the Versa Director. You can do this in one of two ways.
Method 1:
- Log in to Versa Director.
- Select the Administration tab in the top menu bar.
- Select Organizations in the left menu bar. The main pane displays the organizations.

- Select the organization you want to associate with the connector. In the Edit Organization window, enter the following information:
- Select the CMS Connectors tab.
- In the Available pane, click the Azure connector.
- Click the > icon to add the connector to the Selected pane.
- Click OK.

Method 2:
- Log in to Versa Director.
- Select the Workflows tab in the top menu bar.
- Select Infrastructure > Organizations in the left menu bar. The Organizations table displays.
- Select the organization you want to associate with the connector. In the Create Organization window, enter the following information:
- Select the CMS Connectors tab.
- In the Available pane, click the Azure connector to add it to the Selected pane.
- Click Redeploy.

Make Azure VM Interface Addresses Persistent
The first time you onboard a VOS device in Azure, ensure that the MAC address is not changed on the VOS device.
To verify the MAC address of VOS device in Azure, click Virtual Machine > VM > Networking > Network Interface > Properties. For example:

To verify the MAC address of VOS device, issue the show interfaces brief CLI command. For example:
admin@VOS-cli> show interfaces brief

NAME          MAC                OPER   ADMIN  TENANT  VRF                              IP
--------------------------------------------------------------------------------------------------------------------
eth-0/0       52:54:00:39:fa:85  up     up     0       global                           10.192.111.240/16
                                                                                        fe80::5054:ff:fe39:fa85/64
eth-0/1                          down   up     0       global
ptvi1039      n/a                up     up     2       Director-QA-Control-VR           11.1.0.6/32
ptvi1042      n/a                up     up     3       Director-QA-Tenant-1-Control-VR  11.1.0.6/32
ptvi527       n/a                up     up     2       Director-QA-Control-VR           11.1.0.2/32
ptvi530       n/a                up     up     3       Director-QA-Tenant-1-Control-VR  11.1.0.2/32
tvi-0/30      n/a                up     up     -       -
tvi-0/30.0    n/a                up     up     2       Director-QA-Control-VR           11.1.0.253/32
tvi-0/31      n/a                up     up     -       -
tvi-0/31.0    n/a                up     up     2       Director-QA-Control-VR           11.1.0.252/32
tvi-0/36      n/a                up     up     -       -
tvi-0/36.0    n/a                up     up     3       Director-QA-Tenant-1-Control-VR  11.1.0.253/32
tvi-0/37      n/a                up     up     -       -
tvi-0/37.0    n/a                up     up     3       Director-QA-Tenant-1-Control-VR  11.1.0.252/32
tvi-0/5602    n/a                up     up     -       -
tvi-0/5602.0  n/a                pdown  up     3       Director-QA-Tenant-1-LAN-VR      169.254.19.138/31
tvi-0/5604    n/a                up     up     -       -
tvi-0/5604.0  n/a                pdown  up     3       Director-QA-Tenant-1-LAN-VR      169.254.19.140/31
vni-0/0       52:54:00:95:53:f6  up     up     -       -
vni-0/0.0     52:54:00:95:53:f6  up     up     2       WAN-Network-Transport-VR         75.75.75.222/24
vni-0/1       52:54:00:cb:10:cb  up     up     -       -
vni-0/1.100   52:54:00:cb:10:cb  up     up     3       Director-QA-Tenant-1-LAN-VR      85.85.85.101/24
vni-0/1.2     52:54:00:cb:10:cb  up     up     3       Director-QA-Tenant-1-LAN-VR      85.85.85.3/24
vni-0/1.1     52:54:00:cb:10:cb  up     up     3       Director-QA-Tenant-1-LAN-VR      85.85.85.2/24
vni-0/1.0     52:54:00:cb:10:cb  up     up     3       Director-QA-Tenant-1-LAN-VR      85.85.85.1/24
If the MAC address has not changed on the VOS device, issue the following commands to make the Azure VM interface addresses permanent:
sudo touch /etc/cloud/cloud-init.disabled
sudo chmod 644 /etc/cloud/cloud-init.disabled
If the MAC address has changed on the VOS device, do the following to make the Azure VM interface addresses permanent:
- Log in to the VOS device.
- Create the cloud-init.disabled file and set the required permissions.
sudo touch /etc/cloud/cloud-init.disabled
sudo chmod 644 /etc/cloud/cloud-init.disabled
- Delete the vinterfaces file.
sudo rm -rf /var/run/vinterfaces
- Check whether the /etc/udev/rules.d/70-persistent-net.rules file exists. In this file, verify that the mapping of MAC addresses to the eth interfaces has been updated. If there is a mismatch between the MAC address and eth interface naming, correct the mapping in the file.
- Shut down the VM from Azure portal.
- Restart the VM from Azure portal.
Supported Software Information
Releases 20.2 and later support all content described in this article, except:
- Release 21.1.1 adds the Organization field in the CMS Connector window.
- Release 22.1.1 adds support for Azure accelerated networking.
