Deploy a VOS Device in the Oracle Cloud
![]() For supported software information, click here.
For supported software information, click here.
This article describes how to deploy Versa Operating SystemTM (VOSTM) instances in the Oracle Cloud Infrastructure (OCI) that is part of an Oracle virtual cloud network (VCN). You can deploy a VOS instance in standalone mode or in a high availability (HA) mode.
When there is not a strong requirement for HA, you can deploy VOS instances in standalone mode to ensure secure connectivity of cloud workloads.
For HA, you deploy different VOS instances in different availability domains (ADs) and then connect them with the different workloads through a dynamic routing gateway (DRG). You use protocols such as IPsec and BGP to achieve a seamless failover. This configuration allows you to achieve a reliable and distributed connectivity.
Oracle VCNs can be deployed across multiple geographical regions, which makes redundancy scenarios easier to deploy and configure.
Note that the VOS software Releases 21.2 and earlier do not not support integration with advance networking functions such as DPDK. One result is that the expected throughput of a VOS instance in OCI might be less than expected. Releases 22.1 and later support DPDK.
To ensure the proper integration with OCI, Versa Networks can provide software images tailored for the OCI cloud environment.
Deploy a VOS Instance in Standalone Mode
When there is not a strong requirement for HA, you can deploy VOS instances in standalone mode to ensure secure connectivity of cloud workloads. A good practice is to always deploy the VOS instance in a compartment different from the compartment in which you deploy customer workloads. This design ensures that any cloud policy that you might apply to the workload's compartment is not accidentally applied to the VOS instance. For the same reason, it is recommended that VOS instances have a dedicated VCN for their connectivity. You can then establish different subnetworks to manage your public and private segments, which allows for granular control of your SD-WAN traffic. For connectivity between the VCN to which the VOS instance is connected and the VCN to which you connect the workloads, you can use a local VCN peering gateway (LGP), provided that the resources are in the same availability domain (AD). Alternatively, you can connect two different VCNs using a dynamic routing gateway (DRG). DRG connectivity can be established regardless of whether the VCNs are in the same availability domain. The following figure illustrates the high-level architecture for deploying a VOS instance in standalone mode.

To deploy a standalone VOS instance in OCI, you do the following:
- Create a compartment for the VOS instance.
- Import the VOS image.
- Create a VCN for the VOS instance.
- Deploy the VOS instance in OCI.
- Run the staging script on the VOS instance.
- Configure peering with an LGP.
Create a Compartment for the VOS Instance
You create a new compartment for the VOS instance using the Oracle GUI.
To create a compartment:
- Select Identity & Security> Identity > Compartment, and then click Compartment.

The compartments display.

- Create a new compartment. Enter a name and description for the compartment, and optionally enter tags to identify it.

- Click Create Compartment.
Import the VOS Image
You can import a custom VOS image to Oracle. For information about obtaining the custom VOS image, see Obtain a VOS Image for OCI, below.
To import the VOS image:
- In the Oracle GUI, go to Compute > Custom Images.

- Select the compartment that you created in the previous section.

- Click Import Image. In the Import Image screen, select the following options:
- Operating System—Linux
- Import from an Object Storage URL—Enter the URL provided by Versa Networks Customer Support when they provided the image.
- Image Type—qcow2
- Mode—Paravirtualized Mode

- Click Import Image.
Create a VCN for the VOS Instance
For the VOS instance, you create a VCN that contains the required subnets.
To create the VCN:
- In the Oracle GUI, go to the Networking > Virtual Cloud Networks.

The Virtual Cloud Networks screen for the VOS instance displays.

- Click Create VCN.
- In the Create a Virtual Cloud Network screen, enter a name, description, and CIDR block for the VCN. It is strongly recommend that you place the VOS instance in its own VCN and that you connect it to the workloads using only an LGP or a DRG.

- Click Create VCN. The VCN screen displays.

- Click Create Subnets to create subnets in the VCN. You create three subnets in the VCN: internet, LAN, and management.
- Create internet and management subnets in the VCN. You must deploy them as public subnets.
- Create the LAN subnets in the VCN. You must deploy them as private subnets. It is recommend the you deploy the subnets as regional subnets in case you ever need to transition to an HA scenario.


- Check that the three subnet images display.

- In the VCN screen, select Internet Gateways, and then click Create Internet Gateway.

- Create the subnet as a public subnet. It is recommend the you deploy the subnet as a regional subnet in case you ever need to transition to an HA scenario. Enter a name and description for the internet gateway.

- Select Security Lists to create security lists in the VCN. OCI uses security lists to restrict inbound and outbound access. With security lists, you can harden your VOS instances in the cloud. The OCI security uses stateful firewall logic to limit directionality, protocols, ports, the Session Information Protocol (SIP), and the Distance Information Protocol (DIP). Note that to establish the overlay IPsec tunnels, the VOS device needs bidirectional communication on UDP ports 500, 4500, and 4790. For more information, see VOS Device Firewall Requirements.

- In the Create Security List screen, configure the security lists.

Deploy the VOS Instance in OCI
- To create the virtual instance, in the Oracle GUI, go to Instances > Create an Instance.

- Choose the appropriate image for your deployment. Currently, VOS devices support only the VM.Standard2.4, VM.Standard2.8, and VM.Standard2.16 images. The VM.Standard2.4 and VM.Standard2.8 instances are suitable for most applications that do not require UTM. It is recommended that you use the VM.Standard2.16 image for advanced security use cases.
- Select the Availability Domain.

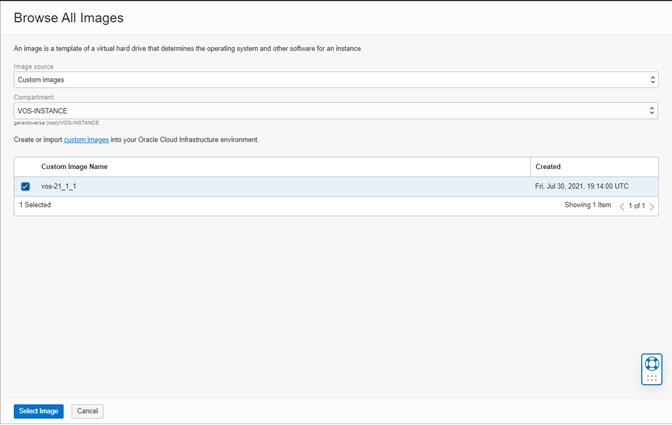
- Select the VOS image that was provided by Versa Networks Customer Support and that you imported in previous steps. You can select the image from the custom image pool.
- Select the management subnet as the primary subnet. It is recommended that you assign a public IP address for this network, to make the onboarding process easier. It is important to save the SSH key that is generated during this process; it is impossible to retrieve it later, and you need it later to SSH to the VM.
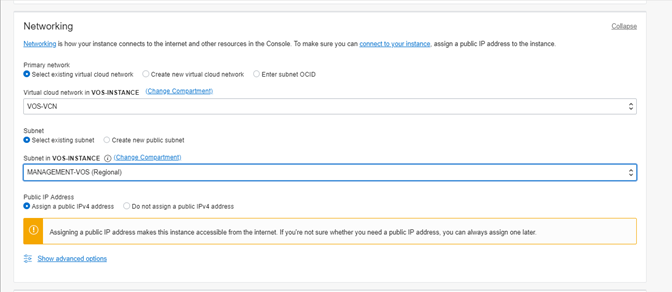
- Create the VNICs for the WAN and LAN networks. While it is not possible to create these networks when you are creating the instance, you can add the two networks on the Virtual Instance menu. You must restart the VN for the changes to take effect.


- On the LAN VNIC menu, disable the Source/Destination Check on the LAN network to enable communication with an LGP or DRG.

After the instance is deployed, a user can log in to the public IP address of the management interface using the SSH key used in Step 6 when creating the instance creation above:
ssh -i ssh-key-filename admin@management_interface_public_ip_address
Prepare the VOS Instance To Be Activated
You activate the VOS instance automatically and remotely using zero-touch provisioning (ZTP).
To prepare the VOS instance to be activated:
- Log in to VOS instance using the following command.
ssh -i id_rsa admin@external-IP-address
For example:
% ssh -i id_rsa admin@35.230.47.165

             .---.,
            (      ``.
       _     \        )    __      ________ _____   _____
      (  `.   \      /     \ \    / /  ____|  __ \ / ____|  /\
       \    `. )    /       \ \  / /| |__  | |__) | (___   /  \
        \     |    /         \ \/ / |  __| |  _  / \___ \ / /\ \
         \    |   /           \  /  | |____| | \ \ ____) / ____ \
          \   |  /             \/   |______|_|  \_\_____/_/    \_\
           \  | /
            \_|/                     ___ _    _____  ___   ___  _ ___
                                    | __| |  | __\ \/ | \ / / \| | __|
                                    | _|| |__| _| >  < \ V /| .` | _|
                                    |_| |____|___/_/\_\ \_/ |_|\_|_|


Versa FlexVNF software
Release     :   21.1.1 (GA)
Release date:   20200822
Package ID  :   6e4e455

Last login: Mon Sep 28 01:22:22 2020
[admin@vos-gcp-instance-1: ~] $
- At the end of the sshd_config file, add the IP addresses of the Versa Director northbound and southbound interfaces as match address exceptions. Doing so allows the Director node to log in to the node using a password and to perform the ZTP process by using the staging.py script. For example:
$ sudo vi /etc/ssh/sshd_config

Match address 10.192.220.193/32,192.168.220.193/32
  PasswordAuthentication yes
Match all
- Restart the SSH service:
$ sudo service ssh restart
Run the Staging Script
Run the staging script on the VOS instance to attach it to a Versa headend. For more information, see Activate VOS Devices.
Note: When you onboard the site, WAN and LAN IP addresses must be assigned statically from the assigned subnet pool. You can configure the WAN and LAN interfaces to use static IP addresses in the workflow template by selecting the Static option for the IPv4 and IPv6 fields in step 2, Interfaces. When you do this, a bind-data variable for the interface’s static address is automatically generated in the template. For more information, see Create Device Templates.
Configure LGP Peering
To complete the deployment of a VOS instance in OCI, configure a local VCN peering gateway (LGP).
Deploy a VOS Instance in HA Mode
To increase the resilience of the network and offer users better and more reliable access to their workloads in Oracle Cloud, you can deploy more than one VOS instance, with each instance in a different availability domain. You can also deploy two VOS instances in different availability domains to increase the footprint of the services in case of any regional failure. In these cases, you must connect VCNs across multiple availability domains and regions, and so you must peer the VOS VCN with the workload's VCN using a DRG. To enable peering options in the DRG, you use protocols such as IPsec and BGP. You can configure these two protocols both in the VOS instance and the DRG, to allow fast and reliable failover in case of any failure. The following figure shows the high-level architecture of an HA scenario.

To deploy a VOS instance in HA mode:
- Follow Steps 1 through 4 in the process for deploying a VOS instance in standalone mode, but here, create two VOS instances:
- Create a compartment for each VOS instance. See Create a Compartment for the VOS Instance, above.
- Import the VOS image. See Import the VOS Image, above.
- Create a VCN for each VOS instance. See Create a VCN for the VOS Instance, above.
- Deploy the VOS instances in OCI. In this step, place the second VOS instance in a different availability domain from the first one if this option is available in the Oracle region. See Deploy the VOS Instance in OCI, above.
- Follow Step 5 in the process for deploying a VOS instance in standalone mode, to run the staging script. See Run the Staging Script, above.
- Create a BGP-over-IPsec peering using DRG:
- Go to Oracle UI > Networking > VPN Connection > Start VPN Wizard.
- Select the required options in Oracle Workflow. For an on-premises network, ensure that the remote destination's aggregate address is reachable through the SD-WAN network. Also note that each VPN connection creates two IPsec tunnels.
- Repeat this process for the second VOS instance.
- Create a BGP-over-IPsec workflow on the Director node. Depending on the VOS software version, you can do this using Workflow templates or service templates. For more information, see Overview of Configuration Templates. In the workflow, set the tunnel mode to ikev1 (main), and enable PFS group 5.
Obtain a VOS Image for OCI
Currently, Versa Networks does not make OCI-specific VOS images publicly available. However, each Versa Networks customer or partner can obtain a certified VM image for Oracle by opening a support case with Versa Network Customer Support, through the support page at https://support.versa-networks.com. When you open a case, specify that you wan an OCI-specific image and provide the following information:
- VOS software version
- Name of the partner, MSP, or reseller who is asking for the OCI-specific image
- Name of the end customer
Supported Software Information
Releases 22.1.2 and later support all content described in this article.