Install on Google Cloud Platform without CMS
![]() For supported software information, click here.
For supported software information, click here.
This article describes how to install a Versa branch device on Google Cloud Platform.
To obtain the Versa Operating SystemTM (VOSTM) software image for Google Cloud Platform so that you can perform the installation, contact Versa Networks Customer Support.
Before you install a Versa branch device on Google Cloud Platform, ensure that you have done the following on the branch device:
- Create three subnets for the VOS instance. Note that you must place the three subnets in three different private clouds (VPCs).
- Management subnet
- WAN subnet, to communicate with the SD-WAN Controller node
- LAN subnet, to communicate with the LAN side
- Create firewall rules and associate them with the VPC and subnet. For more information, see Firewall Requirements.
Create a VM Instance
To create a VM instance on Google Cloud Platform:
- Log in to the Google Cloud Platform account.
- In the left navigation bar, select Compute Engine, and then select VM Instances.

- In the left navigation bar, select VM Instances, and then click the Create Instance icon. The Create an Instance page displays.

- In the left navigation bar, select New VM Instance and enter the following information:
- In the Name field, enter a name for the VM instance.
- In the Labels field, click Add Label to enter a label.
- In the Region field, select the region in which you are creating the VOS instance.
- In the Zone field, select the zone in which you are creating the VOS instance.
- In the Machine Configuration Group, select the machine family and series types for common workloads. For more information, see Qualified AWS, Azure, Google, and Oracle Cloud Instances.
- In the Machine type field, select the machine type as n1-standard-4.

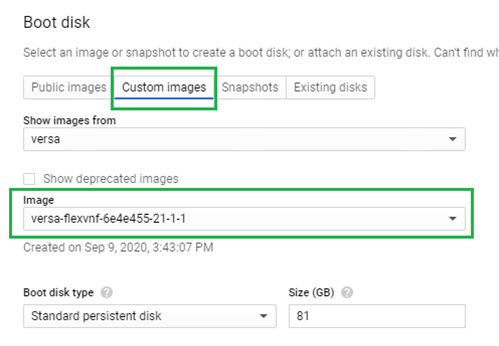
- In the Boot disk section, click Change to select the VOS images.

- Select the Custom Images tab, and then select the VOS image.
- Select Versa in the Show Images From field.
- Select the image in the Image field.
- Click the Management, Security, Disks, Networking, Sole Tenancy field to add network interfaces.

- Select the Networking tab to view the network interfaces.

- In the Networking tab, select the three VPCs and subnets to attach three NICs on the VOS instance.
- In the Network Interface table, enter the network details.
- In the Network field, select the VPC network that contains the subnet that you created.
- In the Subnetwork field, select the subnet for the instance to use.
- In the External IP field, select the external IP address.
• For the WAN subnet, select the external IP address if the Controller node is reachable using public IP address.
• For the LAN subnet, an external IP address is not required. - In the IP Forwarding field, select On to enable IP forwarding for the management subnet.

- Select the Security tab and add the SSH key, which is the public RSA key. The admin user uses this key to log in to the VOS instance.

- Click Create.
Prepare the VOS Instance To Be Activated
You activate the VOS instance automatically and remotely using zero-touch provisioning (ZTP).
To prepare the VOS instance to be activated:
- Log in to VOS instance using the following command.
ssh -i id_rsa admin@external-IP-address
For example:
% ssh -i id_rsa admin@35.230.47.165

             .---.,
            (      ``.
       _     \        )    __      ________ _____   _____
      (  `.   \      /     \ \    / /  ____|  __ \ / ____|  /\
       \    `. )    /       \ \  / /| |__  | |__) | (___   /  \
        \     |    /         \ \/ / |  __| |  _  / \___ \ / /\ \
         \    |   /           \  /  | |____| | \ \ ____) / ____ \
          \   |  /             \/   |______|_|  \_\_____/_/    \_\
           \  | /
            \_|/                     ___ _    _____  ___   ___  _ ___
                                    | __| |  | __\ \/ | \ / / \| | __|
                                    | _|| |__| _| >  < \ V /| .` | _|
                                    |_| |____|___/_/\_\ \_/ |_|\_|_|


Versa FlexVNF software
Release     :   21.1.1 (GA)
Release date:   20200822
Package ID  :   6e4e455

Last login: Mon Sep 28 01:22:22 2020
[admin@vos-gcp-instance-1: ~] $
- At the end of the sshd_config file, add the IP addresses of the Versa Director northbound and southbound interfaces as match address exceptions. Doing so allows the Director node to log in to the node using a password and to perform the ZTP process by using the staging.py script. For example:
$ sudo vi /etc/ssh/sshd_config

Match address 10.192.220.193/32,192.168.220.193/32
  PasswordAuthentication yes
Match all
- Restart the SSH service:
$ sudo service ssh restart
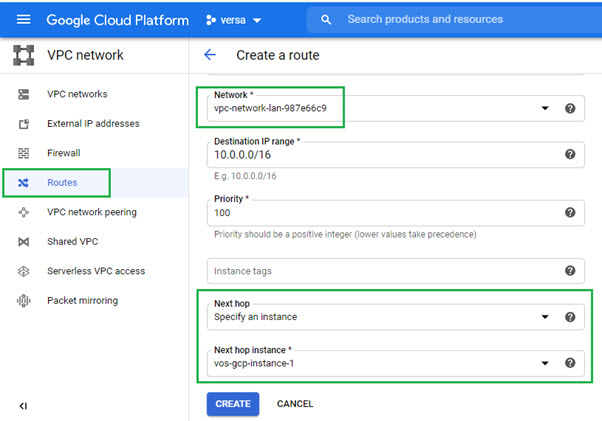
- In Google Cloud Platform, add a custom route to pass the traffic from VOS interface instead of Google backbone network after ZTP has completed.
Supported Software Information
Releases 20.2 and later support all content described in this article.
Additional Information
Firewall Requirements
Qualified AWS, Azure, Google, and Oracle Cloud Instances