Integrate Director and Azure Virtual WAN
![]() For supported software information, click here.
For supported software information, click here.
This article describes how to create secure IPsec tunnels between Versa Operating SystemTM (VOSTM) CPE devices and a Microsoft Azure Virtual WAN to allow VOS users to securely access applications and workloads that are hosted in the Azure Virtual WAN. The secure IPsec tunnels that you create optimize the connectivity between the VOS device and the Azure Virtual WAN.
You can create the IPsec tunnels either by using a Template workflow or a Device workflow.
Before You Begin
Before you configure an Azure Virtual WAN site-to-site tunnel, take the following into consideration:
- The VOS CPE device must be a physical device, the device must have a public IP assigned on a WAN interface, and the WAN interface must not use NAT.
- Ensure that a static pubic IP address is assigned to the WAN interface or network used for the Azure Virtual WAN cloud tunnel connection.
- If you are configuring the site-to-site tunnel using a Workflow, the Azure Virtual WAN cloud tunnel configuration cannot include a NAT configuration.
- Using a Workflow, you can configure site-to-site tunnel with automated provisioning only for the tunnels originating from an on-premises physical CPE and destined to the Azure Virtual WAN hub.
Create a Site-to-Site Tunnel using the Template Workflow
- In Director view:
- Select the Workflows tab in the top menu bar.
- Select Template > Templates in the left menu bar.
- Click the
 Add icon to create a template. The Create Template popup window displays.
- Enter the required information on the Basic, Interfaces, and Routing tabs. For more information, see Initial Configure Basic Features.
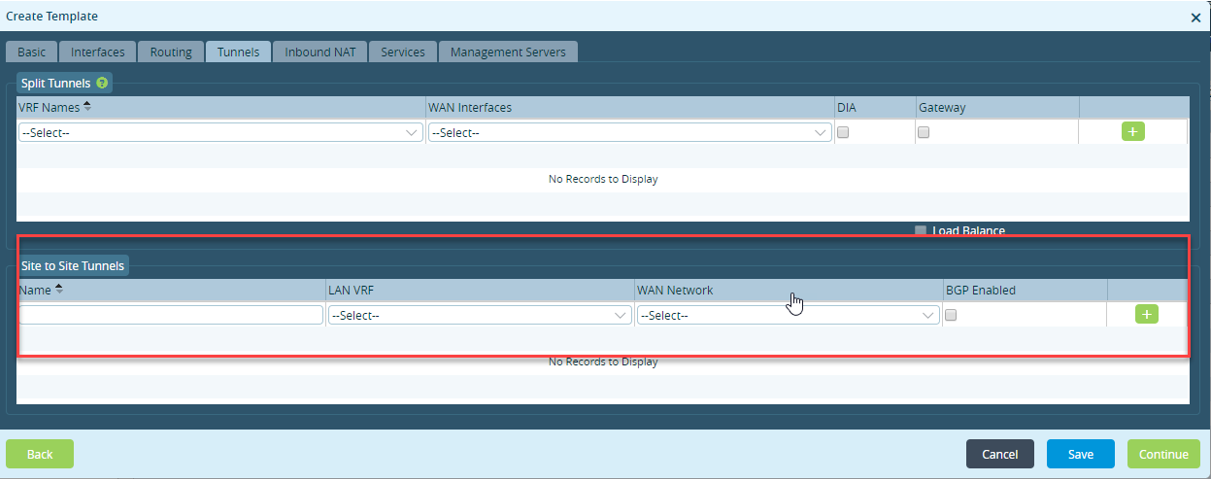
- Select the Tunnels tab, and enter information for the following fields to configure a site-to-site tunnel.

Field Description Name Enter a name for the site-to-site tunnel. Internally, two IPsec profiles are created. LAN VRF Select the routing instance on the LAN side for the tenant. WAN Network Select the WAN transport network over which to connect the Azure Virtual WAN. BGP Enabled Click to enable BGP on the tunnel.
- Click the
 Add icon at the end of the row to add the site-to-site tunnel.
 - If desired, repeat Steps 2 and 3 to create additional site-to-site tunnels from the VOS CPE device to the Azure Virtual WAN.
- Click Continue.
Configure a Site-to-Site Tunnel using the Device Workflow
- In Director view:
- Select the Workflows tab in the top menu bar.
- Select Devices > Devices in the left menu bar.
- Click the
 Add icon in the main panel to create a device. The Add Device popup window displays.
- Select the Tunnel Information tab, and enter information for the following fields to configure a site-to-site tunnel. Note that the
Tunnel Information tab is visible only when you configure the site-to-site tunnels using template workflow.

Field Description Name Select a name of the VPN profile on CPE picked from corresponding post-staging template. Peer Type Select Azure Virtual WAN. Connector Select the Azure connector to use to log in to the Azure Virtual WAN. Region Select the Azure region. Virtual WAN ID Select the ID of the Azure Virtual WAN. Resource Group Select the resource group to which to create the site. LAN Address Space Select the LAN address space on the Versa CPE device. BGP Enabled Click to enable BGP on the tunnel. BGP AS Number Enter the BGP AS number. - Click Continue.
Supported Software Information
Releases 20.2 and later support all content described in this article.
Additional Information
Install on Azure (for Branches)
Install on Azure (for Headend)
