Troubleshoot Titan Portal
![]() For supported software information, click here.
For supported software information, click here.
You can use the troubleshooting dashboard in the Titan portal to troubleshoot the following issues:
- Cannot connect to the internet
- Cannot connect to WiFi
- Slow internet connection
- Cannot access certain websites
Use Troubleshooting Tools
To use troubleshooting tools on the Titan portal:
- Click Troubleshoot in the left menu bar to open the troubleshooting dashboard.
- In the honeycomb, hover over the site that you would like to troubleshoot. The option card for the device displays.

- Click Troubleshoot in the Actions field of the options card. The Troubleshoot screen displays.
- Select the issue that you would like to troubleshoot:
- Cannot connect to the Internet
- Cannot connect to Wi-Fi
- Slow Internet connection
- Cannot access some websites

Cannot Connect to the Internet
If you cannot connect to the Internet:
- Click the Troubleshoot icon in the left menu bar to open the troubleshooting dashboard.
- Hover over the site in the honeycomb that you would like to troubleshoot to open the option card for the device.
- Click Troubleshoot in the Actions column of the device-options card to open the Troubleshoot screen.
- Click Cannot connect to the Internet to open the Troubleshoot screen to begin checking the connection:
- Make sure the device is powered up and that the Ethernet cable is connected to WAN1 or WAN2.
- Make sure the SIM card is inserted if you are using LTE for internet connectivity.

- Click Check Connection to check network connectivity to the router.
If the router is reachable, the system shows that connectivity is successful. If the device is reachable, you have the option to click Go to Configure or Back to Troubleshoot.

If the device is not reachable, you have the option to click Try Again or Manually Reset Device. Note that you can click Try Again several times to attempt to reach the device. If attempts are not successful, physically reset the device.

Physically Reset a Device
When you physically reset device, you switch the router power to off for approximately 30 seconds, and then turn router power on. Note that by resetting the device, all connected devices are temporarily disconnected.
Click Manually Reset Device to access the Manual Reset screen and follow directions on the screen to physically reset the router.

Cannot Connect to WiFi
If you cannot connect to the WiFi network:
- Click the Troubleshoot icon in the left menu bar to open the troubleshooting dashboard.
- Hover over the site in the honeycomb that you would like to troubleshoot to open the option card for the device.
- Click Troubleshoot in the Actions column of the device-options card to open the Troubleshoot screen.
- Select Cannot connect to Wi-Fi to open the Troubleshoot screen to check WiFi connection.

- Click Check Wi-Fi Settings to verify the WiFi status on the Wireless Networks troubleshooting screen:
- Corporate Wi-Fi—Click the toggle to enable Corporate WiFi, or click to open the Edit Wireless Networks window to update settings.
- Guest Wi-Fi—Click the toggle to enable Guest WiFi, or click to open the Edit Wireless Networks window to update settings.

- Click Publish to update the changes on the router.
You can also choose to reset the device.
Restore Default Device Settings
If you cannot connect to WiFi from the Wireless Networks screen, you can reset the device to default settings. When you reset a device, all clients connected to the WiFi and intranet lose connectivity while the router reboots. It can take up to 3 minutes for the connection to resume. When reboot is complete, wait another 3 to 5 minutes for the router to become active.
To reset the device:
- Click the Troubleshoot icon in the left menu bar to open the troubleshooting dashboard.
- Hover over the site in the honeycomb that you would like to troubleshoot to open the option card for the device.
- Click Troubleshoot in the Actions column of the device-options card to open the Troubleshoot screen.
- Select Cannot connect to Wi-Fi to open the Troubleshoot screen to reset the device.

- Click Reset to open the Reset screen.

- Click Continue to initiate device reset. Wait for the device to reboot and reconnect to WiFi.
Slow Internet Connection
You can view internet and internet backup (LTE) settings and run a test to check SD-WAN connectivity speed on reachable online devices from the Speed Test screen. If PPPoE is available for WAN interfaces, you can run a speed test for those devices from this screen.
Run speed tests approximately one minute apart. The system issues an alert if speed tests are performed too closely together or if a speed test has been issued from another device simultaneously. The system allows you to run a maximum of 20 speed tests in a single 24-hour period.
To initiate an internet connectivity speed test on the Titan portal:
- Click the Troubleshoot icon in the left menu bar to open the troubleshooting dashboard.
- Hover over the site in the honeycomb that you would like to troubleshoot to open the option card for the device.
- Click Troubleshoot in the Actions column of the device-options card to open the Troubleshoot screen.
- Select Slow Internet connection to open the Troubleshoot screen to check slow Internet connection.
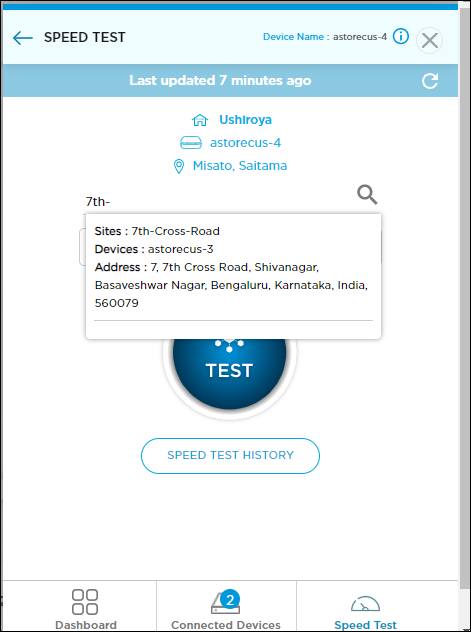
- Click Run Speed Test to open the Speed Test screen to check the SD-WAN speed.

- Select a device. Use the Search feature and enter the device, site name, or zip code to find a device.
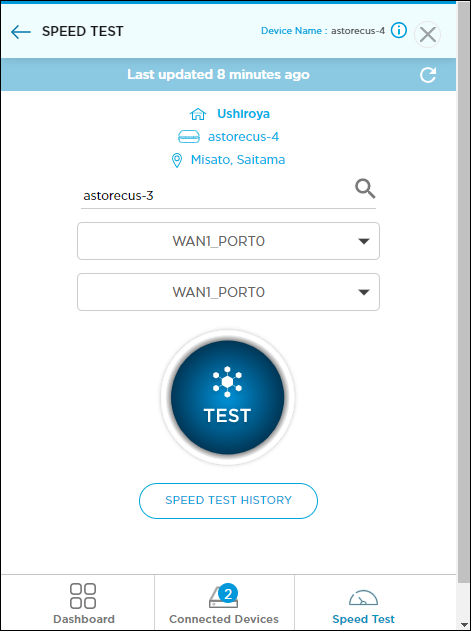
- Select a source WAN interface from the Please Select Source Interface drop-down menu, and then click Continue.

- Select a destination WAN interface from the Please Select Destination Interface drop-down menu, and then click Continue.

- Click Test.
The following is an example of WAN speed test results when checking devices for slow internet connection.

- Click Speed Test History to view the complete speed test history for the device. Click Clear History to clear speed test history.

View Internet Backup Signal Strength
If LTE backup is available, the signal strength is displayed on the Speed Test screen. A signal strength above >65 is considered strong, and a signal below this value is considered weak.
Note that you cannot run a speed test on LTE backup.
To check LTE Internet backup signal strength on the Titan portal:
- Click the Troubleshoot icon in the left menu bar to open the troubleshooting dashboard.
- Hover over the site in the honeycomb that you would like to troubleshoot to open the option card for the device.
- Click Troubleshoot in the Actions column of the device-options card to open the Troubleshoot screen.
- Select Slow Internet connection to open the Troubleshoot screen to check slow Internet connection.
Tap Reload to refresh any device connected with LTE internet backup to troubleshoot connectivity. Wait one minute, then tap Start Speed Test again to check for updated status.
Slow Internet Connection
If you are experiencing slow internet connection, you can check that the network is up and that LTE Internet backup is not slowing the connection.
To check the connection:
- Click the Troubleshoot icon in the left menu bar to open the troubleshooting dashboard.
- Hover over the site in the honeycomb that you would like to troubleshoot to open the option card for the device.
- Click Troubleshoot in the Actions column of the device-options card to open the Troubleshoot screen.
- Select Slow Internet connection to open the Troubleshoot screen to check slow Internet connection.

- Click Network to check settings on the Network screen.

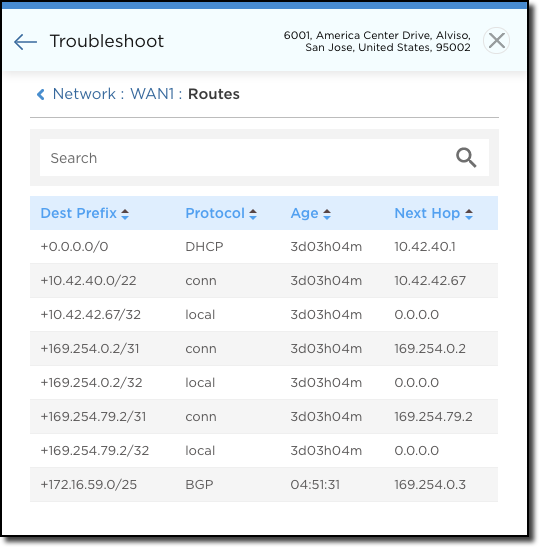
- Click Routes to check the status of the router routing table. Use the Search feature to find a route.
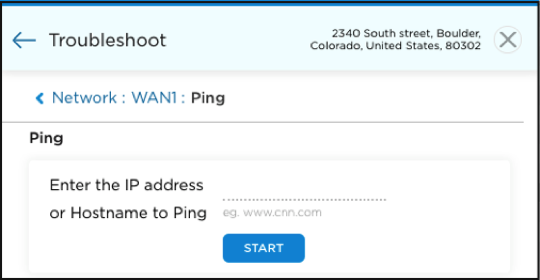
- Click Ping to check that the router is available and connected.
- Enter a valid host name and IP address in the fields provided.
- Click Start.
- Click Traceroute to measure packet transit delays across the network.
- Enter a valid host name and IP address in the field provided.
- Click Start.

Cannot Access Certain Websites
If you cannot access certain websites:
- Click the Troubleshoot icon in the left menu bar to open the troubleshooting dashboard.
- Hover over the site that you would like to troubleshoot to open the option card for the device.
- Click Troubleshoot in the Actions column of the device-options card to open the Troubleshoot screen.
- Select Cannot access some websites to open the Troubleshoot screen to check website accessibility.
- Select an option:
- Check Denied (Blacklisted) Sites
- Add Sites to Allowed (Whitelisted)
- URL Reputation
- URL Category
- Look Up URL Settings

Check Denied Sites
- Click Check Denied (Blacklisted) Sites to add websites that you wank to block on the network. To block multiple websites, separate each URL with a comma.
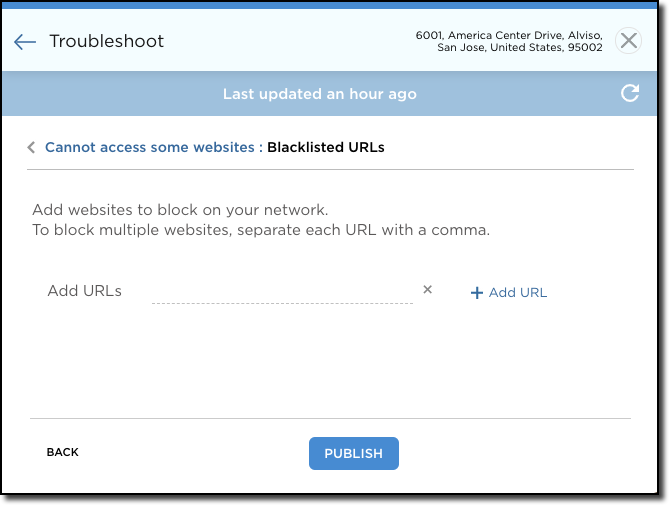
- Click Publish to save the settings to the router.
Add Sites to the Allow
- Click Add Sites to Allow (Whitelist) to add websites to always allow on the network, even if they are blocked by other settings. To add multiple websites, separate each URL with a comma.

- Click Publish to save the settings to the router.
Configure URL Reputation
- Click URL Reputation to open the Reputation Level screen.
- Select the device URL reputation-level settings. Click the down arrow in the left column to display a description of each category:
- High Risk
- Suspicious
- Moderate Risk
- Low Risk
- Trustworthy

- Click one of the icons in the right column for each category to select a reputation level for the category:
- Blocked (red)
- Ask (amber)
- Allowed (blue)
- Click Look Up URL to enter a URL and to look up the mappings to predefined and custom URL reputations and categories.
- Click Back to return to the Reputation Level screen.
- Click Publish to save the settings to the router.
Configure URL Category
- Click URL Category to open the URL category screen.
- Click one of the boxes next to each name to adjust the URL-filtering category. Click Information for a description of each category:
- Blocked
- Alert & Confirm

- Click + Custom URL Category to create a new custom URL category object. For more information, see Add Custom URL Categories.
- Click Look Up URL to enter a URL and to look up the mappings to predefined and custom URL reputations and categories.
- Click Back to return to the URL category filtering screen.
- Click Publish to save the settings to the router.
Configure Look Up URL Settings
- Click Look Up URL Settings to open the look up URL settings screen.

- In the Look Up URL search bar, enter a URL to look up the mappings to predefined or custom URL reputation and category. For example, enter www.google.com. The Look Up URL Result section displays information about the URL, including its category and reputation.
- Click Clear to clear the look up URL result.
- Click Back to return to the Cannot Access Some Websites screen.
Contact Support
Click the Help icon from any screen to contact Versa Networks Customer Support for assistance.
Software Release Information
Releases 11.3 and later support all content described in this article.