Configure IPsec Backhaul
![]() For supported software information, click here.
For supported software information, click here.
You use IPsec backhaul to create an IPsec tunnel from the SASE gateway to a non-Versa device. Titan Portal then adds the name of the tunnel to the drop-down menus for WAN static IP routes, steering rules, and firewall rules for route-based IPsec profiles.
For policy-based and rule-based VPNs, there are no zone or menu options available in static, steering, and security rules. Tunnels use preshared key (PSK) authentication and are built using IKEv1, IKEv2, or both. If you configure the tunnel using IKEv1, ensure that the shared key values for the local authentication and peer authentication are the same.
When you configure IPsec route-based profiles, Titan Portal creates a security rule that allows IPsec traffic by default. The rule appears in the security rule list. For an IPsec profile, the security rule is created with the same name as the IPsec route-based profile name. You cannot edit or delete a system-generated default rule for port forwarding or an IPsec profile. However, you can disable or reorder a default rule to change its priority.
To enable routing over an IPsec tunnel, you must also add a static IP route. For more information, see Configure Routing.
To create an IPsec backhaul:
- Click Configure in the left menu bar to open the Configure dashboard.
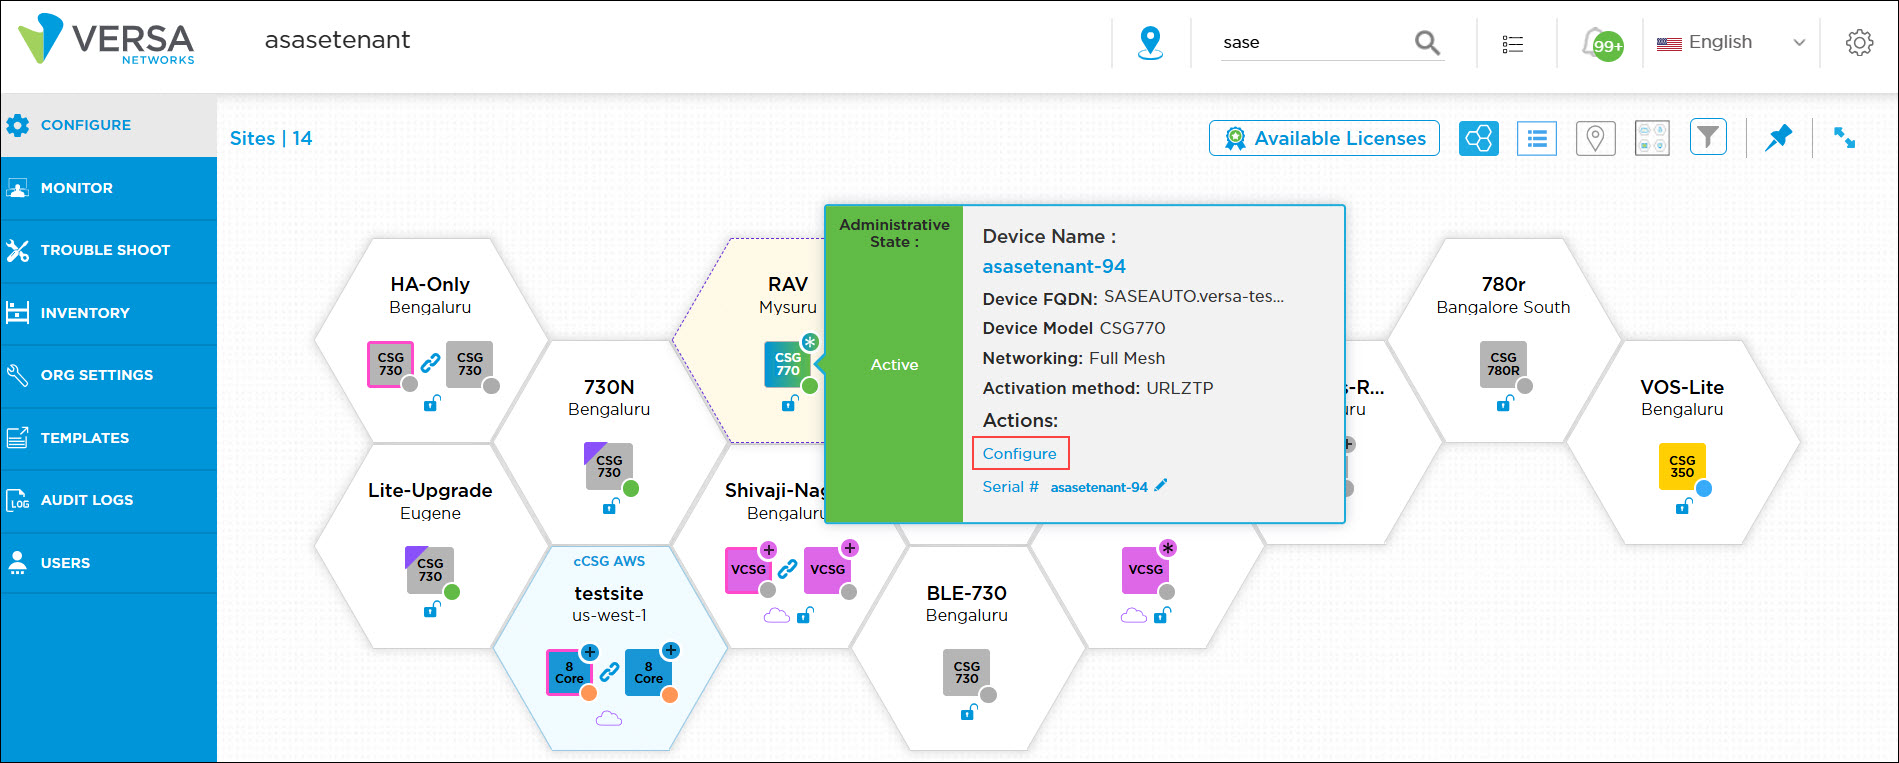
- Hover over the device in the honeycomb, and then click Configure to open the site information window.

- Select the IPsec Backhaul tab, and then enter information for the following fields.

Field Description Name (Required) Enter a name for the IPsec tunnel. Titan Portal adds the tunnel name to the IPsec drop-down list in the Static IP Route screen. Redistribute Click to make the IPsec tunnel eligible for redistribution into the VPN network when the tunnel is used as the next hop for a static route. VRF (Required) Select the source virtual routing forwarding (VRF) routing instance. Peer Type (Required) Select the format for the peer type value:
- Fully qualified domain name (FQDN)
- Hostname
- IP address
Peer Type Value (Required) Enter the peer value using the format selected in the Peer Type field. Tunnel Initiate (Required) Select how to initiate creation of the child security association:
- Automatic—Initiate automatically.
- Responder Only—Initiate for responder.
Default: Automatic
Local Authentication (Group of Fields) Enter local authentication information. - Authentication Type
Displays the authentication type (PSK). - Identity Type
Enter the format for the identity type value:
- FQDN
- IP address
- Identity Type Value
Enter a value in the format you selected in the Identity Type field. - Shared Key
Enter the preshared key. Peer Authentication (Group of Fields) Enter peer authentication information. - Authentication Type
Displays the authentication type (PSK). - Identity Type
Enter the format for the identity type value:
- FQDN
- IP address
- Identity Type Value
Enter a value in the format you selected in the Identity Type field. - Shared Key
Enter the preshared key. IKE Version (Group of Fields) Select the IKE version:
- IKEv1
- IKEv2
- IKEv1 or IKEv2
- Hash Algorithm
Select the hash algorithms to use:
- MD5—MD5 Message Digest Algorithm
- SHA-1—Secure Hash Algorithm 1 with 160-bit digest
- SHA-256—Secure Hash Algorithm 2 with 256-bit digest
- SHA-384—Secure Hash Algorithm 2 with 384-bit digest
- SHA-512—Secure Hash Algorithm 2 with 512-bit digest
- Encryption
Select the encryption algorithms to use:
- 3DES—Triple DES encryption algorithm
- AES 128—Advanced Encryption Standard (AES) Cipher Block Chaining (CBC) encryption algorithm with 128-bit key
- AES 256—AES CBC encryption algorithm with 256-bit key
- DH Group
Select the Diffie-Hellman group to use:
- Diffie-Hellman Group none
- Diffie-Hellman Group 1—768-bit modulus
- Diffie-Hellman Group 2—1024-bit modulus
- Diffie-Hellman Group 5—1536-bit modulus
- Diffie-Hellman Group 14—2048-bit modulus
- Diffie-Hellman Group 15—3072-bit modulus
- Diffie-Hellman Group 16—4096-bit modulus
- Diffie-Hellman Group 19—256-bit elliptic curve
- Diffie-Hellman Group 20—384-bit elliptic curve
- Diffie-Hellman Group 21—521-bit elliptic curve
- Diffie-Hellman Group 25—192-bit elliptic curve
- Diffie-Hellman Group 26—224-bit elliptic curve
- IKE Rekey Time
Enter the time interval for how often to regenerate the IKE key.
Range: 3600 through 28800 seconds
Default: 3600 secondsIPsec Transforms (Group of Fields) Select the IPsec transform and Diffie-Hellman group. - Hash Algorithm
Select the hash algorithms to use:
- MD5—MD5 Message Digest Algorithm
- SHA-1—Secure Hash Algorithm 1 with 160-bit digest
- SHA-256—Secure Hash Algorithm 2 with 256-bit digest
- SHA-384—Secure Hash Algorithm 2 with 384-bit digest
- SHA-512—Secure Hash Algorithm 2 with 512-bit digest
- XCBC—Extended Cipher Block Chaining
- Encryption
Select the encryption algorithm to use:
- 3DES—Triple DES encryption algorithm
- AES128—AES CBC encryption algorithm with 128-bit key
- AES128-CTR—AES counter mode encryption algorithm with 128-bit key
- AES128-GCM—AES Galois/Counter mode (GCM) encryption algorithm with 128-bit key
- AES256—AES CBC encryption algorithm with 256-bit key
- AES256-GCM—AES GCM encryption algorithm with 128-bit key
- NULL
- Perfect Forward Secrecy Group
Select the Diffie-Hellman groups to use for PFS:
- Diffie-Hellman Group none
- Diffie-Hellman Group 1—768-bit modulus
- Diffie-Hellman Group 2—1024-bit modulus.
- Diffie-Hellman Group 5—1536-bit modulus
- Diffie-Hellman Group 14—2048-bit modulus
- Diffie-Hellman Group 15—3072-bit modulus
- Diffie-Hellman Group 16—4096-bit modulus
- Diffie-Hellman Group 19—256-bit elliptic curve
- Diffie-Hellman Group 20—384-bit elliptic curve
- Diffie-Hellman Group 21—521-bit elliptic curve
- Diffie-Hellman Group 25—192-bit elliptic curve
- Diffie-Hellman Group 26—224-bit elliptic curve
- IPsec Rekey Time
Enter the time interval for how often to regenerate the IPsec key.
Range: 3600 through 28800 seconds
Default: 3600 secondsTunnel Network (Route-Based Only) (Group of Fields) Configure a route-based tunnel. - Tunnel IP Local Address
Enter the IP address of the local tunnel interface in CIDR format. If you do not specify an address, the IP address is automatically generated. - Tunnel IP Remote Address
Enter the IP address of the remote tunnel interface. If you do not specify an address, the IP address is automatically generated. Policy-Based VPN Click the Policy-Based VPN toggle to turn on VPN policies configuration options. Then click the
 Add Rule icon to add a policy. You can configure a tunnel using either route-based or policy-based options.
Note that a route-based VPN needs a static route, but a policy-based VPN does not. You can add a static route in a route-based IPsec backhaul profile only for provider organizations.

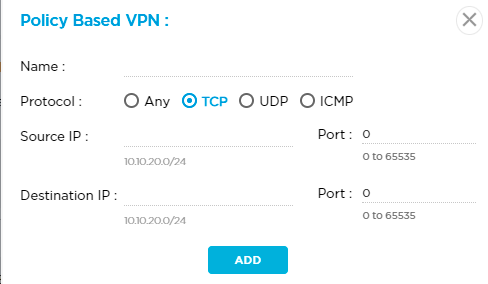
In the Policy-Based VPN popup window, enter information for the following fields.

- Name—Enter a name for the policy.
- Protocol—Select a protocol:
- Any
- ICMP
- TCP
- UDP
- Source IP—Enter the IPv4 source address or prefix.
- Port—Enter the source port number.
- Destination IP—Enter the IPv4 destination address or prefix.
- Port—Enter the destination port number.
- Click Add.
- Click the
 Add IPsec Profile icon. This saves the tunnel to the IPsec VPN screen but not the Titan cloud.

- To change an IPsec tunnel type from a route-based tunnel to a policy-based tunnel, or vice versa:
- Delete the existing IPsec tunnel and publish the configuration.
- Add the IPsec tunnel with required tunnel type.
- Publish the configuration again.
- To display tunnel details, click the
 Eye icon.
 - To edit a tunnel, click the
 Pencil icon.
 - To delete a tunnel, click the
Trash icon.
- Click Save, and then click Publish from the drop-down list.
Supported Software Information
Releases 11.2 and later support all content described in this article.
