Configure Application Reverse Proxy
![]() For supported software information, click here.
For supported software information, click here.
Application reverse proxy protects software as a service (SaaS) applications from direct access from unmanaged devices that do not have Versa client installed to connect to the Versa Cloud Gateways.
When you configure a SaaS application with single sign-on (SSO) through a third-party identity provider such as Azure AD, OneLogin, Okta, or PingIdentity, the Security Assertion Markup Language (SAML) directs the user to an identity provider (IdP) for user authentication. After the IdP authenticates the user, the IdP directs the traffic to application reverse proxy so that the proxy can enforce real-time protection policies applicable for that application for the user.
Versa supports both IdP-initiated and SaaS application-initiated reverse proxy flows.
IdP-initiated Flow
You configure the SaaS application to authenticate the user directly with the third-party IdP. When an endpoint accesses a SaaS application (such as acme.box.com), the SaaS provider (for example, box.com) redirects the endpoint to the IdP for SSO. After successful authentication, the IdP presents the SAML assertion to the Versa IdP broker (that is, the ACS URL points to Versa IdP broker). The result is that the Versa reverse proxy comes in the path to the SaaS application and enforces zero-trust network access (ZTNA), secure web gateway (SWG), cloud access security broker (CASB), data loss prevention (DLP), and other security features.

SaaS Application-initiated Flow
You configure SaaS application with Versa Cloud Gateway as the IdP. When an endpoint accesses a SaaS application (such as acme.box.com), the SaaS provider (for example, box.com) redirects the endpoint to Versa IdP broker, which, after applying policies, redirects the endpoint to endpoint's real IdP (such as Azure AD or Okta). After successful authentication by the endpoint's real IdP, the IdP presents an assertion to the Versa IdP broker, which ensures that the Versa reverse proxy remains in the path to SaaS application and enforces ZTNA, SWG, CASB, DLP and other security features.

Configure Application Reverse Proxy
This section describes how to set up application reverse proxy to integrate with an IdP and a sanctioned SaaS application provider.
Configure Identity Provider
- In Director view:
- Select the Administration tab in the top menu bar.
- Select Appliances in the left menu bar.
- Select a device name in the main panel. The view changes to Appliance view.
- Select the Configuration tab in the top menu bar.
- Select Objects and Connectors
 > Connectors
  > Identity Proxy
  > Identity Provider in the left menu bar.

- Click the
 Add icon to add identity provider details. In the Add Identity Provider popup window, enter information for the following fields.

Field Description Name Enter a name for the identity provider. Description Enter a text description for the identity provider. Domain Enter the domain name. IdP Sign-In Method Select the IdP sign in method. SAML Config (Group of Fields) - Login URL
Enter the location to which to submit the SAML authentication request. - Logout URL
Enter the location to which to send the log out response. - Error URL
Enter the location to which to send the error response. - Forgot Password URL
Enter the location to which to send the forgot password response. - ACS URL
Enter the location to which to submit SAML assertion. - Prefix
Enter the prefix to use in the request identifier. - SAML Version
Select the SAML version. - SAML Request Binding
Select the SAML request binding:
- HTTP Post
- HTTP Redirect
- SAML Respond Binding
Select the SAML response binding:
- HTTP Post
- HTTP Redirect
- Entity ID
Enter the entity ID. - Certificate
Enter the certificate name for authentication. - CA Chain
Enter the certificate authority (CA) chain for the server certificate. - Relay State
Enter the default relay state value for IdP-initiated flow. - Signed Request
Select if it is necessary to sign SAML authentication request. - Signed Response
Select if it is necessary to sign SAML authentication response. - Click OK
Configure Service Provider
- In Director view:
- Select the Administration tab in the top menu bar.
- Select Appliances in the left menu bar.
- Select a device name in the main panel. The view changes to Appliance view.
- Select the Configuration tab in the top menu bar.
- Select Objects and Connectors > Connectors > Identity Proxy > Service Provider in the left menu bar.

- Click the Add icon to add service provider details. In the Add Service Provider popup window, enter information for the following fields.
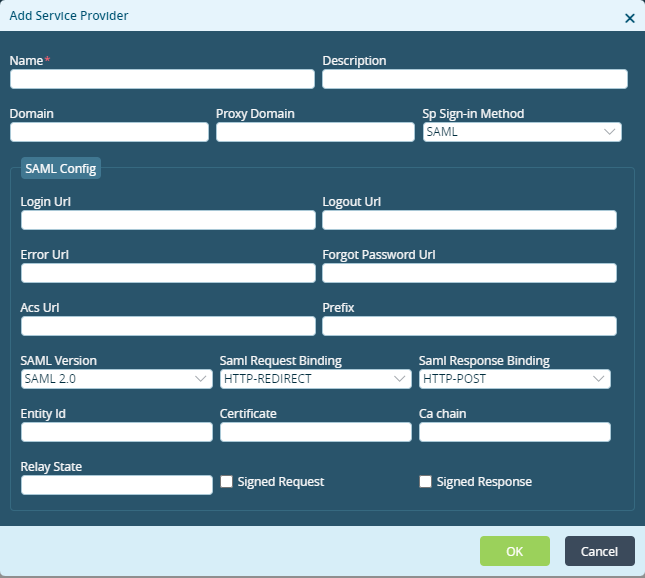
Field Description Name Enter a name for the identity provider. Description Enter a text description for the identity provider. Domain Enter the domain name. Proxy Domain Enter a proxy domain name. SP Sign In Method Select the service provider sign in method. SAML Config (Group of Fields) - Login URL
Enter the location to which to submit the SAML authentication request. - Logout URL
Enter the location to which to send the log out response. - Error URL
Enter the location to which to send the error response. - Forgot Password URL
Enter the location to which to send the forgot password response. - ACS URL
Enter the location to which to submit SAML assertion. - Prefix
Enter the prefix to use in the request identifier. - SAML Version
Select the SAML version. - SAML Request Binding
Select the SAML request binding:
- HTTP Post
- HTTP Redirect
- SAML Respond Binding
Select the SAML response binding:
- HTTP Post
- HTTP Redirect
- Entity ID
Enter the entity ID. - Certificate
Enter the certificate name for authentication. - CA Chain
Enter the certificate authority (CA) chain for the server certificate. - Relay State
Enter the default relay state value for IdP-initiated flow. - Signed Request
Select if it is necessary to sign SAML authentication request. - Signed Response
Select if it is necessary to sign SAML authentication response. - Click OK
Configure Proxy Profiles
- In Director view:
- Select the Administration tab in the top menu bar.
- Select Appliances in the left menu bar.
- Select a device name in the main panel. The view changes to Appliance view.
- Select the Configuration tab in the top menu bar.
- Select Objects and Connectors > Connectors > Identity Proxy > Proxy Profiles in the left menu bar.

- Click the Add icon to add proxy profiles details. Select the General tab, and then enter information for the following fields.

Field Description Name Enter a name for the proxy profile. Description Enter a text description for the proxy profile. Service Provider Profile Select a service provider profile LEF Profile Select a log export functionality (LEF) profile to use to capture logs for the proxy profile. Default Action (Group of Fields) - Mode
Select a mode:
- Proxy
- Service
- Authentication Profile
If you select service, select an authentication profile. - Identity Provider Profile
If you select proxy mode, select an identity provider profile. - Select the Rules tab, and then click the Add icon to add a proxy profile rule.
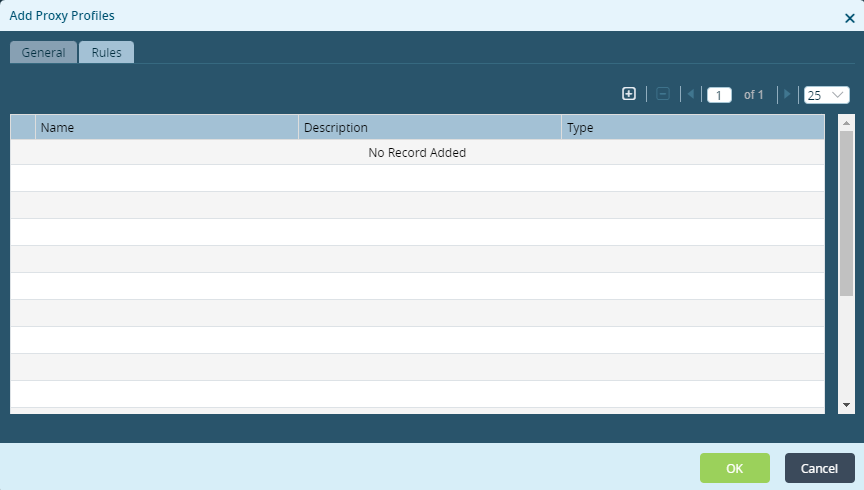
- In the Add Rule popup window, enter information for the following fields.

Field Description Name Enter a name for the rules profile. Description Enter a description for the rules profile. Type Select the rule type:
- Request
- Response
-
For the Request rule type, select the Match tab, and then enter information for the following fields.

Field Description Geolocation Select the geographic location, and then click the  Add icon.
Devices Enter the device name, and then click the  Add icon.
Users Enter the username, and then click the  Add icon.
Groups Enter the group name, and thenclick the Add icon. - Select the Set tab, and then enter information for the following fields.

Field Description Action Select an action:
- Allow—select the mode:
- Proxy—Select proxy mode and then select an identity provider profile.
- Service—Select service mode and then select an authentication profile.

- Deny
- Allow—select the mode:
- Click OK.
- For a Response rule type, select the Match tab, and then enter information for the following fields.

Field Description Geolocation Select the geographic location, and then click the Add icon.Devices Enter the device name, and then click the Add icon.Users Enter the username, and then click the Add icon.Groups Enter the group name, and thenclick the Add icon. - Select the Set tab, and then select an action.

- Click OK.
Supported Software Information
Releases 21.2.3 and later support all content described in this article.