Configure QoS
![]() For supported software information, click here.
For supported software information, click here.
When a network experiences congestion and delay, you can use quality of service (QoS), also known as class of service (CoS), to prioritize traffic so that more important traffic is handled with a higher priority. QoS allows you to do the following:
- Prioritize network and application traffic to ensure high priority for essential traffic and to limit traffic for non-essential activities.
- Control how to share a link's bandwidth among different classes, subnetworks, and users in the network.
- Allocate bandwidth to internal and external traffic, and to upload and download traffic.
- Ensure low latency for network traffic that generates revenue for the enterprise.
- Implement application traffic profiling to ensure bandwidth usage.
QoS examines and classifies all incoming (ingress) traffic on a Versa Operating SystemTM (VOSTM) device, and then schedules the outgoing (egress) traffic so that it is transmitted out the VOS device's interfaces. QoS classifies all ingress traffic packets based on their importance and places related packets into their own forwarding class. For egress traffic, QoS distributes the forwarding classes across interface queues and schedules the transmission for each queue. For ingress traffic, you define policies that accept or deny Layer 2 and application-specific traffic. For both ingress and egress traffic, you can rewrite the DSCP and 802.1p bits in the packet headers.
To define how QoS handles traffic, you configure the following:
- QoS profiles—QoS profiles define how to police ingress traffic, they assign the ingress traffic to a forwarding class, and they define whether to rewrite the DSCP or 802.1p header bits. A QoS profile can define a per-user policer, based either on IP address or user ID, to police the traffic for individual users, restrict the total number of concurrent users on the device, and restrict the number of sessions allowed for each user. For example, you can restrict YouTube traffic to 10 concurrent users, with 5 Mbps per user, and you can allow 100 concurrent users for voice traffic, with 100 Mbps and two active sessions for each user. You associate a QoS profile with a QoS policy.
- Application QoS policies—Application QoS policies define how to process ingress traffic based on the application or URL from which the traffic originates. When you define both QoS and application QoS policies, the QoS policy is applied first and the application QoS policy is applied second. This means that the application QoS policy overwrites the QoS policy.
- Stateless QoS policies—Stateless QoS policies define how to process ingress traffic, including match parameters and actions to take on matching traffic.
This article describes how to configure QoS profiles, application QoS policies, and stateless QoS policies.
Configure QoS Profiles
You configure a QoS profile to:
- Create ingress policers, which limit the rate of ingress traffic. Ingress policers prevent ingress traffic from overloading a port or device. Ingress policing uses the following parameters:
- Peak rate—The maximum transmission rate. The maximum supported policer rate is 4 GB.
- Burst size—The number of bytes that are allowed beyond the configured peak rate. You set the burst size to avoid retransmission during bursts of traffic.
- Associate ingress traffic with a forwarding class and loss priority.
- Define whether to rewrite the DSCP or 802.1p header bits.
To configure a QoS profile:
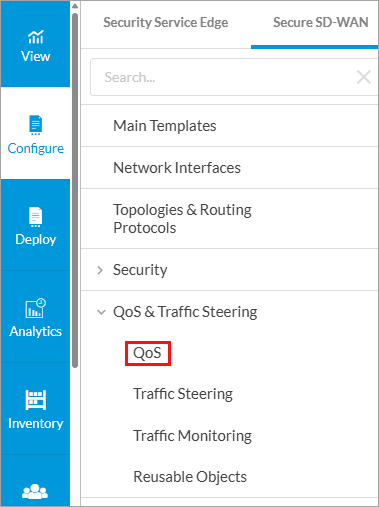
- In Tenant view, select Configure > Secure SD-WAN > QoS & Traffic Steering > QoS.
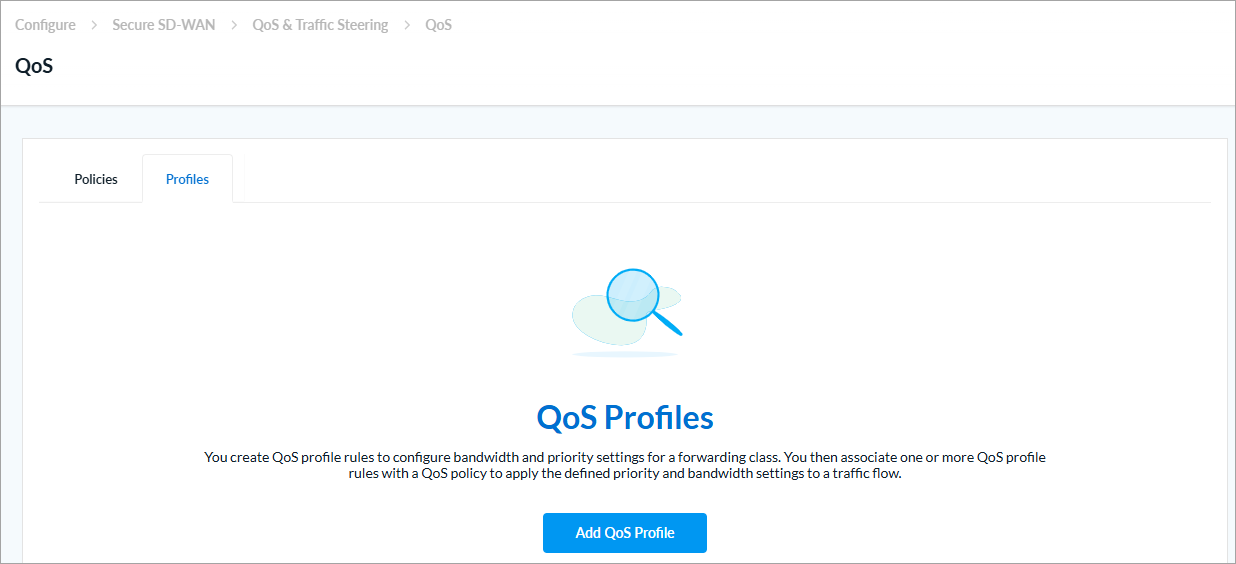
The following screen displays if there are no exiting QoS profiles.
The following screen displays if there are existing QoS profiles.
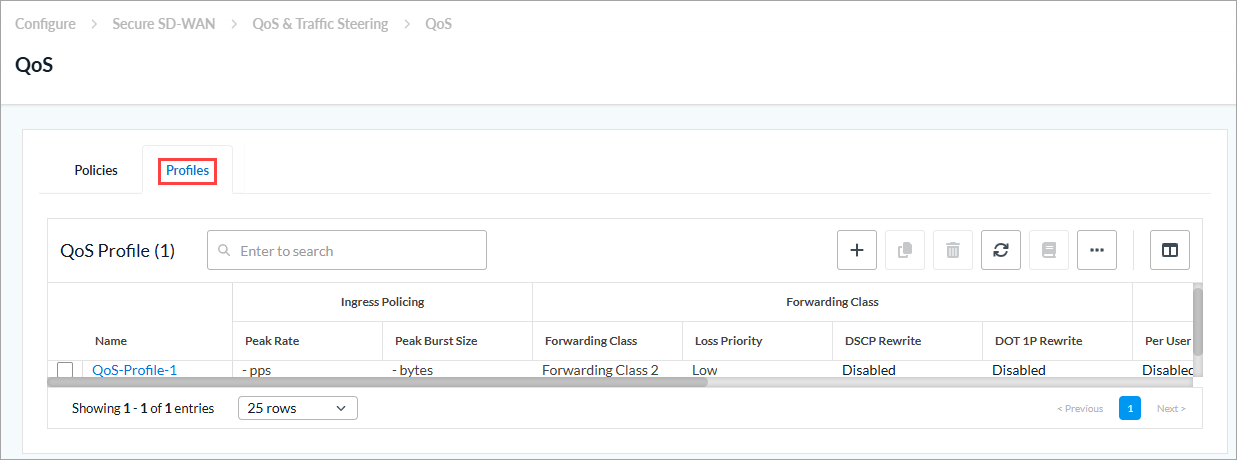
- Select the Profiles tab.
- Click Add QoS Profile or + Add. The Add QoS Profile screen displays
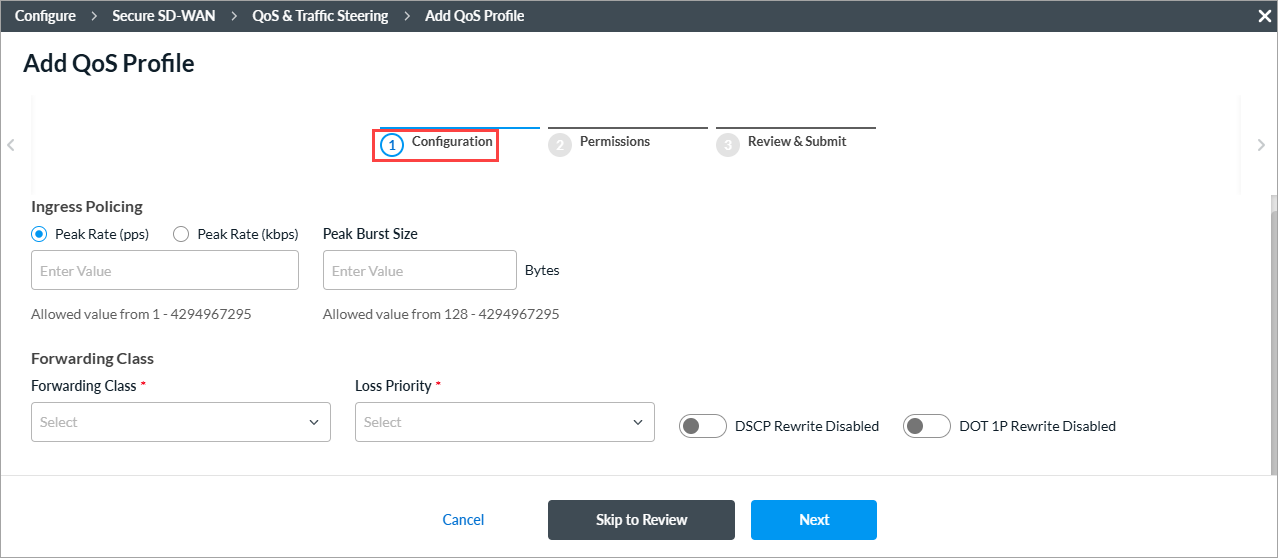
- Click step 1, Configuration, and enter information for the following fields.
Field Description Ingress Policing (Group of Fields)
- Peak Rate (pps)
Enter how many data packets to allow, in packets per second (pps). All packets that exceed this value are dropped. Entering a peak rate value enables the policer.
Range: 1 through 4294967295 pps
Default: None
- Peak Rate (Kbps)
Enter the maximum ingress rate, in kilobits per second (Kbps). For Releases 21.2.2 and later, if you enter a peak rate value, the fields on the Per-User Policer tab display. For more information, see Step 6.
Range: 64 through 4294967295 Kbps
Default: None
- Peak Burst Size
Enter the packet burst size, in bytes.
Range: 128 through 4294967295 bytes
Default: None
Forwarding Class (Group of Fields) - Forwarding Class (Required)
Select the forwarding class to associate with the profile. - Loss Priority (Required)
Select the loss priority for the forwarding class. - DSCP Rewrite
Click to change the DSCP value in the header of incoming IP packets. The value can be changed to predefined values. - Dot IP Rewrite
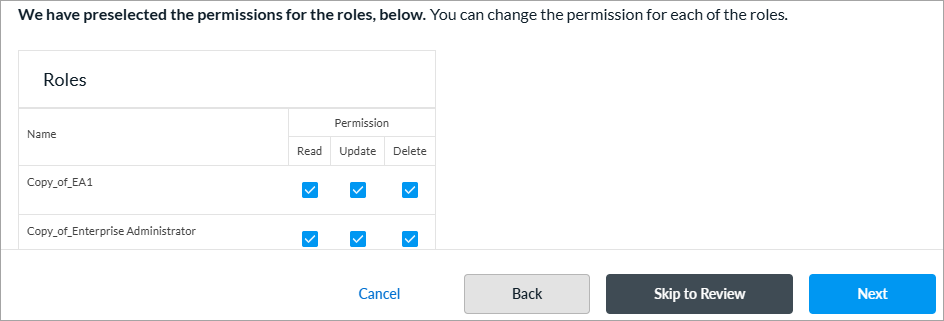
Click to rewrite the IEEE 802.1p value of outgoing Ethernet packets. The value can be changed to predefined values. - Click Next to go to step 2, Permissions. The following screen displays. The permission for each role is selected by default, and you can update it.
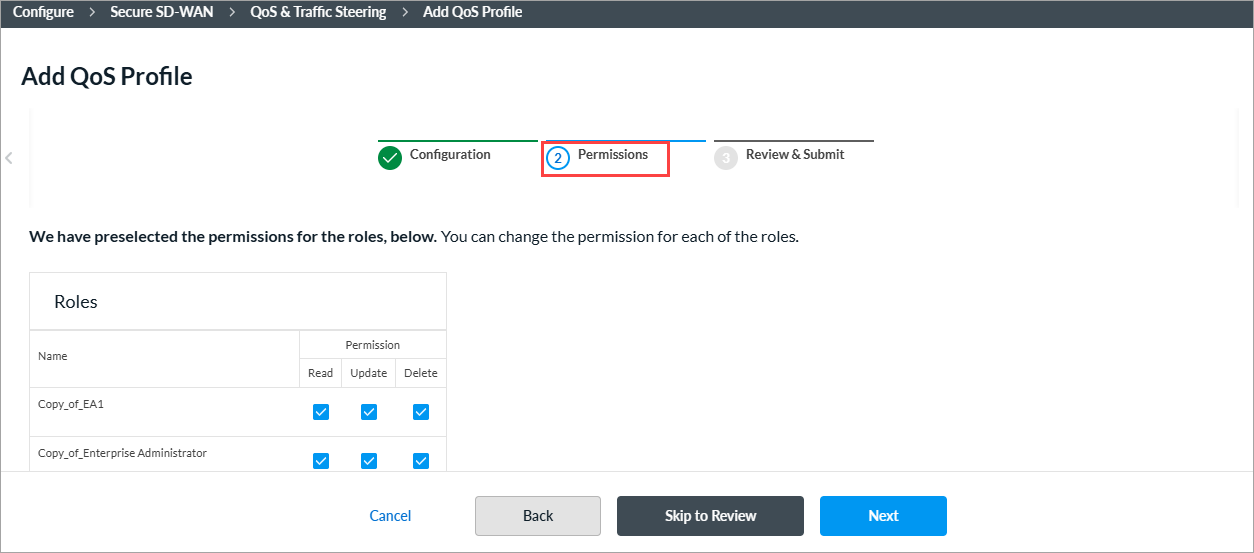
- To change the permissions for a role, select or deselect the Read, Update, and Delete fields for the role.
- Click Next to go to step 3, Review and Submit. In the General section, enter information for the following fields.
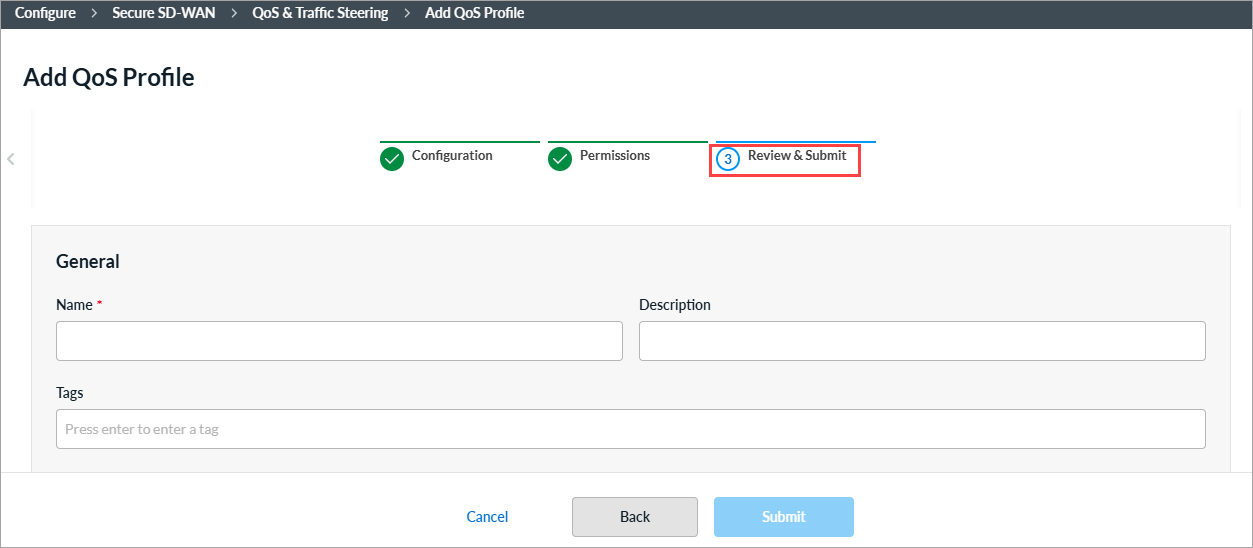
Field Description Name
Enter a name or the rule. Description
(Optional) Enter a description for the rule. Tags
(Optional) Enter one or more tags. A tag is an alphanumeric text descriptor with no spaces or special characters. You can specify multiple tags added for the same object. The tags are used for searching the objects. - Review the settings you have selected. Click the
 Edit icon to change a setting, as needed.
 - Click Submit.
Configure Application QoS Policies
Similar to stateless QoS policies, application QoS policies define how to handle traffic when a network becomes congested. You define rules for processing mission-critical and latency-sensitive application traffic as well as for processing lower-priority traffic. Application QoS policies are based on Layer 7 protocols, and they are enforced on a per-session basis. In an application QoS policy, you associate QoS classes with specific types of Layer 7 applications, and then you define how to classify traffic for treatment when it transits a QoS-enabled interface.
When you configure both stateless QoS and application QoS policies, the stateless QoS policy is evaluated first and then the application QoS policy. Because the application QoS policy evaluation occurs after the stateless QoS policy evaluation, the forwarding class assigned in the application QoS policy overwrites the one assigned in the stateless QoS policy.
Application QoS policies define traffic-handling parameters for specific applications to ensure optimal performance and user experience. To configure an application QoS policy, you first define rules to classify incoming traffic based on match criteria, such as application, source IP address, destination IP address, and incoming zone. Then, you specify the action to take when traffic matches the configured criteria.
The rules in a policy are evaluated starting with the first rule, that is, from top to bottom in the order in which the rules are displayed in the Concerto rules UI. When a packet matches the criteria defined in a rule, that rule is enforced and all subsequent rules in the policy are ignored. Therefore, to enforce the most specific match, place the more specific rules above the more generic rules, and place generic rules that can match any packets, such as wildcard rules, at the end. After you create policy rules, you can re-order them.
Create an Application QoS Policy
You can create an application QoS policy as part of a main template, or you can create it separately and then associate it with a main template. For more information on main templates, see Configure Main Templates.
- To create a application QoS policy for an existing main template:
- In Tenant view, select Configure > SD-WAN > Main Templates.
- Select the main template for which you want to configure the policy.
- Click step 5, QoS, Traffic Steering, and Traffic Monitoring. The following screen displays.
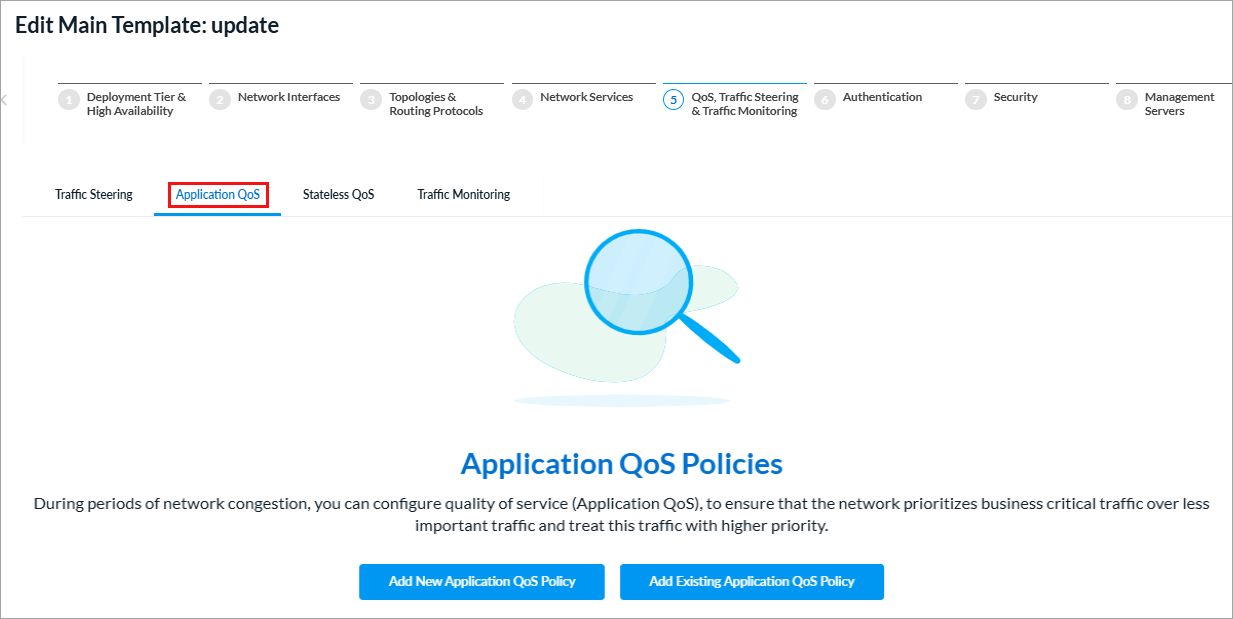
- Select the Application QoS tab, and then click Add New Application QoS Policy.
- Continue to Configure an Application QoS Policy Rule, below.
- To create an application QoS policy separately from a main template:
- In Tenant view, select Configure > Secure SD-WAN > QoS & Traffic Steering > QoS.
The following screen displays with the Policies > Application QoS Policies tab selected by default.

If there are no existing QoS policy rules, the following screen displays:

- Click + Add or Add Application QoS Policy. The Add Application QoS Policy screen displays.
- Continue to Configure an Application QoS Policy Rule, below.
- In Tenant view, select Configure > Secure SD-WAN > QoS & Traffic Steering > QoS.
Configure an Application QoS Policy Rule
- In the Add Application QoS Policy screen, click Add Application QoS Rule.
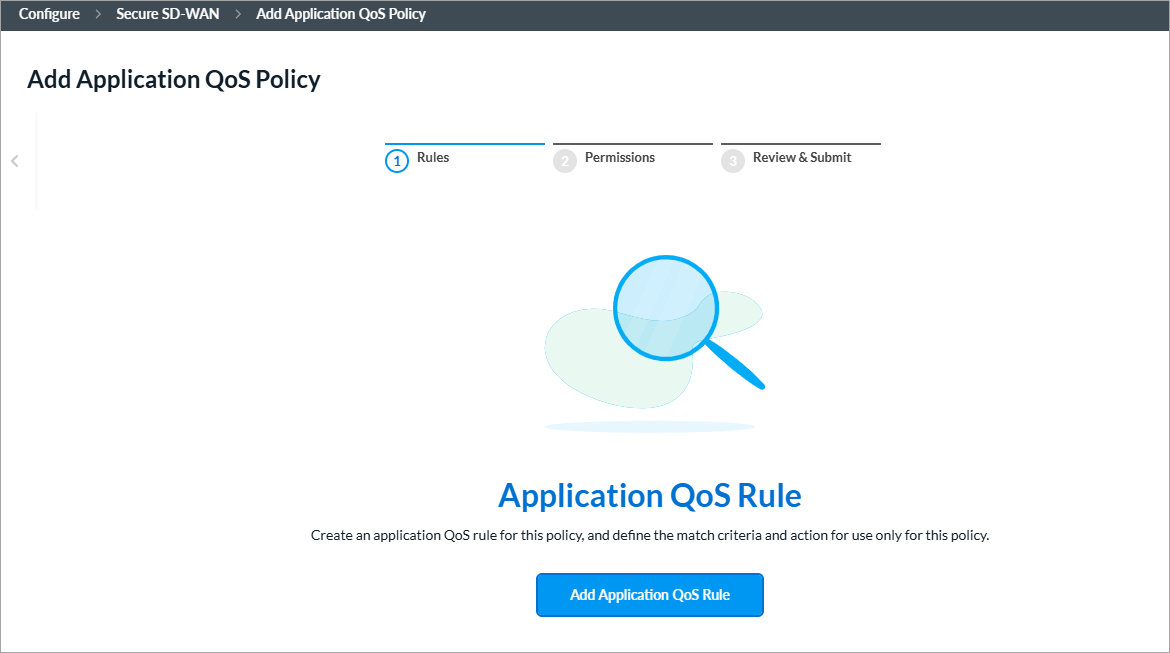
The screen displays the workflow to create a rule, beginning with step 1, Applications and URLs.

- By default, all applications, URLs, and reputations are included in the match criteria. You can include or exclude specific applications, application groups, application categories, URL categories and URL reputations.
To specify traffic for application groups, specific applications, application categories, and URL categories and reputations for the rule:- Select the Applications > Application Groups tab.

- To select specific application groups to include or exclude in the rule, click User Defined Application Groups, Predefined Application Groups, or both. Then select the application groups for the rule to match. You can use the Search bar to find specific application groups.
- To create an Application Group object, click + Add Application Group.
- Select the Applications > Applications tab.
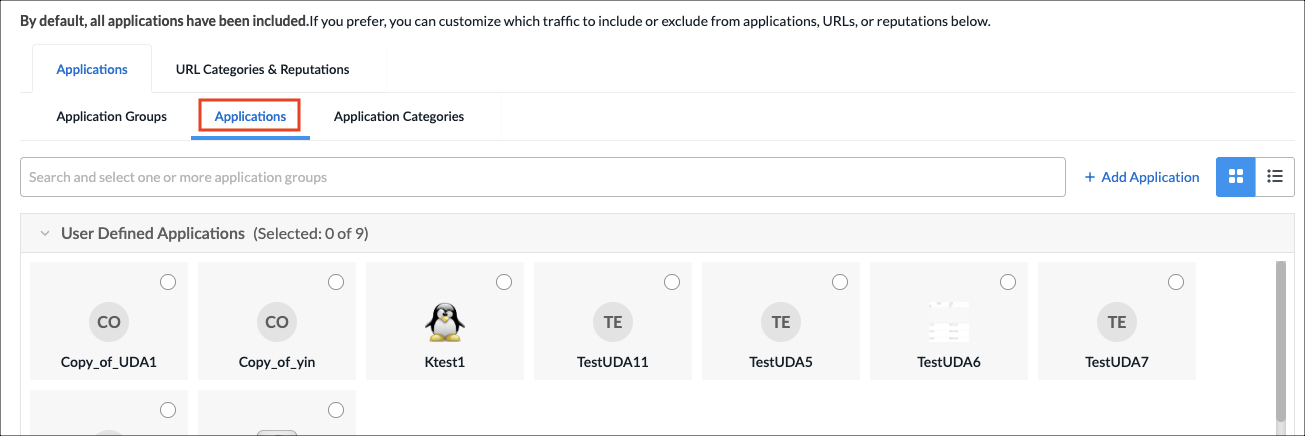
- To select specific applications, click User Defined Applications, Predefined Applications, or both. Then select the applications for the rule to match. You can use the Search bar to find specific applications.
- To create an Application object, click + Add Application. See Applications section in Configure Reusable Objects.
- Select the Applications > Application Category tab.

- Select one or more user-defined and predefined application categories for the rule to match. You can use the Search bar to find specific application categories.
- To create an Application Category object, click + Add Application Category. See the See Application Categories section in Configure Reusable Objects.
- Select the URLs and Reputations tab.
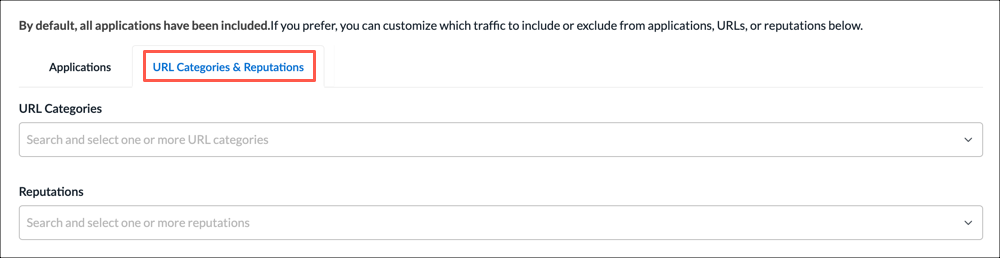
- In the URL Categories field, click the down arrow, and then select one or more URL categories for the rule to match.
- To create a URL category, select + Add URL Category. See the Add a URL Category section in Configure Reusable Objects.
- In the Reputations field, click the down arrow, and then select one or more reputations to include in the rule:
- High risk
- Low risk
- Moderate risk
- Suspicious
- Trustworthy
- Undefined
- Select the Applications > Application Groups tab.
- Click Next or select step 2, Users & User Groups.
- By default, all users and user groups are included in the match criteria. To customize which traffic to include or exclude from users & user groups:
- Click to select the user type for which you want to apply the rule:
- All Users—Apply rule for all matched users. This is the default.
- Selected Users—Apply rule for selected users.
- Known Users—Apply rule for all known (authenticated) users.
- Unknown Users—Apply rule only for users that are not authenticated.

- If you select the Selected Users option, the following screen displays.

- Click the User and Device Authentication Profile field to select a user authentication profile for the matched users and groups.
- To create a new profile, select + Create New. See the Configure User and Device Authentication Profiles in Configure SD-WAN User and Device Authentication.
- On the User Groups tab, click the checkbox for each user group to include. You can search for specific user groups, or click Select All to include all user groups.
- Click the Users tab, and then click the checkbox for each user to include. You can search for specific users, or click Select All to include all users.
- Click to select the user type for which you want to apply the rule:
- Click Next or select step 3, Source & Destination Traffic.
- By default, traffic from all source and destination addresses and zones, and all sites, are included in the match criteria. You can include or exclude specific source and destination traffic to match the rule.
To match traffic from specific source and destination addresses, zones, and sites:- Select the Source Addresses tab.
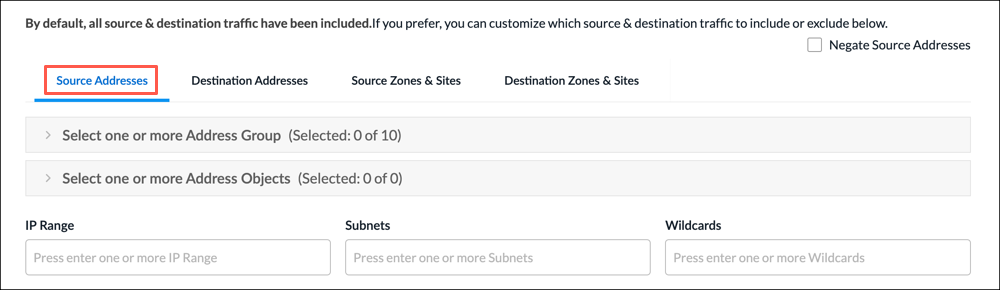
- Select a source address group or address object for the rule to match, or use the search box to find a source address group or object. To exclude the source address or addresses, click Negate Source Address.
- To create an Address Group object, click the + icon. For more information, see Add Address Group.
- To create an Address Object, click the + icon. For more information, see Add Address Object in Configure Reusable Objects.
- To match on IP range, subnet, or wildcard, enter one or more values in the IP Range, Subnet, or Wildcard fields.
- Select the Destination Addresses tab.
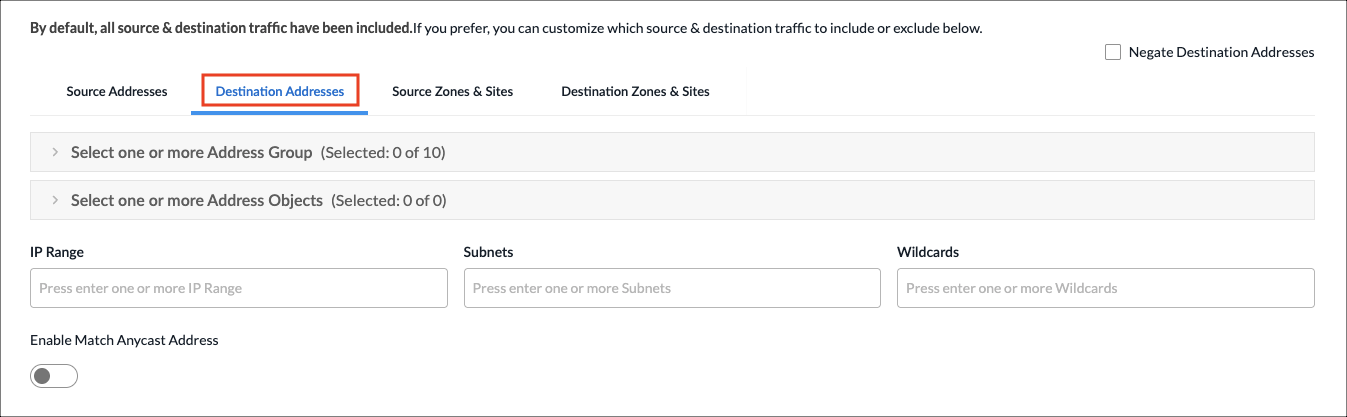
- Select a destination address group or object for the rule to match, or use the search box to find a source address or object. To exclude the destination address or addresses, click Negate Source Address.
- To create an Address Group object, click the + icon. For more information, see Add Address Group in Configure Reusable Objects.
- To create an Address Object, For more information, see Add Address Object in Configure Reusable Objects.
- To match on IP range, subnet, or wildcard, enter one or more values in the IP Range, Subnet, or Wildcard fields.
- Click the Enable Match Anycast Address to enable match on an anycast IP address, which is a shared default gateway IP address.
- Select the Source Zones & Sites tab to specify source zones to include in the match criteria. Select one or more source zones or source sites from the lists. You can also select an ingress routing instance.

- Select the Destination Zones & Sites tab to specify destination zones to include in the match criteria. Select one or more destination zones or destination sites from the lists. You can also select an egress routing instance.

- Select the Source Addresses tab.
- Click Next to go to step 4, Source and Destination Geolocation.
- Geolocation uses IP addresses to identify the location of connected devices. By default, source and destination traffic from all locations are included in the match criteria. You can specify the source and destination traffic to include or exclude in the match criteria based on geographic location.
To specify the geographic locations to include or exclude:
- On the Source Geo Location tab, click the Country drop-down list to select a geographic category to search.
- In the next field, type the name of the country, state, or city. When a match is found, it is added to the Selected list.
- To remove a country from the list, click the X next to the country name. To remove all selections, click Clear All.
- To exclude the selected geographic locations from the match criteria, click Negate Selection.
- Click the Destination Geo Location tab, and repeat steps 8a through 8d.

- Click Next to go to step 5, Services & DSCP.
- By default, all services, service groups, and DSCPs are included in the match criteria. You can specify the services, service groups, and Differentiated Services Code Points (DSCPs) for the rule to match.
To specify services, service groups, and DSCP to include:- Select the Services tab.

- Select the services to include in the match criteria. To filter the list, click All Services, and select Predefined or User Defined. You can also search by service name.
- To create a services object, click the + icon. For more information, see Add a Service Object in Configure Reusable Objects.
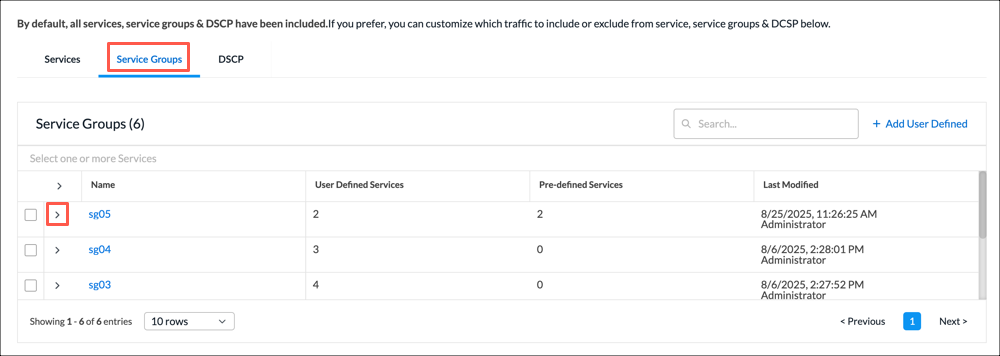
- Select the Service Groups tab.

- Select the service groups to include in the match criteria. You can search by service group name.
- To create a service group object, click the + icon. For more information, see Add a Service Group in Configure Reusable Objects.
- Select the DSCP tab. By default, all DSCP decimal values are included in the match criteria. You can specify which DSCP decimal values to include.
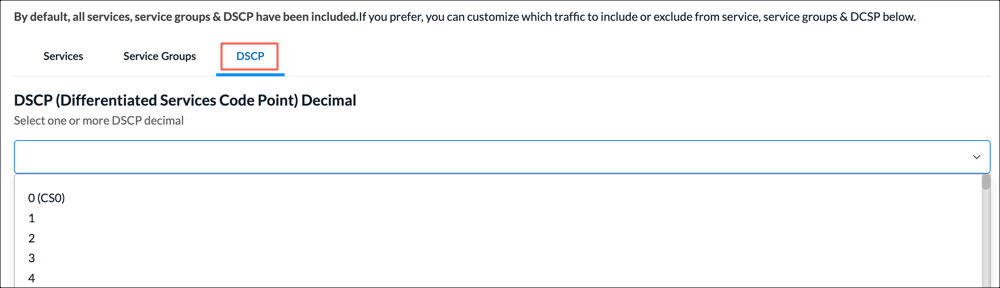
- Select one or more DSCP decimal values. The value range is 0 to 63. You can use the search bar to locate values.
- Select the Services tab.
- Click Next to go to step 6, QoS Profile.

- In the QoS Profile field, select an existing QoS profile to associate with the rule, or click + Create New to create a new profile. For more information, see Configure QoS Profiles, above.
- Click Next to go to step 7, Review and Submit.
- In the General section, enter information for the following fields.

Field Description General (Group of Fields) - Name
Enter a name or the rule. - Description
(Optional) Enter a description for the rule. - Tags
(Optional) Enter one or more tags. A tag is an alphanumeric text descriptor with no spaces or special characters. You can specify multiple tags added for the same object. The tags are used for searching the objects. - Schedule
Select a schedule to set the time and frequency at which the rule is in effect. - Rule Enabled
Click to disable the rule once it is saved. By default, the rule is enabled. - Logging Disabled
Click to the slider bar to enable logging for the rule. By default, logging is disabled. - Review the remaining sections. Click the Edit icon in any section to make changes, as needed.
- Click Save Traffic Steering Rule. The Add Application QoS Policy screen displays the saved rule.

- To add another rule, click + Add in the horizontal menu. You can also select an existing rule and perform the following operations:
- Filter—Click the
 Filter icon to filter on matching IP address or subnet in any address range. You can also filter on service port number. In the drop-down list, select one of the following:
- Select IP Address and enter an IP address or IP subnet, and then click Apply.
- Select Service Port and enter a service port number, and then click Apply.
- Select IP Address and enter an IP address or IP subnet, and select Service Port and enter a service port number, and then click Apply.
- Clone—Creates a copy of the rule. You can change the default name of the cloned rule, if desired. The cloned rule then appears in the list of traffic steering rules.
- Reorder—Reorder the selected policy rule.
- Delete—Delete the selected policy rule.
- Filter—Click the
- Continue to Configure Permissions, Review and Submit the Application QoS Policy, below.
Configure Permissions, Review, and Submit the Application QoS Policy
- In the Add Application QoS Policy screen, click Step 2, Permissions. The following screen displays.
- The permission for each role is selected by default, and you can update it.
- To change the permissions for a role, select Read, Update, or Delete in the Permissions column.
- Click Next to go to step 3, Review and Submit.
- In the General section, enter a name for the application QoS policy. You can also enter a text description for the policy and one or more tags. A tag is an alphanumeric text descriptor with no spaces or special characters. You can specify multiple tags added for the same object. The tags are used for searching the objects.

- Review the settings you have selected. Click the Edit icon to change a setting, as needed.
- Click Submit.
Configure Stateless QoS Policies
A stateless QoS policy classifies and prioritizes packets individually, without maintaining any session or flow state information.
To configure a stateless QoS policy, you first create rules to classify incoming traffic based on match criteria, such as source IP address, destination IP address, services, and Layer 2 parameters. Then, you specify the action to take when traffic matches the configured criteria.
Create a Stateless QoS Policy
You can create a stateless QoS policy as part of a main template, or you can create it separately and then associate it with a main template. For more information on main templates, see Configure Main Templates.
- To create a stateless QoS policy for an existing main template:
- In Tenant view, select Configure > SD-WAN > Main Templates.
- Select the main template for which you want to configure the policy.
- Click step 5, QoS, Traffic Steering, and Traffic Monitoring.

- Select the Stateless QoS tab, and then click Add New Stateless QoS Policy.
- Continue to Configure Stateless QoS Policy Rules below.
- To create a stateless QoS policy separately from a main template:
- In Tenant view, select Configure > Secure SD-WAN > QoS & Traffic Steering > QoS.
- In the Stateless QoS Policies screen, select the Stateless QoS Policies tab.

- Click + Add. The Add Application QoS Policy screen displays.
- Continue to Configure Stateless QoS Policy Rules below.
- In Tenant view, select Configure > Secure SD-WAN > QoS & Traffic Steering > QoS.
Configure Stateless QoS Policy Rules
- In the Add Stateless QoS Policy screen, click Add Stateless QoS Rules.

The screen displays the workflow to create a rule, beginning with step 1, Source and Destination Traffic.

- By default, traffic from all source and destination addresses and zones, and all sites, are included in the match criteria. You can include or exclude specific source and destination traffic to match the rule.
To match traffic from specific source and destination addresses, zones, and sites:- Select the Source Addresses tab.
- Select a source address group or address object for the rule to match, or use the search box to find a source address group or object. To exclude the source address or addresses, click Negate Source Address.
- To create an Address Group object, click the + icon. For more information, see Add Address Group in Configure Reusable Objects.
- To create an Address Object, click the + icon. For more information, see Add Address Object in Configure Reusable Objects.
- To match on IP range, subnet, or wildcard, enter one or more values in the IP Range, Subnet, or Wildcard fields.
- Select the Destination Addresses tab.

- Select a destination address group or object for the rule to match, or use the search box to find a source address or object. To exclude the destination address or addresses, click Negate Source Address.
- To create an Address Group object, click the + icon. For more information, see Add Address Group in Configure Reusable Objects.
- To create an Address Object, click the + icon. For more information, see Add Address Object in Configure Reusable Objects.
- To match on IP range, subnet, or wildcard, enter one or more values in the IP Range, Subnet, or Wildcard fields.
- Click the Enable Match Anycast Address to enable match on an anycast IP address, which is a shared default gateway IP address.
- Select the Source Zones & Sites tab to specify source zones to include in the match criteria. Select one or more source zones or source sites from the lists. You can also select an ingress routing instance.

- Select the Destination Zones & Sites tab to specify destination zones to include in the match criteria. Select one or more destination zones or destination sites from the lists. You can also select an egress routing instance.

- Select the Source Addresses tab.
- Click Next to go to step 2, Services & DSCP.
- By default, all services, service groups, and DSCPs are included in the match criteria. You can specify the services, service groups, and Differentiated Services Code Points (DSCPs) for the rule to match.
To specify services, service groups, and DSCP to include:- Select the Services tab.

- Select the services to include in the match criteria. To filter the list, click All Services, and select Predefined or User Defined. You can also search by service name.
- To create a services object, click + Add User Defined. <link here>
- Select the Service Groups tab.
- Select the service groups to include in the match criteria. You can search by service group name.
- To create a service group object, click + Add User Defined. <link here>
- Select the DSCP tab. By default, all DSCP decimal values are included in the match criteria. You can specify which DSCP decimal values to include.
- Select one or more DSCP decimal values. The value range is 0 to 63. You can use the search bar to locate values.
- Select the Services tab.
- Click Next to go to step 3, Layer 2.
- To classify packets that an interface receives based on Layer 2 fields, enter information for the following fields.
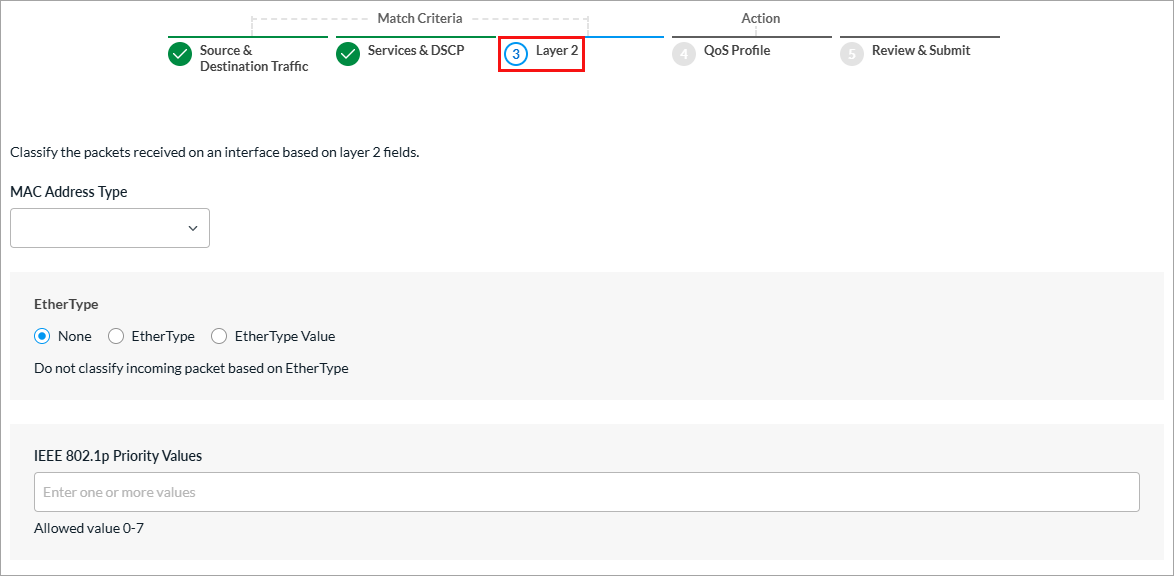
Field Description MAC Address Type
Select the MAC address type to match:
- Broadcast
- Multicast
Ether Type (Group of Fields)
- None
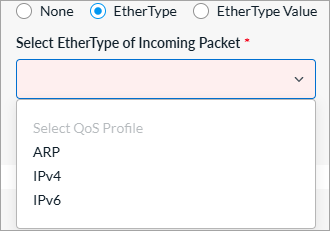
Select if you do not want to classify incoming packets based on Ether type. - Ether Type
Select to match by name, and then select the Ether type of incoming packets:
- ARP
- IPv4
- IPv6
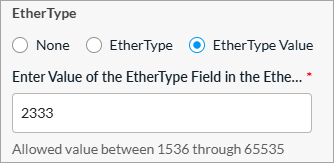
- Ether Type Value
Select to match by value, and then enter a numeric value between 1536 through 65535.
IEEE 802.1p Priority Values Enter a value (0 through 7) for the IEEE 802.1p Priority Code Point (PCP) in the VLAN tag at Layer 2 to specify the frame priority for QoS handling in Ethernet networks. - Click Next to go to step 4, QoS Profile.
- Enter information for the following fields.

Field Description Action
Click the action to take on traffic that matches the rule:
- Allow—Permit traffic that matches the rule.
- Deny—Do not permit traffic that matches the rule.
- Bypass Service—Route traffic that matches the rule, but do not perform any service-related processing or create a session for the traffic.
QoS Profile Select an existing QoS profile to associate with the rule or click + Create New to create a new QoS profile. For more information, see Configure QoS Profiles above. Permit Existing Flow Select how to apply the rule to an existing flow for TCP sessions created by a non-SYN TCP packet:
- Allow—Select to allow the existing TCP flows with minimal services.
- Validate—Select to allow the existing TCP flows with all services applicable in the service chain.
- Click Next to go to step 5, Review and Submit.
- In the General section, enter information for the following fields.
Field Description General (Group of Fields) - Name
Enter a name or the rule. - Description
(Optional) Enter a description for the rule. - Tags
(Optional) Enter one or more tags. A tag is an alphanumeric text descriptor with no spaces or special characters. You can specify multiple tags added for the same object. The tags are used for searching the objects. - Schedule
Select a schedule to set the time and frequency at which the rule is in effect. - Rule Enabled
Click to disable the rule once it is saved. By default, the rule is enabled. - Logging Disabled
Click to the slider bar to enable logging for the rule. By default, logging is disabled. - Review the remaining sections. Click the Edit icon in any section to make changes, as needed.
- Click Save Traffic Steering Rule. The Add Stateless QoS Policy screen displays the saved rule.

- To add another rule, click + Add in the horizontal menu. You can also select an existing rule and perform the following operations:
- Filter—Click the Filter icon to filter on matching IP address or subnet in any address range. You can also filter on service port number. In the drop-down list, select one of the following:
- Select IP Address and enter an IP address or IP subnet, and then click Apply.
- Select Service Port and enter a service port number, and then click Apply.
- Select IP Address and enter an IP address or IP subnet, and select Service Port and enter a service port number, and then click Apply.
- Clone—Creates a copy of the rule. You can change the default name of the cloned rule, if desired. The cloned rule then appears in the list of traffic steering rules.
- Reorder—Reorder the selected policy rule.
- Delete—Delete the selected policy rule.
- Filter—Click the
- Continue to Configure Permissions, Review and Submit the Stateless QoS Policy.
Configure Permissions, Review, and Submit the Stateless QoS Policy
- In the Add Stateless QoS Policy screen, click step 2, Permissions. The following screen displays.
- The permission for each role is selected by default, and you can update it. To change permissions for a role, select or deselect the Create, Read, Update, and Delete fields for the role.
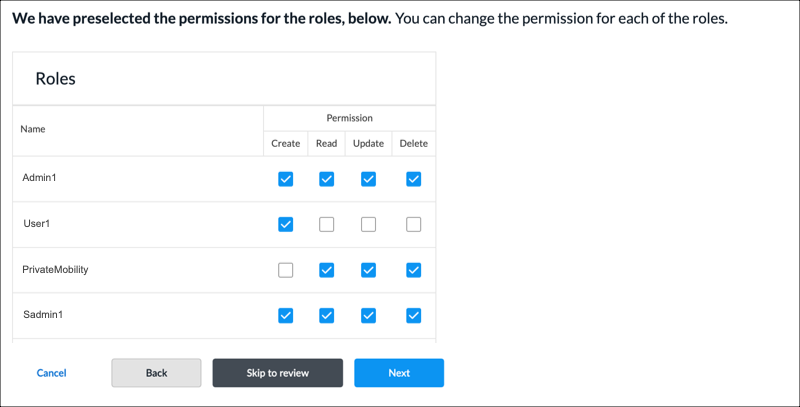
- To change the permissions for a role, select Edit, Hide, or Read in the Permissions column.
- Click Next to go to step 3, Review and Submit.
- In the General section, enter a name for the stateless QoS policy. You can also enter a text description for the policy and one or more tags. A tag is an alphanumeric text descriptor with no spaces or special characters. You can specify multiple tags added for the same object. The tags are used for searching the objects.
- Review the settings you have selected. Click the Edit icon to change a setting, as needed.
- Click Submit.
Manage Application and Stateless QoS Policies
You can perform the following actions on application and stateless QoS policies:
- Filter
- Edit
- Clone
- Delete
- View references
- Propagate
- Compare versions
- View the audit log
- Enable and disable auto delete
For information about these actions, see Manage SD-WAN Policies and Profiles.
Supported Software Information
Releases 13.1.1 and later support all content described in this article.