Configure Paired CPE Devices and Location IDs
![]() For supported software information, click here.
For supported software information, click here.
When you deploy branch CPE devices in active–active mode, you can pair the two CPE devices so that clients in the branch that are connected to either CPE device can access the WAN interfaces on either of the CPE devices. If each CPE is connected to a different transport domain, clients can access those transport domains without being directly connected to both CPE devices.
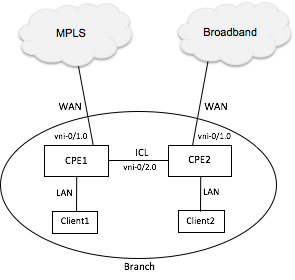
In this scenario, the two paired CPE devices are connected to each other using an interchassis link (ICL). To illustrate this, the following figure shows a branch site that has two CPE devices. CPE1 has a WAN interface that connects to an MPLS transport domain, and CPE2 has a WAN interface that connects to a broadband transport domain. On the LAN side, each CPE has a client connected to it. By connecting CPE1 and CPE2 using an interchassis link, the client connected to CPE1 can reach the broadband domain that is connected to CPE2, and the client connected to CPE2 can reach the MPLS domain that is connected to CPE1.
To configure a CPE pair in a branch site, you assign a unique location identifier to the branch site, and you configure the paired CPE devices with the same location ID. The location ID is referred to as a paired site location ID. Its purpose is to identify cross-connect branch devices in an active–active deployment so that any traffic from a cross-connect device that is using the local device's WAN for egress is NATed using endpoint-independent mapping (EIM) and endpoint-independent filtering (EIF).
The following figure shows paired HA CPE devices in three different branch sites, New York, London, and Tokyo. Here, the location ID for New York is New-York-Branch1, for London it is London-Branch1, and for Tokyo it is Tokyo-Branch1. The paired CPEs in each branch must have the same location ID. In this example, CPE1 and CPE2 in the New York branch each has the location ID New-York-Branch1, CPE1 and CPE2 in the London branch each has the location ID London-Branch1, and CPE1 and CPE2 in the Tokyo branch each has the location ID Tokyo-Branch1. If you later add a second branch in New York that has paired HA CPEs, the new site must have a different location ID, such as New-York-Branch2.

To configure a CPE pair in a branch site:
- In Director view:
- Select the Administration tab in the top menu bar.
- Select Appliances in the left menu bar.
- Click on an appliance in the main panel. The view changes to Appliance view.
- Select the Configuration tab in the top menu bar.
- Select Services > SD-WAN > System > Site Configuration in the left menu bar. For more information, see Configure SD-WAN Sites.

- Click the
 Edit icon. In the Edit Site Configuration popup window, enter information for the following fields.
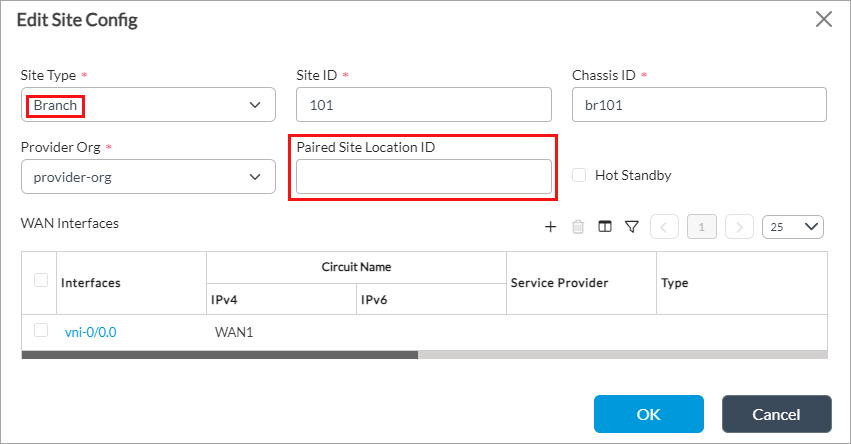
Field Description Site Type Select Branch. Paired Site Location ID Enter the location identifier. It can be any text string of letters and numbers, and it must be unique for each location or site in the SD-WAN network. - Click the + Add icon to add a new WAN interface, or for an existing interface, click the interface name. The Add/Edit WAN Interfaces popup window displays.

- For a new WAN interface, select the interface in the Interfaces field.
- In the Interchassis Link field, select Active–Active to configure the interface as an ICL.
- Click OK.
- Repeat Steps 1 through 8 to configure the second CPE device in the branch. Note that the location ID of the second CPE device must be identical to the location ID of the first CPE device.
Then, in the CGNAT rules that perform source NAT translation of ingress traffic on the ICL, enable the paired site parameter:
- In Director view:
- Select the Configuration tab in the top menu bar.
- Select an organization from the left menu bar.
- Select a template from the main pane. The view changes to Appliance view.
- Select the Configuration tab in the top menu bar.
- Select Configuration > Services > CGNAT in the left menu bar, and then select the Rules tab.

- Click the + Add icon to add a new CGNAT rule, or click the name of an existing rule. The Add/Edit CGNAT popup window displays.

- For a new rule, enter a name for the new rule in the Name field.
- Click Paired Site.
- For information about configuring the other fields, see Configure CGNAT.
- Click OK.
Supported Software Information
Releases 20.2 and later support all content described in this article.