Configure a Secure Access Service (Remote Access VPN)
With a remote access VPN, you can enable a secure access VPN in branch, which allows remote users to connect to enterprise networks. You can configure a remote access VPN for a license when you add or upgrade the license. A remote access VPN is a global configuration that is used for the instances that support the remote access VPN and Versa secure access (VSA).
Before you configure a remote access VPN, you must have the public static IP from AWS, public FQDN, and public CA certificates. You can enable or disable remote access VPN only when the device is in undeploy or lock mode.
After you add a license, you can enable remote access VPN when configuring the WAN network, and then the Remote Access VPN tab is displayed in the license configuration window.

The Remote Access VPN tab has the following options:
- Secure Access Profile—The secure access profile configuration is read only. You configure a secure access profile in the Secure Access Default template.
- IPsec Tunnel Address Pool—For a license on which remote access VPN is enabled, select this option to manually enter the WAN IPsec tunnel address pool information.
To use a remote access VPN, configure the following:
- Enable Remote Access VPN and Configure WAN Networks
- Configure Versa Secure Access (Remote Access VPN)
- Upload Public Certificates
- Configure IPsec Tunnel Address Pool
- Enable or Create Firewall Rules for Remote Access VPN
- Register and Connect a Versa Secure Access Client
Enable Remote Access VPN and Configure WAN Networks
To configure a remote access VPN:
- Click Configure in the left menu bar to open the Configure dashboard.
- Hover over the instance in the honeycomb and click Configure to open the site information window.

- Click the WAN icon to open the Network > WAN screen.

- In the Network > WAN screen, enter information for the following fields.

Field Description Remote Access VPN Interface Click the toggle switch to enable or disable remote access VPN. FQDN Enter the FQDN of the device. Network Address - Address
Enter the AWS private IPv4 address for the WAN port. This IP address is retrieved from AWS. For example, the following screenshot shows the private IPv4 address in AWS.

- Gateway
Enter the IP address of the gateway. - Click Publish.
For more information, see Configure WAN Connections.
Configure a Versa Secure Access (Remote Access VPN) Template
- Click Templates in the left menu bar to open the Templates dashboard.
- Select Versa Secure Access Template and then click on the secure access default template name.

- In the Secure Access Default Configuration screen, click Secure Access Profiles > Secure Access Client tab, and then enter information for the following fields.

Field
Description Private Prefix Access (Required)
Enter an IP prefix that can be reached over the remote access VPN, and then click the  icon. If you do not enter a value, the IP subnet is automatically allocated.
Domain (FQDN) and DNS Resolver (Required)
Select the domains to which the FQDN and DNS resolver IP address apply.
- All Domains
Apply the name server for all domains that are not explicitly defined. In the Name Server field, enter the name of the DNS name server, and then click the
 icon.
icon.Authenticator
Select an authentication profile:

- Enterprise LDAP Profile—If you select LDAP authentication in the Select Authentication Profile field, select an LDAP profile to associate with the authentication profile. Click + Authenticator Profile to add a new LDAP profile. For more information, see Configure LDAP Profiles.
- Enterprise SAML Profile—If you select SAML authentication in the Select Authentication Profile field, select a SAML profile to associate with the authentication profile. Click + Authenticator Profile to add a new SAML profile. For more information, see Configure SAML Profiles.
- Versa IDP—Use the authentication and user credentials that are stored on the local server.
For more information, see Configure a Secure Access Service (Remote Access VPN) Template.
Note: You can configure VSA users on the Users menu in the left menu bar. You must select VSPA/(RAC/RAS). For more information, see Manage Users.
Upload Public Certificates
You must upload the public certificates on an activated license. Before you upload a certificate, you must upload a key file with the extension .key.
The key file, certificate file, and CA chain file that you upload to the license must have the same name as the remote access VPN device FQDN. For example, if the remote access VPN FQDN is blrgw1.versa-networks.com, the filenames must be as follows:
- Key filename—blrgw1.versa-networks.com.key
- Certificate filename—blrgw1.versa-networks.com.crt
- CA chain filename—ca.blrgw1.versa-networks.com.crt (The CA chain filename is a combination of root CA and intermediate CA)
To upload a key file:
- Click Inventory in the left menu bar to open the Inventory dashboard.
- Locate the license in the grid, and then click the 3-dot icon in the Action column to display available actions.

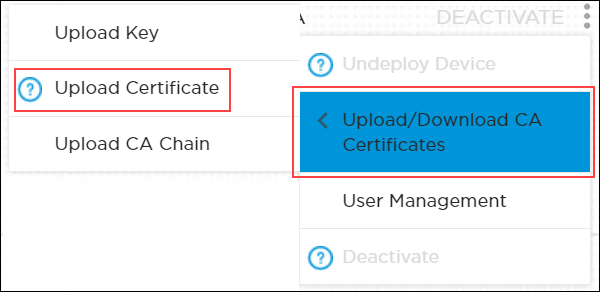
- Click Upload/Download CA Certificates and then click Upload Key.

- In the Add Key popup window, enter the following information.

- Enter a key name and password.
- Click Browse file to select the key file to upload. The file must be in .key format.
- Click System Key to store the key file at system level for remote access VPN. Selecting this option is mandatory. Note that you must select System Key after you upload the key file.
- Click Add.
- Click Upload/Download CA Certificates, and then click Upload Certificate.

- In the Add CA Certificate popup window, enter the following information.

- Enter a certificate name.
- Select the key file name.
- Click Browse file to select the CA certificate file to upload. The file must be in .crt, .cer, or .pem format.
- Click System Certificate store the certificate file at system level for remote access VPN. Selecting this option is mandatory. Note that you must select System Certificate after you upload the certificate file.
- Click Add. The certificate file is displayed.
- Click the
 icon to download the file.
- Click Upload/Download CA Certificates and then click Upload CA Chain.

- In the Add CA Chain popup window, enter the following information.

- Enter a CA chain name.
- Click Browse file to select the CA chain file to upload. The file must be in .crt format.
- Click System CA Chain to store the CA chain file at system level for remote access VPN. Selecting this option is mandatory. Note that you must select System CA Chain after you upload the CA chain file.
- Click Add.
Configure IPsec Tunnel Address Pool
To configure an IPsec tunnel address pool on WAN interfaces:
- Click Configure in the left menu bar to open the Configure dashboard.
- Hover over the license in the honeycomb and click Configure to open the site information window.
- Select the Remote Access VPN > IPsec Tunnel Address Pool tab, and enter information for the following fields.

Field Description Start Address (Required) Enter the lowest IP address in the pool assigned to the VSA client. End Address Automatically assigned based on the lowest address. Netmask Automatically assigned based on the lowest address. - Click Publish.
Enable or Create Firewall Rules for Remote Access VPN
Versa Portal is preconfigured with default firewall rules for remote access VPN. You cannot edit or delete a system-generated default rule. However, you can disable a default rule and reorder a default rule to change its priority.
You can also add a new firewall rule. To create a new firewall rule, see Configure Security.
The default firewall rule used for remote access VPN is VSIA-VSPA-Rule, which you view by clicking Security > Security Policy > Firewall Rules. This rule allows remote client as the ingress zone for the traffic coming from VSA clients.

Register and Connect a Versa Secure Access Client
To register and connect a Versa secure access client on an Android, a MacOS, or a Windows device:
- Download and install the VSA client application on your device.
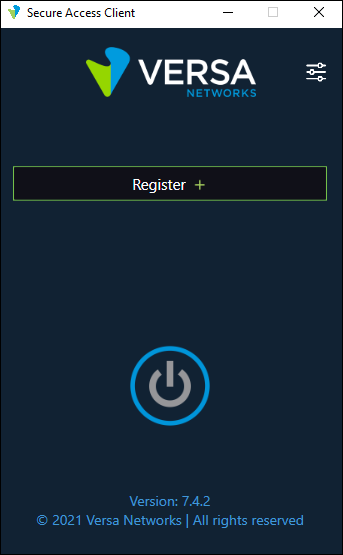
- Open the Secure Access Client, and click Register.

- Enter the information you received in email in the following fields:
- Fully qualified domain name (FQDN) or IP address of the portal.
Note that, for Windows, IP address is currently not supported. If you use IP address for Windows, ensure that the server certificate IP address is included the Common Name or Subject Alternative Name (SAN) property. Else, the https connection fails and so does the client registration. You can also add the host entry with the required FQDN and use this FQDN the instead of IP address. - Name for the enterprise
- User ID

- Fully qualified domain name (FQDN) or IP address of the portal.
- Click Submit to submit the registration.
- When prompted, enter your password.

- Click Submit.
To connect to a Versa secure access client after you register the client, from the Versa secure access client home screen, click the Power icon to connect to the server.

The following screen displays that the Versa secure access client is connected.

