Configure Threat Intelligence from VMS
![]() For supported software information, click here.
For supported software information, click here.
Threat intelligence enhances your organization's security posture by providing real-time, actionable insights into potential threats. It helps you identify, track, and mitigate cyber threats proactively.
You enable the threat intelligence microservice from Versa Messaging Service (VMS) and configure it to receive threat feeds from external sources. You can configure different threat feeds for each tenant, using criteria such as IP address, IP address combined with a port, domain name, and URL. You can configure each tenant for preferred threat feed categories and use these in access policy rules to filter traffic.
When the threat intelligence microservice receives a threat feed, it validates the data, removes any invalid entries, and stores the valid entries in a local database. If a database exists for the downloaded feed, threat intelligence compares the new feed with the existing entries in the database and adds new entries or deletes outdated ones. VMS then sends the delta threat feed to Versa Operating SystemTM (VOSTM) devices.
To receive threat feeds, you activate threat intelligence for the VMS connector of your tenant, and then enable relevant threat intelligence feeds.
Enable and Configure Threat Intelligence
To enable and configure threat intelligence for a tenant:
- In Director view, select the Administration tab in the top menu bar.
- Select Connectors > VMS in the left menu bar.
- To add a VMS connector, click + Add. To update a connector, select an existing one. The Configure VMS Connection configuration wizard displays.
- Add or update the required information in the VMS Connection and VMS Cluster screens. For more information, see Configure a VMS Connector in Install and Configure VMS.
- Select step 3, Tenants and Services, in the top menu bar.

- Select the tenant or tenants for which you want to enable threat intelligence. Click Select All to select all tenants. Selected tenants display in the Tenant Selected section. For example:
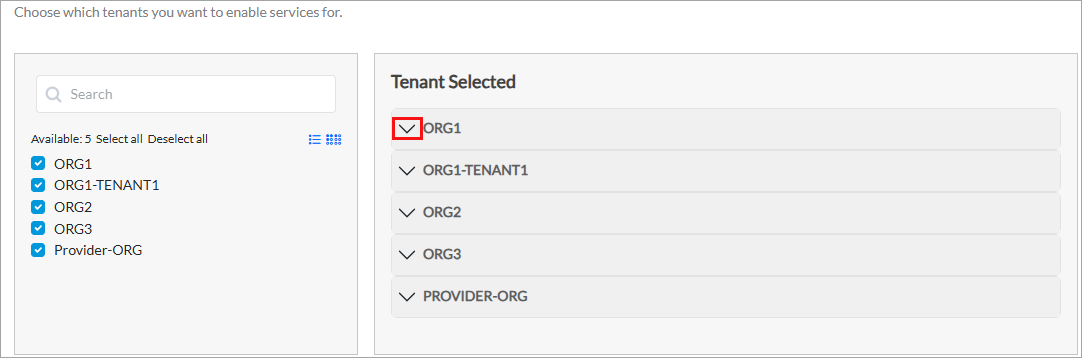
Note that to clear a tenant selection for an existing VMS connector, you must first disable the VMS services on the VOS devices for that tenant. - From the Tenant Selected section, click the down arrow of the tenant for which you want to enable threat intelligence. The list of services displays, as shown below.
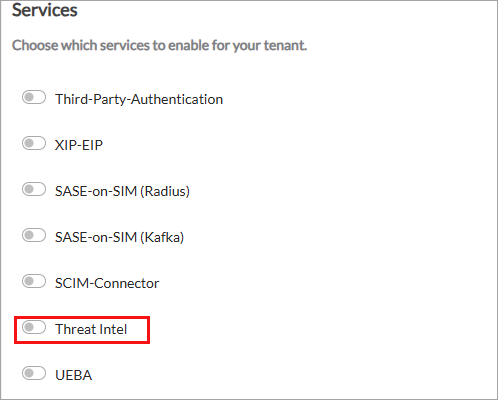
- Click the Threat Intel toggle to enable threat intelligence, and then enter information for the following fields.
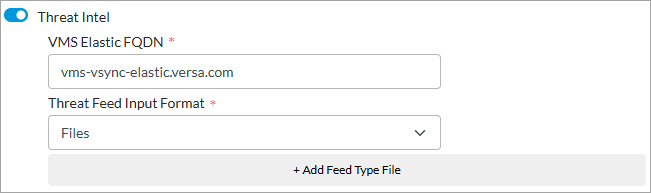
Field Description VMS Elastic FQDN Enter the FQDN of the VMS host to which the external server connects to share threat intelligence data. Threat Feed Input Format Select the format in which to share or save threat feeds. Currently, the Files option is supported. - To add threat feed categories, click + Add Feed Type File, and then enter information for the following fields.
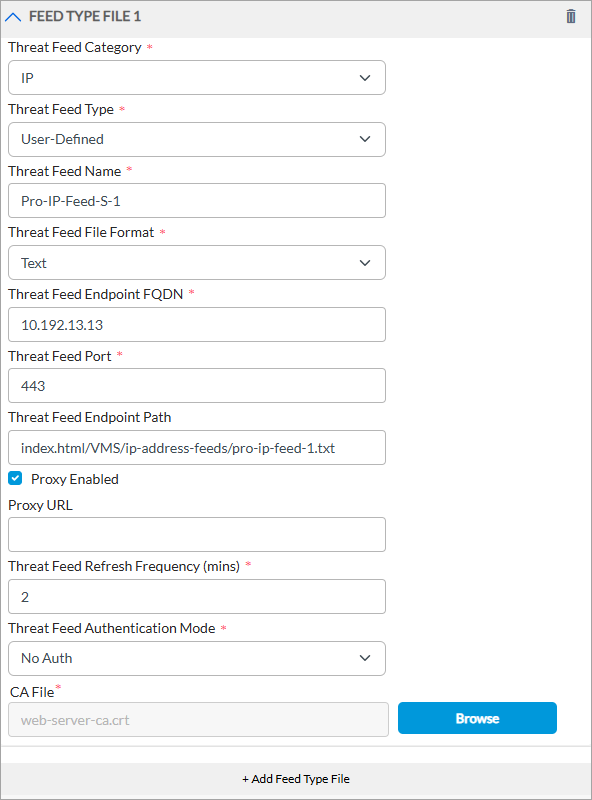
Field Description Threat Feed Category
Select the threat feed category from these options:
- IP and Port—These threat feeds include combinations of IP addresses and specific ports, IP address range, and port range associated with malicious activity. For example:
- 11.0.0.1|11001
- 12.0.0.1|12000-12009
- 13.0.0.1-13.0.0.100|1300
- 14.0.0.1-14.0.0.100|14000-14009
- 15.0.0.1-15.0.0.100
- IP—These feeds contain standalone IP addresses and IP addresses with subnet mask that have been observed to participate in malicious activities. For example:
- 1.0.1.0/24
- 1.0.2.0/24
- 8.8.8.8.
- FQDNs—These feeds include domain names associated with malicious infrastructure. For example:
- google.com
- cnn.com.
- URL Patterns—These feeds consist of specific URL paths to match URLs that fall within a defined pattern. This otpion supports hyperscan regex patterns. For example:
- cnn.com
- bbc.com
- ^(www|maps|news)?\.?google.com
- URL Strings—These feeds consist of URL strings used to perform an exact match against the specified URL. For example, amazon.in/gift-card-store/b/?ie=UTF8&node=3704982031&ref_=nav_cs_gcflipkart.com/travel/flights?otracker=nmenu_Flights.
Threat Feed Type
Select the type of threat feed. For example, user-defined. Threat Feed Name
Enter a name for the threat feed. Threat Feed File Format
Select a file format for the feed, such as Text. Threat Feed Endpoint FQDN
Enter the FQDN of the external threat feed server to which VMS connects. Threat Feed Port
Enter the port number of the external threat feed server. Threat Feed Endpoint Path
Enter the path of the threat feed server from which VMS downloads threat feed data. Proxy Enabled (For Release 5.2.2 (Service Release dated 2026-03-04) and later) Click to enable web proxy, if the external threat server is reachable via proxy from VMS. This enables the Proxy URL field. Proxy URL (For Release 5.2.2 (Service Release dated 2026-03-04) and later) Enter the web proxy URL for the external threat server for VMS to connect. Note that this field is enabled only when you select Proxy Enabled. Threat Feed Refresh Frequency (mins)
Enter the frequency, in minutes, to refresh the threat feed.
Default: 5 minutes.Threat Feed Authentication Mode
Select the authentication mode for the feed:
- No Authentication
- API Authentication Header
- Password Authentication
CA File Upload a CA certificate to connect to the threat feed server. - IP and Port—These threat feeds include combinations of IP addresses and specific ports, IP address range, and port range associated with malicious activity. For example:
- Perform the remaining steps as described in Configure a VMS Connector in Install and Configure VMS to complete the configuration.
Use Threat Feeds in Access Policies
You associate threat feeds for the following categories with access polices, as follows:
- IP address—Configure External Dynamic address group and associate with access policy.
- URL patterns—Configure Custom URL category and associate with access policy or URL filtering profile.
- DNS filtering feeds—Configure DNS filtering feed and associate this feed with a DNS profile, and then apply the profile in an access policy rule.
VOS automatically enforces IP-Port threat feeds on traffic that matches the destination IP address and port, without requiring any access policy association. You can enforce traffic control using feed rules from the Edit Threat Intelligence IP Port window. For more information, see Edit Threat Intelligence IP Port below.
Associate IP Address Threat Feeds with an NGFW Access Policy Rule
To associate IP address threat feeds with an NGFW access policy:
- Configure an address group, and then add the IP address threat feed type to that group:
- In Director view > Appliance view, select the Configuration tab in the top menu bar.
- Select Objects & Connectors > Objects > Address Groups. The main pane displays the configured address group objects.
- Select an existing address object or click + Add. The Add/Edit Address Group window displays.

- For the Type field, select External Dynamic Address. The Kind field displays.
- For the Kind field, select one of the following:
- Exclusive—Specific to a tenant.
- Shared—Shared address group configured in a parent tenant and can be shared with tenants.
- From the User-defined Address Feeds field, click the
 icon, and then enter the name of IP threat feed you entered in the Threat Feed Name while configuring a VMS connector. For more information, see Step 7 in Enable and Configure Threat Intelligence above.
 - For information about configuring other parameters, see Configure Address Group Objects.
- Click OK.
- To use the same address group in other tenants, add an address group for the provider organization as shown in Step 1, and for the Kind field, select Shared. To add this address group in other tenants:
- In Director view > Appliance view, select the Configuration tab in the top menu bar.
- Select Others > Organization > Limits in the left menu bar. The main pane displays the organizations associated with the Controller node.
- Click an organization name in the main pane for which you want to add the address group from the provider organization. The Edit Organization Limit popup window displays.

- Select the Resources tab.
- Under Available Address Groups, click the icon. All Shared address groups of the provider organization display. Select the shared address group or groups.
- For information about configuring other parameters, see Configure Organization Limits.
- To associate an address group for IP threat feeds with an NGFW policy rule:
- Select the Configuration tab in the top menu bar.
- Select Services > Next Gen Firewall > Security > Policies in the left menu bar, and select the Rules tab.
- Select an existing rule or click + Add to add one. The Add/Edit Rule window displays.

- Select the Destination tab.
- Under Destination Address, Click the icon, and then select an address group (shared or exclusive) that you added in Step 1, above.
- For configuring other parameters, see Configure Access Policy Rules (ACL Rules).
Associate URL Patterns Threat Feeds with an NGFW Access Policy Rule or URL Filtering Profile
- Configure a URL category, and then add the URL Patterns threat feed type to that category:
- In Director view > Appliance view, select the Configuration tab in the top menu bar.
- Select Objects & Connectors > Objects > Custom Objects > URL Categories in the left menu bar.
- Select an existing category or click + Add. The Add/Edit URL Category window displays.

- In the General tab, from the Kind field, select one of the following:
- Exclusive—Specific to a tenant.
- Shared—Shared URL category configured in a parent tenant and can be shared with tenants.
- From the User-defined Feeds field, click the icon, and then enter the name of URL Pattern feed you entered in the Threat Feed Name while configuring a VMS connector. For more information, see Step 7 in Enable and Configure Threat Intelligence, above.
- For information about configuring other parameters, see Configure Custom URL Categories.
- Click OK.
- To use the same URL category in other tenants, add the URL category for the provider organization as shown in Step 1, and from the Kind field, select Shared. To add this category in other tenants:
- In Director view > Appliance view, select the Configuration tab in the top menu bar.
- Select Others > Organization > Limits in the left menu bar. The main pane displays the organizations.
- Click an organization name in the main pane for which you want to add the address group from the provider organization. The Edit Organization Limit popup window displays.

- Select the Resources tab.
- Under Available URL Categories, click the icon. All Shared URL categories of the provider organization display. Select the the required URL categories.
- For information about configuring other parameters, see Configure Organization Limits.
- To associate a URL category for URL Patterns feeds with an NGFW policy rule:
- Select the Configuration tab in the top menu bar.
- Select Services > Next Gen Firewall > Security > Policies in the left menu bar, and then select the Rules tab.
- Select an existing rule or click + Add to add one. The Add/Edit Rule window displays.

- Select the Applications/URL tab.
- Under URL Category List, click the icon, and then select a URL category that you added in Step 1, above.
- For configuring other parameters, see Configure Access Policy Rules (ACL Rules).
- To associate URL Patterns threat feeds with a URL filtering Profile:
- In Director view > Appliance view, select the Configuration tab in the top menu bar.
- Select Services > Next Gen Firewall > Security > Profiles > URL Filtering in the left menu bar.
- Select an existing URL filtering profile or click the icon add to add one. The Add/Edit URL Filter window displays.

- Select the Category-Based Action tab, and click the icon to add actions for categories. The Add Category Based Action window displays.
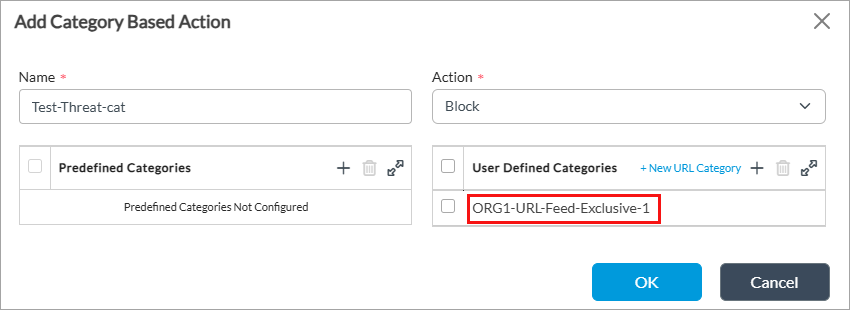
- Enter a name and select the action (here, Block).
- Under User Defined Categories, select the URL category you added in the steps to configure a URL category (here, ORG1-URL-Feed-Exclusive-1).
- For configuring other parameters, see Configure a URL-Filtering Profile.
- Click OK.
Configure DNS Filtering Feeds and Apply in a DNS Profile for Access Policy Rule
Dynamic threat intelligence for Domain Name System (DNS) security provides real-time, proactive protection by seamlessly integrating VOS with threat Intelligence feeds that automatically update the knowledge base of bad actors such as phishing, ransomware, or botnet domains.
To use DNS filtering feeds in a DNS profile, you create DNS filtering feeds and associate the feeds with the DNS profile. You then apply the DNS profile to an access policy rule. This allows you to configure how the network responds to threats. For example, using custom allow or block lists, you can configure the policy to silently drop the connection, send an alert, or redirect the user to a safe sinkhole page.
Add a DNS Filtering Feed
- In Director view:
- Select the Configuration tab in the top menu bar.
- Select Devices > Devices in the horizontal menu bar.
- Select an organization in the left menu bar.
- Select the device in the main pane. The view changes to Appliance view.
- Select the Configuration tab in the top menu bar.
- Select Services > Next-Gen Firewall > Security > Security Settings > DNS Filtering in the left menu bar.

- Click + Add. The Add DNS Filtering Feed window displays. Enter information for the following fields.

- Enter a name for the DNS filtering feed (here, DNS-Feed-Group-1).
- In the User Defined Feed List field, select an FQDN threat feed that you configured while configuring a VMS connector, and then click the
 icon to add it. For more information, see Enable and Configure Threat Intelligence, above.
- Click OK.
Associate DNS Filtering Threat Feeds to a DNS Profile
- In Director view:
- Select the Configuration tab in the top menu bar.
- Select Devices > Devices in the horizontal menu bar.
- Select an organization in the left menu bar.
- Select the device in the main pane. The view changes to Appliance view.
- Select the Configuration tab in the top menu bar.
- Select Services > Next-Gen Firewall > Security > Profiles > DNS Filtering in the left menu bar.
- Click the + Add icon or select an existing DNS profile (here, DNS-Feed-Profile-1). The Add/Edit DNS Filter window displays.
- Select the Reputation-Based Actions tab, and then enter information for the following fields.

- In the DNS Feeds section, click the + Add icon.
- In the DNS Feeds popup window, enter information for the following fields.

Field Description Name Enter a name for the DNS feed. Feed Groups Select a feed group that you added in Add a DNS Filtering Feed, above (here, DNS-Feed-Group-1). Action Select an action to take for the DNS feed:
- Alert—Allow the DNS response and generate an entry in the DNS filtering log in Versa Analytics.
- Allow—Allow the DNS response and do not generate an entry in the DNS filtering log in Versa Analytics.
- Block—Block the DNS response and generate an entry in the DNS filtering log in Versa Analytics. No response page is displayed, and the user cannot continue with the website.
- Drop Packet—Have the browser wait for a response from the DNS server and then drop the packet. It is not possible to determine whether the packet was dropped because of a non-responsive DNS server or because a firewall blocked access to the website.
- Drop Session—Have the browser wait for a response from the server and then drop the session. It is not possible to determine whether the session was dropped because of a non-responsive DNS server or because a firewall blocked access to the website
- Reject—Send an ICMP unreachable message back to the client.
- Sinkhole—Return a false IP address to the URL, thus blocking a DNS sinkhole. A DNS sinkhole spoofs DNS servers to prevent the resolution of the hostnames associated with URLs. This action can help you identify infected hosts in a network if a firewall is unable to find the original source IP address of the DNS request sender. Sinkhole malware DNS queries create responses to the client host queries directed at malicious domains and try to connect to a sinkhole IP address instead of connecting to malicious domains. You can check the traffic logs to identify infected hosts.
- For information about configuring other parameters, see Create a DNS-Filtering Profile.
- Click OK.
Apply DNS Filtering Profile in an Access Policy Rule
- In Director view:
- Select the Administration tab in the top menu bar.
- Select Appliances in the left menu bar.
- Select a device name in the main panel. The view changes to Appliance view.
- Select the Configuration tab in the top menu bar.
- Select Services > Next-Gen Firewall > Security > Policies in the left menu bar.
- Select the Rules tab, and then select an access policy rule. The Edit Rule window displays.
- Select the Enforce tab.
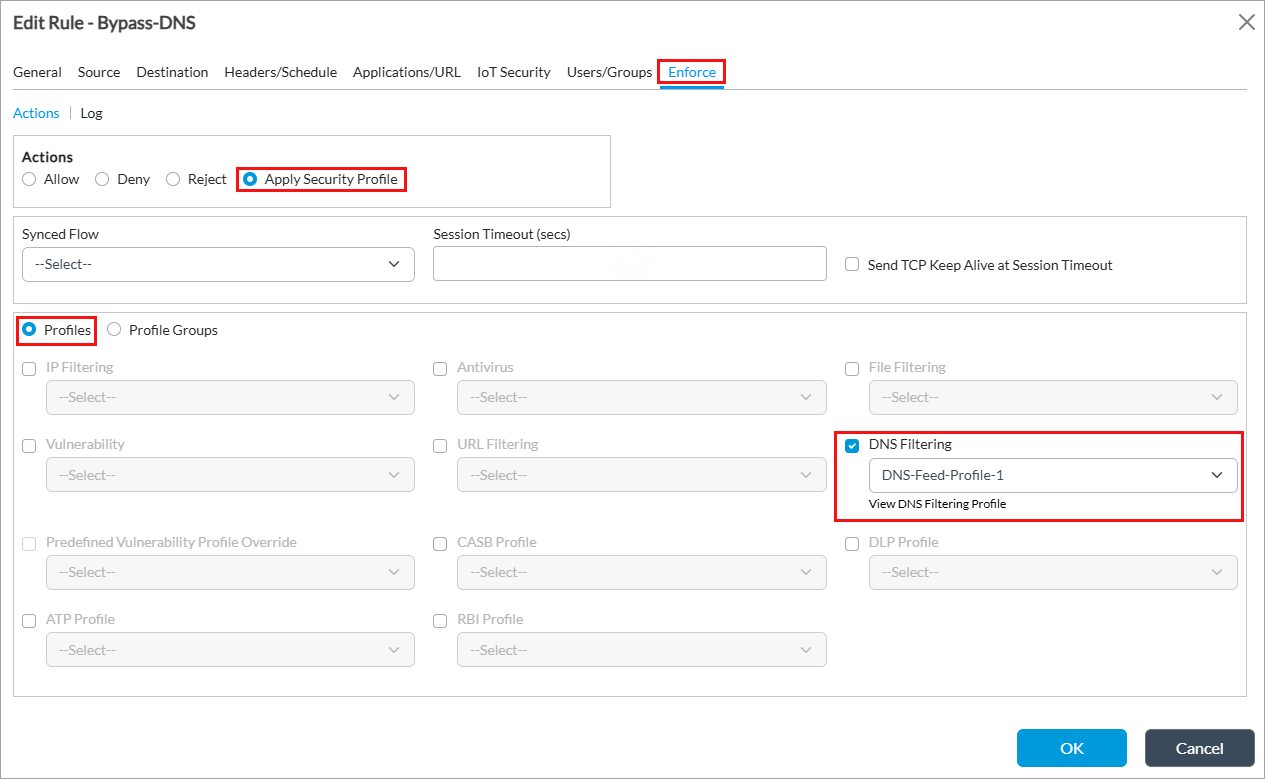
- In the Actions group of fields, click Apply Security Profile.
- Click Profiles.
- Click DNS Filtering and select the DNS-filtering profile (here, DNS-Feed-Profile-1) that you associated with DNS filtering feeds in Associate DNS Filtering Threat Feeds to a DNS Profile, above.
- For information about configuring other parameters, see Apply a DNS-Filtering Profile in an Access Policy.
- Click OK.
Edit Threat Intelligence IP Port Settings
The threat intelligence IP port enables VOS devices to receive and enforce dynamic threat feeds based on IP address and port range from VMS. It processes incoming feeds in real time.
You can configure feed rules for the threat intelligence IP port to control traffic flow. If you configure a feed rule, and traffic matches the rule criteria, the action in the rule is applied (allow, drop, or skip). If you do not configure a feed rule, the default action is applied, which is to drop all IP port threat feeds received from VMS.
To edit the threat intelligence IP port settings:
- In Director view:
- Select the Configuration tab in the top menu bar.
- Select Devices > Devices in the horizontal menu bar.
- Select an organization in the left menu bar.
- Select the device in the main pane. The view changes to Appliance view.
- Select the Configuration tab in the top menu bar.
- Select Services > Next-Gen Firewall > Security > Security Settings > Threat Intelligence in the left menu bar.

- Click the
 Edit icon. The Edit Threat Intelligence IP Port window displays.
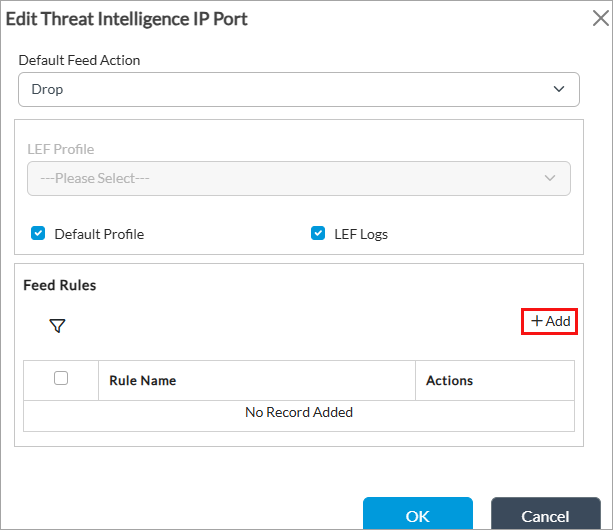
- Enter information for the following fields.
Field Description Default Feed Action Select the action to take on the associated IP port threat feeds feeds:
- Allow
- Drop
- Skip
Default: Drop
LEF Profile (Group of Fields) Select the LEF profile to use to log the actions related to DNS filtering. Either select a LEF profile in this field, or click Default Profile. For information about applying a LEF profile to a feature or service, see Apply Log Export Functionality. - Default Profile
Click to use the default LEF profile. For information about configuring a default LEF profile, see Configure Log Export Functionality. - LEF Logs
Click to enable LEF log collection. - In the Feed Rules section, click + Add to configure feed rules. The Add Rule window displays.
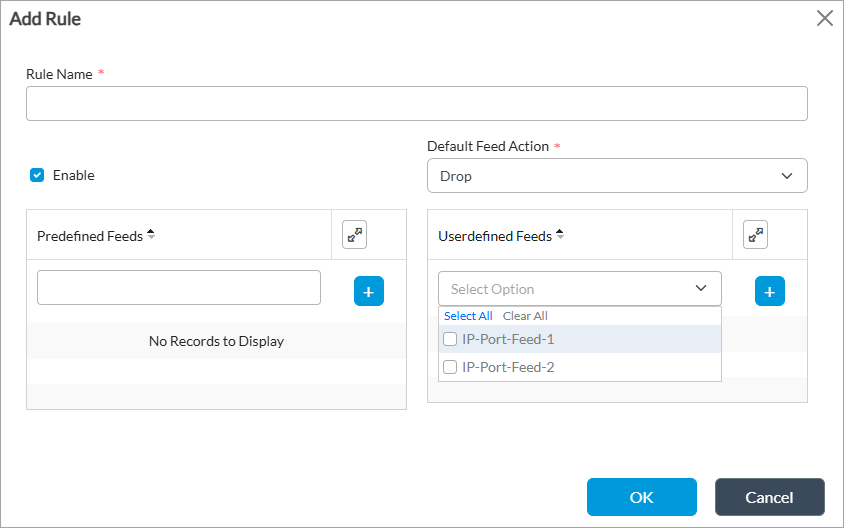
Field Description Rule Name Enter a name for the rule. Enable Click to enable the rule. This enables the Default Feed Action field. Default Feed Action Select an action to take on IP port threat feeds:
- Drop
- Allow
User-defined Feeds Select an IP and port threat feed that you configured while configuring a VMS connector, and click the icon. For more information, see Enable and Configure Threat Intelligence, above. - Click OK.
Monitor IP Port Threat Feeds
You can monitor IP port threat feed statistics, search entries, view processing logs, and display feed processing summaries for troubleshooting and verification.
To monitor IP port threat feeds, use the following CLI commands:
- To display VMS processing statistics for each feed, such as messages received, add/delete counts, and failures:
- show orgs org-services <organization-name> security threat-intelligence ip-port-feed stats
- To display recent IP port feed processing logs with optional filters (feed-name, log-level, and limit):
- request orgs org-services <organization-name> security threat-intelligence ip-port-feed logs [feed-name <name>] [log-level <info|error|debug>] [limit <n>] [event-type <type>] [seq-num <number>]
- To display a summary of recent feed processing results such as add, delete, failure, and time taken:
- request orgs org-services <organization-name> security threat-intelligence ip-port-feed summary [feed-name <name>] [limit <n>]
- To search for a specific IP address and port range entry within a named feed:
- request orgs org-services <organization-name> security threat-intelligence ip-port-feed search feed-name <name> ip-port <ip-address,port-range>
Enable Streaming Feeds for Threat Intelligence
You can enable the VOS device (branch) to receive threat intelligence streaming feeds from the VMS server. To do this, you associate a messaging server profile with the threat intelligence microservice that you configured in Enable and Configure Threat Intelligence, above. For more information about VMS messaging server profiles, see Configure a Messaging Server Profile in Install and Configure VMS.
To enable streaming feeds for threat intelligence:
- In Director view:
- Select the Administration tab in the top menu bar.
- Select an Appliance in the left menu bar.
- Select a device name in the main panel. The view changes to Appliance view.
- Select the Configuration tab in the top menu bar.
- Select Others > Organization > Messaging Service > VMS Service in the left menu bar. You can enable streaming feeds for threat intelligence IP address, IP Port, FQDN, and URLs, as highlighted in the following screenshot.

- Click the
 Edit icon next to the threat intelligence category for which you want to enable streaming feeds. The Edit Threat Intel <category name> VMS Service popup window displays. For example, the screenshot below displays when you select Threat Intel IP Address. Note that the fields are the same for all the categories you select from the VMS Service screen.

- In the VMS Profile field, select a VMS server profile. For more information, see Configure a Messaging Server Profile in Install and Configure VMS.
- Click Enabled to enable the service.
- Click OK. For more information, see Enable Stream Feeds for VMS Services in Install and Configure VMS.
Monitor Threat Intelligence Statistics
You can monitor VMS threat intelligence statistics for threat intelligence categories such as IP address and port, IP address, FQDNs, and URL patterns. For more information, see Monitor Device Services.
To monitor threat intelligence services:
- Select the Administration tab in the top menu bar.
- Select Appliances in the left menu bar.
- Select a device name in the main panel. The view changes to Appliance view.
- Select the Monitor tab in the top menu bar.
- Select an organization, and then click Devices.
- Select a device, and then click Services > VMS. The threat intelligence statistics display, as shown below.

- Click View in the Current column to view current statistics for the server, such as the number of messages received, dispatched, dropped, connection status and connect time, and the last sequence number. For example:

- Click View in the Total column to view total statistics for the server, such as the number of messages received, dispatched, dropped, and failovers detected. For example:

Display Threat Intelligence Logs
- In Director view, select the Analytics tab from the top menu bar. The view changes to Analytics view.
- Select Logs > Threat Intelligence in the left menu bar.

- Select the organization, tenant, and the period for which to display threat intelligence analytics logs. The following screen displays.

- Select the Exception tab to view exception logs for threat intelligence. In the example below, download has failed and action taken is Deny.

Supported Software Information
VMS Releases 5.2.2 and later support all content described in this article, except:
- Release 5.2.2 (Service Release dated 2026-03-04) adds support web proxy.
VOS Releases 22.1.4 and later support all content described in this article, except:
- VOS Release 22.1.4 (Service Release dated 2026-02-24) adds support for DNS filtering feeds and threat intelligence IP port.
Note: The Threat Intelligence feature had been partially provided by the VSync tool but is now provided by VMS, making the VSync tool obsolete and incompatible with the following versions of VOS software:
| Service | VMS | VOS | Director | Analytics |
|---|---|---|---|---|
| Threat Intelligence | Release 5.2.2 | Release 22.1.4 (Service Release dated 2025-06-27) and later | Release 22.1.4 (Service Release dated 2025-06-27) and later | Release 22.1.4 (Service Release dated 2025-06-27) and later |