Enable and Configure VMS Services
![]() For supported software information, click here.
For supported software information, click here.
You can enable and configure Versa Messaging Service (VMS) microservices such as:
- (Releases 5.1.1 and later) SASE for SIM—Allows organizations to deploy SASE in a flexible manner, requiring minimal infrastructure changes. It seamlessly integrates into the existing networks of mobile network operators (MNOs) by adding a SASE domain. For more information, see Enable and Configure SASE for SIM, below.
- (Releases 5.2.1 and later) SCIM—A Versa SASE tenant can configure system cross-domain identity management (SCIM) to notify the Versa SASE gateways and the Versa advanced security cloud (ASC) about changes to users and groups in the tenant’s identity provider (IdP). For more information, see Enable and Configure SCIM, below.
- (Releases 5.1.1 and later) Third-party authentication—Verify user identity without requiring any authentication action. Secure SD-WAN CPE devices use VMS for third-party authentication, eliminating the need for users to authenticate themselves through a captive portal. For more information, see Enable and Configure Third-Party Authentication, below.
- (Releases 5.2.1 and later) UEBA—Versa user and entity behavior analytics (UEBA) is a cloud service that provides a layer of security that enables your organization to monitor, detect, and respond to suspicious behaviors across your network infrastructure. For more information, see Enable and Configure UEBA, below.
- (Releases 5.2.1 and later) VOS Aggregator—The VMS VOS aggregator service receives the published aggregator data from a VOS device and distributes it to other connected VOS devices. For more information, see Enable and Configure VOS Aggregator, below.
- (Releases 5.1.1 and later) XIP EIP—Converts Palo Alto Networks host information profile (HIP) reports into the VOS endpoint information profile (EIP) report format. You can configure VOS gateways to subscribe to XIP EIP, and you can then use these reports to enforce security policies. For more information, see Enable and Configure XIP-EIP, below.
- (Releases 5.2.2 and later) Threat intelligence—Receive threat feeds from external sources to identify, track, and mitigate cyber threats proactively. For more information, see Configure Threat Intelligence from VMS.
This article also describes how to configure a messaging server profile for the VOS device to communicate with the VMS and to use this profile to enable VMS services to send and receive stream feeds from the VMS messaging server.
Enable and Configure SASE for SIM
SASE on SIM is a clientless solution that helps secure SIM-enabled IoT and user devices connected over 2G, 3G, 4G, and 5G networks. VOS SASE for SIM provides traffic segregation by using Versa Messaging Service (VMS) to identify tenants. VMS integrates with the Versa Concerto and Director orchestration provisioning systems and with Versa Analytics to provide private mobility services. Versa SASE for SIM supports RADIUS and Kafka. For more information about configuring SASE for SIM for Concerto, see Configure SASE for SIM.
To enable and configure SASE for SIM (RADIUS and/or Kafka) service:
- In Director view, select the Administration tab in the top menu bar.
- Select Connectors > VMS Connector in the left menu bar.
- To add a VMS connector click + Add and to update a VMS connector, select an existing one. The Configure VMS Connection configuration wizard displays.
- Add or update the required information in the VMS Connection and VMS Cluster screens. For more information, see Configure a VMS Connector.
- Select Tenants and Services in the top menu bar, and then enter information for the following fields.
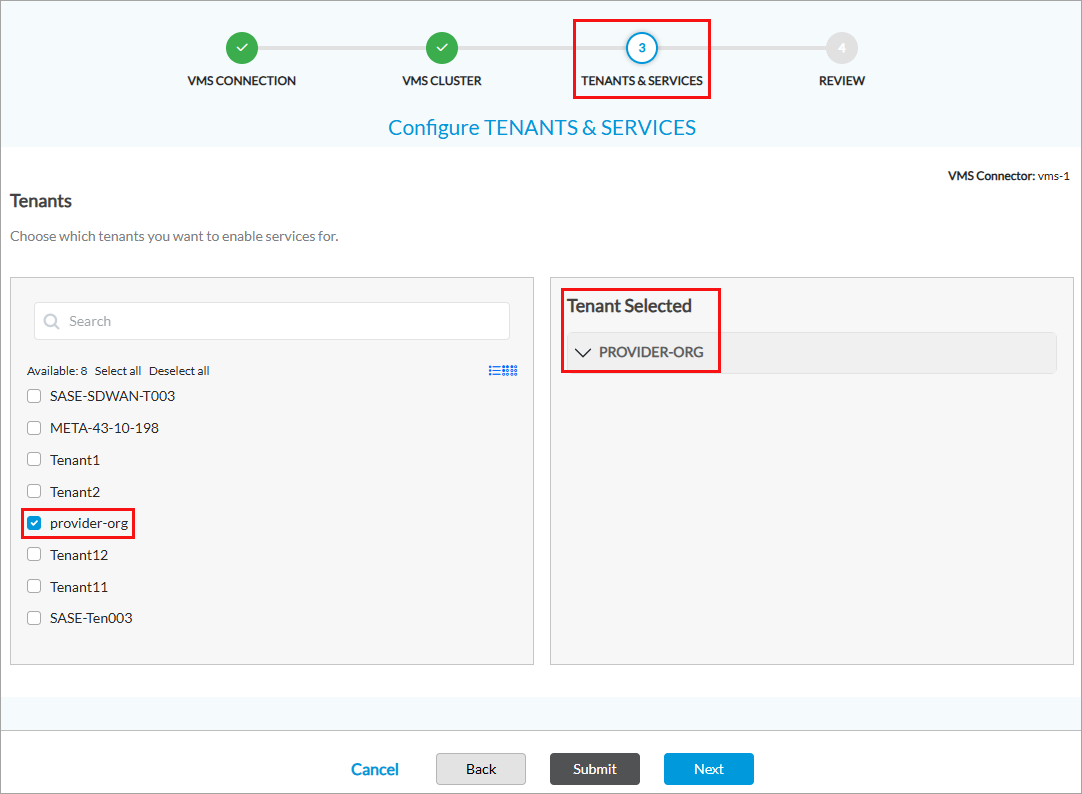
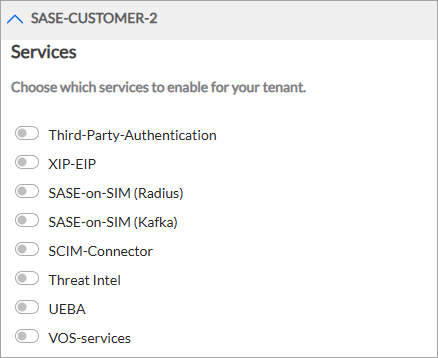
- Select the tenant for which you want to enable SASE for SIM. The list of services displays when you click the down arrow for the tenant on the right pane.
- Click the SASE on SIM (RADIUS) toggle to enable SASE on SIM for RADIUS and enter information for the following fields.

Field Description VMS Elastic IP/FQDN
Enter the FQDN of VMS host to which the accounting server sends RADIUS accounting events. This value is same as the elastic FQDN of the VMS cluster. Default Routing Instance
Enter the IP address of the routing instance on the Versa Cloud Gateway (VCG) or SASE gateway (VOS device) to which the aggregator forwards the ingress traffic. RADIUS Server Password
Enter the password for the RADIUS server. Number of Missed Interims
Enter the total number of times an interim message can be missed before the entry is considered stale and is removed from the VMS and VOS. devices. A combination of this value and the keepalive interval is used to remove a user entry from the system. Keepalive Interval for Interim Updates
Enter the interval, in seconds, between two interim messages. For AAA, the range is 60 through 3600 seconds. For RADIUS, this is a user-defined value. The combination of this value and value in the Number of Misses Interims field is used to remove a user entry from the system.
- Click the SASE on SIM (Kafka) toggle to enable SASE on SIM for Kafka and enter information for the following fields.
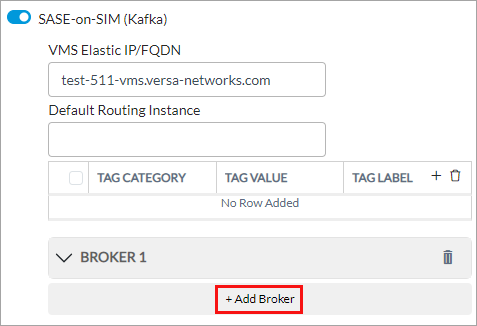
Field Description - VMS Elastic IP/FQDN
Enter the FQDN of VMS host to which the Kafka producer connects to VMS server. This value is same as the elastic FQDN of the VMS cluster. - Default Routing Instance
Select the default routing instance on the VCG or SASE gateway (VOS device) to which the aggregator forwards the ingress traffic. Tags Enter information that describes all the services. - Tag Category
Select a category for the third-part service description:
- Active Directory Domain Name
- Name
- Region
- Custom
- Tag Value
Enter a value that corresponds to the value you select in the Tag Category field:
- Active Directory Domain Name—Enter the AD domain name in which the VMS server is located.
- Name—Enter a name for the VMS server.
- Region—Enter the region in which the VMS server is located.
- Custom—Enter a custom value.
- Tag Label
Enter a text string that describes the third-party authentication service. - Click Submit to add or update the VMS connector.
After you enable SASE for SIM, configure a server profile to connect the gateway to VMS and then enable stream feeds for SASE for SIM.
Configure SASE for SIM User Groups and Profiles from Director
You configure SASE on SIM (or SASE for SIM) user groups from Versa Director to manage groups of mobile devices in a private mobile network. You then add profiles and associate groups with profiles. To configure a messaging server profile and to enable stream feeds for a VMS service, see Configure VMS Messaging Service.
Configure User Groups
- In Director view, select the Administration tab in the top menu bar.
- Select VMS Services > SASE-on-SIM in the left menu bar.

- Select the Groups tab, and then click + Add. In the Add Groups popup window, enter information for the following fields.

Field Description Group Name
Enter a name for the user group.
Value: Text string from 1 through 32 characters.
Tenant Name Select a Tenant to which the user group belongs. Solution Tier Select the product solution tier:
- VSA Essentials (Versa Secure Access)—Provides secure access to the internet for the service provider user.
- SWG (secure web gateway)—Provides secure access to private enterprise resources for the service provider user.
- Bundle—Provides secure access to the internet and private enterprise resources for the service provider user
Is Default Group Select to make this the default user group. Note than you can have only one default group for a tenant. - Click OK.
Configure User Profiles
- In Director view, select the Administration tab in the top menu bar.
- Select VMS Services > SASE-on-SIM in the left menu bar.
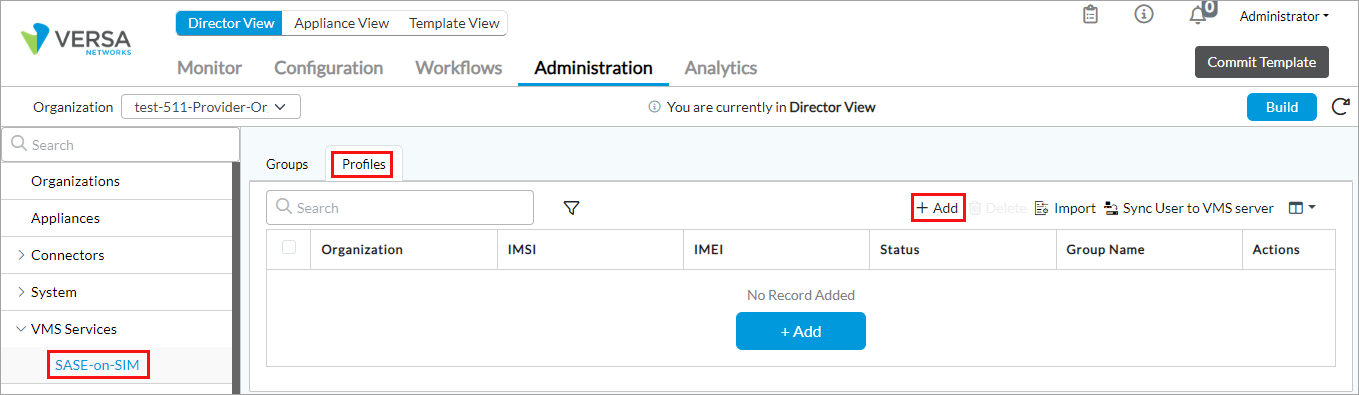
- Select the Profiles tab and click + Add. The Add Profiles popup windows displays.
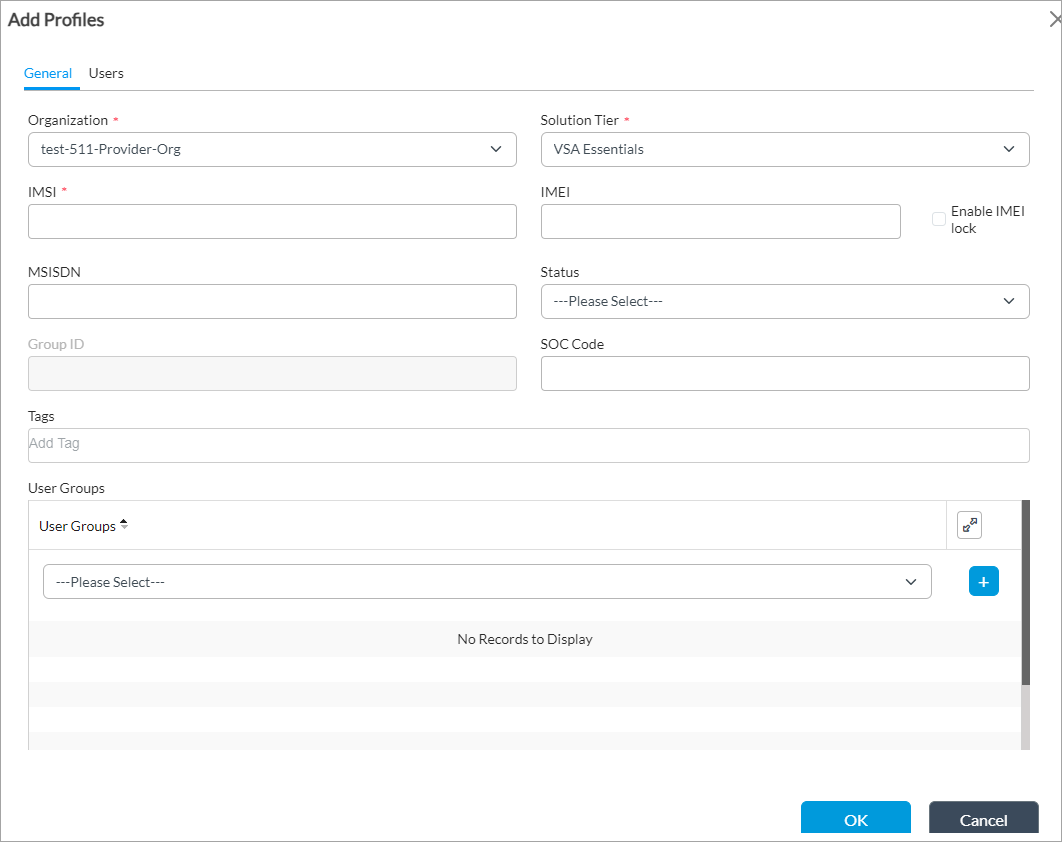
- Select the General tab, and then enter information for the following fields.
Field Description Tenant Name Select a Tenant to which the user group belongs. Solution Tier Select the product solution tier:
- VSA Essentials (Versa Secure Access)—Provides secure access to the internet for the service provider user.
- SWG (secure web gateway)—Provides secure access to private enterprise resources for the service provider user.
- Bundle—Provides secure access to the internet and private enterprise resources for the service provider user
IMSI Enter the international mobile subscriber identity (IMSI) to authorize devices in a network. IMEI Enter the 15-digit International Mobile Equipment Identity (IMEI) number of the device. MSISDN Enter the Mobile Station International Subscriber Directory Number (MSISDN), which is the phone number associated with a single SIM card and is the number to which you call or send an SMS message. Status Select the status:
- New
- Claimed
- Deployed
Group ID Displays the group identifier associated with the user groups you select from the User Groups field. SOC Code Enter the 12-bit System Operator Code (SOC) that identifies a service provider. A mobile station uses SOC along with System Identity (SID) to acquire or reject services offered by specific service providers. Tags Enter tags to identify the profile. Press Enter to add the tags. User Groups Select a user group to associate with the profile. For more information, see Configure User Groups, above. - Select the Users tab, and then enter information for the following fields.

Field Description Locale Enter the geographic location of the users. Custom Variables Enter user variables to associate with the profile. - Click OK.
Enable and Configure SCIM
You configure system cross-domain identity management (SCIM) service for the provider organization from Versa Director. This enables VMS and Concerto to connect to the SCIM microserver. Note that you must perform this configuration only on a provider organization. If required, you can add multiple VMS connectors for a provider organization and also enable SCIM for each connector. For more information about configuring SCIM for Concerto, see Provision SCIM Service on Versa SASE.
Note that you must enable SCIM service only for a provider organization and not for any other tenant.
To enable and configure SCIM service for a provider organization:
- In Director view, select the Administration tab in the top menu bar.
- Select Connectors > VMS Connector in the left menu bar.
- To add a VMS connector click + Add and to update a VMS connector, select an existing one. The Configure VMS Connection configuration wizard displays.
- Add or update the required information in the VMS Connection and VMS Cluster screens. For more information, see Configure a VMS Connector.
- Select Tenants and Services in the top menu bar, and then enter information for the following fields.
- Select the provider organization. The list of services displays when you click the down arrow for the provider organization on the right pane.

- Click the SCIM Connector toggle to enable SCIM and then enter information for the following fields.
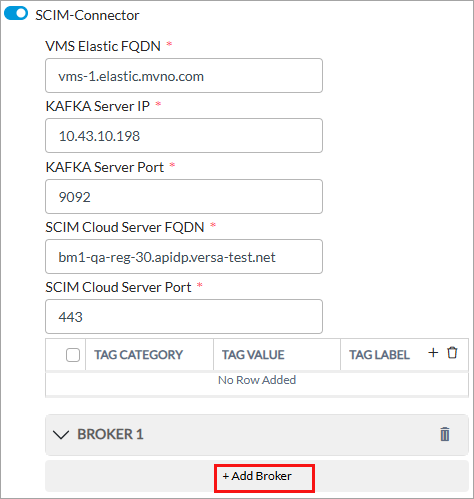
Field Description VMS Elastic FQDN
Enter the FQDN of the VMS host to which the Kafka producer connects to VMS server. This value is the same as the elastic FQDN of the VMS cluster. Kafka Server IP Enter the IP address of the Kafka server through which the SCIM microservice server connects to Concerto. This is the same IP address as the one you enter on the Create Kafka screen when you configure a Kafka connector. For more information, see Configure Kafka Connectors. Kafka Server Port Enter the Kafka server port number on which Concerto listens for connections. This must the same port number that you enter on the Create Kafka screen when you configure a Kafka connector. For more information, see Configure Kafka Connectors. SCIM Cloud Server FQDN Enter the FQDN of the SCIM microservice on ACS to which Concerto connects. When SCIM receives a request from a tenant in Concerto with the VMS IP address, it generates a URL that is a combination of this FQDN along with the tenant name. SCIM Cloud Server Port Enter the SCIM cloud server port number on which Concerto listens for connections.
Default: 443
Tags (Group of Fields) Tag fields are currently not supported. Broker (Group of Fields) Click + Add Broker and click the down arrow to enter information for the following fields.

- Topic Name
Enter the Kafka broker topic name that the broker node handles. - Group Name
(Optional) Enter a name for the group associated with the broker node. - Address
Enter the IP address or hostname of the broker node that VMS uses to connect to Concerto through Kafka broker. For example, 10.43.10.198. - Port
Enter the port number for the broker connection that VMS uses to connect to Concerto through Kafka broker. For example, 9092. - Certificate
Click this to use certificates for security. These are the certificates that you generate when you configure the VMS server. For more information, see Configure the Primary VMS Server Using Bash in Install and Configure VMS. Browse to upload the following certificates:
- CA File—Certificate Authority (CA) file to validate certificates.
- Cert File—Client certificate file.
- Key File—Client private key file.
- Click Submit to add or update the VMS connector.
After you enable SCIM, configure a server profile to connect the gateway to VMS and then enable stream feeds for SCIM. For more information, see Configure VMS Messaging Service below.
Enable and Configure Third-Party Authentication
You can use third-party authentication to verify user identity without requiring the user to perform any authentication action. When a secure SD-WAN CPE uses Versa Messaging Service (VMS) for third-party authentication, users do not have to authenticate themselves using a captive portal. VMS functions alongside the customer Active Directory (AD). When AD authenticates a user, the Windows Management Instrumentation (WMI) agent notifies VMS about user login and logoff events. The notification contains information about the user IP address, which VMS disseminates to all secure SD-WAN devices in the network.
Before You Begin
Before you deploy third-party authentication, ensure that your system meets the following requirements:
Headend Requirements
- Ensure that headend and branch devices are running Versa Operating SystemTM (VOSTM) 22.1.4 (Service Release dated 2025-11-10) or later.
- Create new application delivery controller (ADC) configurations for VMS with a separate TVI IP address, which must be advertised through the controller as part of Versa-BGP routes. ADC VIP must also be included while generating certificates. Otherwise, exempt IP addresses on controllers staging IPsec configurations. For more information, see Configure the ADC Service.
- It is recommended that you configure DNS servers to resolve FQDNs. You can also create host entries for FQDNs in the VOS software. For more information, see Configure DNS Servers.
Certificate Requirements
VMS, by default, uses self-signed certificates for the communication between the VOS software and WMI, and vice versa. To generate managed service provider and client certificates for WMI and VMS, see the certificate generation section in Install and Configure VMS.
VMS Requirements
- To deploy the VMS server, configure VMS Release 5.2.2 with the hardware requirement specified in VMS Hardware Requirements.
- Deploy VMS with the following network interfaces:
- Northbound—eth0
- Southbound—eth1
- (Optional) VMS Interconnect—eth2
- Configure the VMS IP addresses and the other details for the Active VMS (VMS1) and Standby VMS (VMS2) for the following:
- Hostname
- eth0 (northbound)
- Elastic interface (VMS Services)—Same as northbound subnet
- eth1 (southbound)
- (Optional) eth2 (interconnect)
- FQDN of eth0 (FQDN for VMS in Versa Director)
- FQDN of elastic IP agents
- FQDN of eth1 (VOS to VMS)
- (Optional) FQDN of eth2.
Note: VMS currently supports the addition of 10 FQDNs.
WMI Agent Requirements
- Deploy the WMI server with the following requirements in the AD LAN segment:
- CPU—4 cores
- Memory—16 GB RAM
- Disk—150 GB
- Download the WMI agent from this link: https://versanetworks.app.box.com/s/d7jh1z6y3kaijd3yfwil0uxchr1w9ton/folder/336700835217
- Create a specific domain user with admin rights for initial WMI installation. Ensure that you have the credentials ready to login and for further configuration.
- Open the ports for VMS connectivity through a tunnel or TLS from the WMI agent.
- Configure the WMI server details such as hostname, IP address, domain username and password. For more information, see Install and Configure the WMI Agent.
- Configure the AD server details that are part of authentication. If there are multiple AD servers, list all the servers that capture authentication events.
General Requirements
- Allot 5 free IP addresses from the existing staging overlay segment for the controller ADC configuration on the parent tenant. Configure the VMS controller to exclude the required subnets. For more information, see Configure a VMS Connector. Otherwise, use a separate, non-overlapping subnet. Then, create TVI interfaces and advertise the virtual IP address from the branches to the ADC IP address through the controllers.
- By default, the WMI to VMS connection is secured by TLS. To implement additional security for compliance, establish an IPsec tunnel between your network and the VMS infrastructure.
- Synchronize NTP across all Versa devices, AD, and client machines.
Port Requirements
- Allow outbound port 443 for communication from your WMI servers to the VMS server.
- Enusre that port 443 is open from the internet for VMS inbound and allow required IP addresses.
For more information, see VMS Firewall Requirements.
Enable and Configure VMS for Third-Party Authentication
- In Director view, select the Administration tab in the top menu bar.
- Select Connectors > VMS Connector in the left menu bar.
- To add a VMS connector, click + Add, or to update a connector, select an existing one. The Configure VMS Connection configuration wizard displays.
- Add or update the required information in the VMS Connection and VMS Cluster screens. For more information, see Configure a VMS Connector.
- Select Tenants and Services in the top menu bar, and then enter information for the following fields.
- Select a tenant for which you want to enable third-party authentication. The list of services displays when you click the down arrow for the tenant on the right pane.
- Click the Third-Party-Authentication toggle to enable third-party authentication, and then enter information for the following fields.

Field Description VMS IP Address Enter the IP address of the VMS server that the Windows WMI agent notifies about user login and logoff events. Tags Click the + icon to add tags that describe the third-party authentication service. - Tag Category
Select a category for the third-party service description:
- Active Directory Domain Name
- Name
- Region
- Custom
- Tag Value
Enter a value that corresponds to the value you select in the Tag Category field:
- Active Directory Domain Name—Enter the AD domain name in which the VMS server is located.
- Name—Enter a name for the VMS server.
- Region—Enter the region in which the VMS server is located.
- Custom—Enter a custom value.
- Tag Label
Enter a text string that describes the third-party authentication service. - Click Submit to add or update the VMS connector.
After you enable third-party authentication, configure a server profile to connect the gateway to VMS and then enable stream feeds for third-party authentication. For more information, see Configure VMS Messaging Service below.
Enable and Configure UEBA
Versa user and entity behavior analytics (UEBA) is a cloud service that provides a layer of security that enables your organization to monitor, detect, and respond to suspicious behaviors across your network infrastructure. It involves multiple Versa components. You configure UEBA profiles and policies through Versa Concerto, which sends the information to the UEBA service through Versa Director and the configuration server. The SASE gateway shares user activity data with Versa Analytics, which sends the relevant logs to the UEBA service through Kafka.
The UEBA service processes these logs using intelligent algorithms to analyze user activity, and assigns a severity score to each activity. Activity scores are aggregated to compute the overall user confidence score for each user connected to the gateway. Users are assigned to a confidence band based on their scores. The user-to-confidence mapping is sent to the Versa Messaging Service (VMS), which connects to multiple SASE gateways through gRPC.
For more information about configuring UEBA for Concerto, see Configure User and Entity Behavior Analytics (UEBA).
To enable and configure UEBA for a tenant:
- In Director view, select the Administration tab in the top menu bar.
- Select Connectors > VMS Connector in the left menu bar.
- To add a VMS connector click + Add and to update a connector, select an existing one. The Configure VMS Connection configuration wizard displays.
- Add or update the required information in the VMS Connection and VMS Cluster screens. For more information, see Configure a VMS Connector.
- Select Tenants and Services in the top menu bar, and then enter information for the following fields.
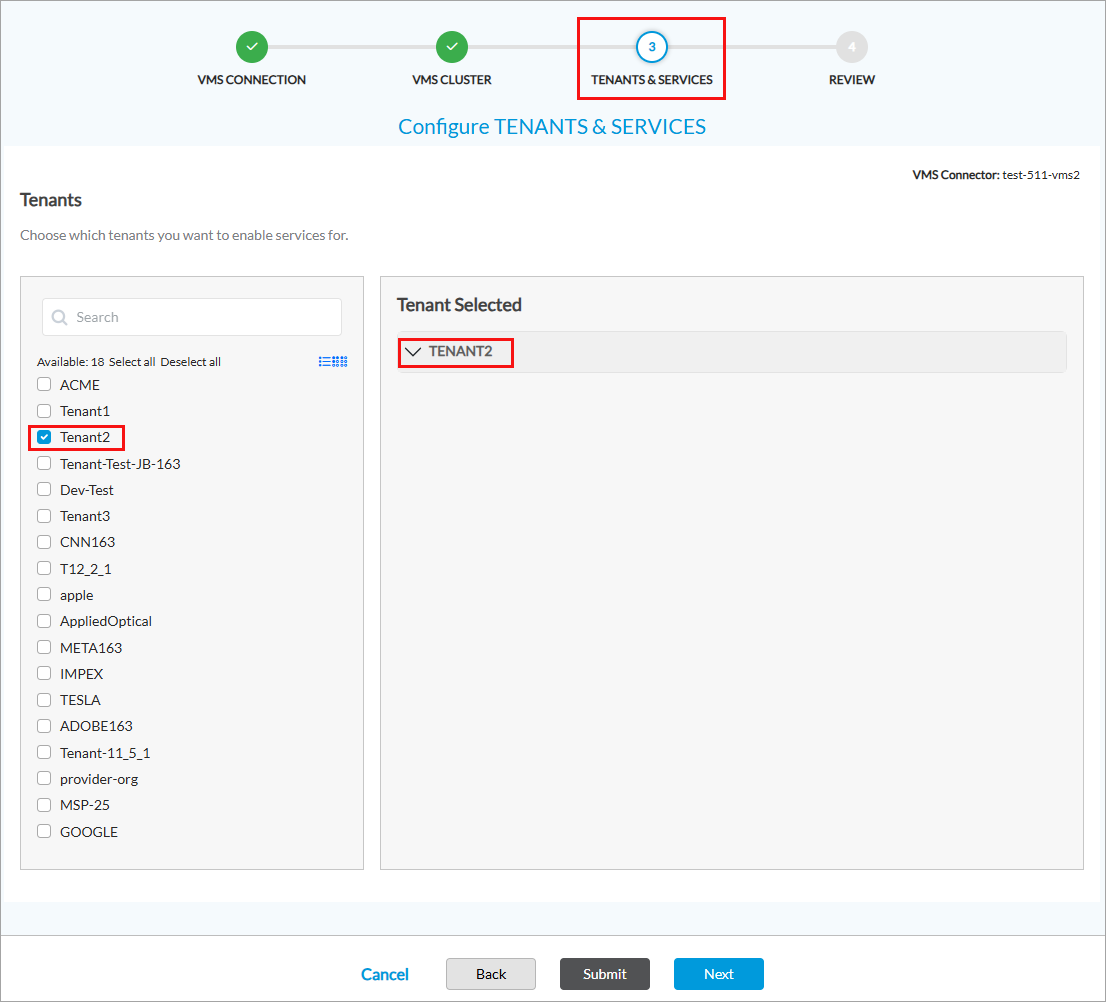
- Select an organization. The list of services displays when you click the down arrow for the organization on the right pane.
- To enable the UEBA service for a tenant, click the UEBA toggle, and then enter information for the following fields. Note that you receive the details for the following fields and certificate from the UEBA administrator.
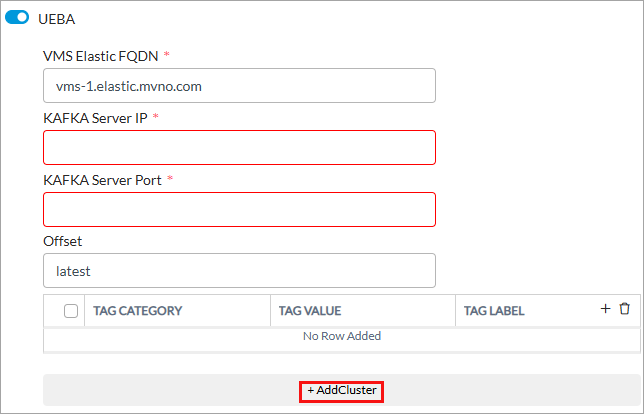
Field Description VMS Elastic FQDN
Enter the FQDN of the VMS host to which the Kafka producer connects to the VMS server. This value is the same as the elastic FQDN of the VMS cluster. Kafka Server IP Enter the UEBA Kafka server cluster IP address through which the UEBA server connects to Concerto. This is the same IP address as the one you enter on the Create Kafka screen when you configure a Kafka connector. Contact the UEBA administrator for this IP address. Kafka Server Port Enter the Kafka server port number (default is 9094) on which Concerto listens for connections. This must the same port number that you enter on the Create Kafka screen when you configure a Kafka connector.
Offset Enter the unique offset ID assigned to a Kafka topic or partition. Offset tracks the position in a Kafka topic or partition for the system to know where to start reading or processing new messages. This value is provided by the UEBA administrator. Tags (Group of Fields) Tag fields are currently not supported. Cluster (Group of Fields) You can create a cluster of users or entities that UEBA identifies as having similar behavioral patterns in a network. This allows security teams to focus investigations on groups of individuals or devices, rather than analyzing individual user actions.
To create a cluster, Click + Add Cluster, click the down arrow, and then enter information for the following fields.

- Topic Name
Enter the Kafka topic name for Kafka connection between VMS and UEBA. - Group Name
(Optional) Enter a Kafka group name for Kafka connection between VMS and UEBA. - Address
Enter the IP address or hostname of the broker node that VMS uses to connect to Concerto through the Kafka broker. For example, 10.43.10.198. - Port
Enter the port number for the broker connection that VMS uses to connect to Concerto through the Kafka broker. For example, 9092. - Certificate (Group of Fields)
Click this to use certificates for security. These are the certificates that you generate when you configure the VMS server. For more information, see Configure the Primary VMS Server Using Bash in Install and Configure VMS.
. CA file, certificate file, and private key are required for VMS to communicate with UEBA. Browse to upload the following certificates:

- CA File—Certificate Authority (CA) file to validate certificates.
- Cert File—Client certificate file.
- Key File—Client private key file.
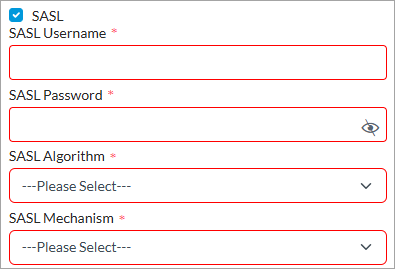
- SASL (Group of Fields)
Click to enable Simple Authentication and Security Layer (SASL) authentication process, and then enter information for the following fields:

- SASL Username—Enter the username used for SASL authentication. This identifies the client to the server.
- SASL Password—Enter the password associated with the SASL username.
- SASL Algorithm—Select the algorithm or method for SASL authentication. The options are:
- Salted Challenge Response Authentication Mechanism (SCRAM)—Uses a salted challenge-response process to authenticate users without sending plain text passwords over the network.
- Oauthbearer—Uses OAuth tokens for authentication and requires a separate authorization flow with an identity provider to obtain tokens.
- SASL Mechanism—Select the Secure Hash Algorithm (SHA) to use in SASL authentication:
- SHA-512
- SHA-256
- Click Submit to add or update the VMS connector.
After you enable UEBA, configure a server profile to connect the gateway to VMS and then enable stream feeds for UEBA. For more information, see Configure VMS Messaging Service below.
Enable and Configure VOS Aggregator
The VOS aggregator service publishes aggregator data to aggregator nodes that are part of the network topology. When an aggregator node receives the first data packet from a new user, it selects a gateway from the available pool of gateways. The service then maps the user's IP address to the selected gateway and publishes this mapping information to VMS.
The VMS VOS aggregator service receives the published aggregator data from a VOS device and distributes it to other connected VOS devices. This data includes information such as the routing instance, user IP address, and tenant ID.
To publish and receive this data, you enable and configure the VOS aggregator service on each SOS device as described in the following steps.
To enable and configure VOS aggregator for a tenant:
- In Director view, select the Administration tab in the top menu bar.
- Select Connectors > VMS Connector in the left menu bar.
- To add a VMS connector click + Add and to update a connector, select an existing one. The Configure VMS Connection configuration wizard displays.
- Add or update the required information in the VMS Connection and VMS Cluster screens. For more information, see Configure a VMS Connector.
- Select Tenants and Services in the top menu bar, and then enter information for the following fields.
- Select an organization. The list of services displays when you click the down arrow for the organization on the right pane.
- Click the VOS Services toggle to enable the VOS aggregator service. The VMS elastic FQDN displays by default.

- Click Submit to add or update the VMS connector.
After you enable VOS aggregator service, configure a server profile to connect the gateway to VMS and then enable stream feeds for VOS aggregator. For more information, see Configure VMS Messaging Service below.
Enable and Configure XIP EIP
XIP EIP converts Palo Alto Networks host information profile (HIP) reports into the Versa Operating SystemTM (VOSTM) endpoint information profile (EIP) report format. You can configure VOS gateways to subscribe to XIP EIP, and you can then use these reports to enforce security policies. VOS gateways subscribe to XIP EIP and use these reports to enforce security policies. For more information about EIP, see Configure Endpoint Information Profiles.
When you enable XIP EIP:
- Panorama sends syslog messages to the Versa Messaging Service (VMS) Panorama (PAN) agent.
- When the VMS PAN agent receives syslog messages that requires action, it retrieves HIP reports that include security postures of devices. VMS takes action for the following syslog messages:
- Gateway register (for internal gateway users)
- Gateway connected (for external gateway users)
- Gateway logout
- Gateway HIP report (checks device posture updates).
- XIP EIP converts HIP reports to EIP format and shares the device name, username, IP address, and security posture to VMS.
- The messaging service establishes a TCP connection to all VOS devices and shares the EIP profile of each device and tenant for security enforcement. User traffic is allowed or denied based your NGFW access policy.
To enable and configure XIP EIP for tenant:
- In Director view, select the Administration tab in the top menu bar.
- Select Connectors > VMS Connector in the left menu bar.
- To add a VMS connector click + Add and to update a connector, select an existing one. The Configure VMS Connection configuration wizard displays.
- Add or update the required information in the VMS Connection and VMS Cluster screens. For more information, see Configure a VMS Connector.
- Select Tenants and Services in the top menu bar, and then enter information for the following fields.
- Select an organization. The list of services displays when you click the down arrow for the organization on the right pane.

- Click the XIP-EIP toggle to enable the XIP EIP service and then enter information for the following fields.

Field Description PAN Agent FQDN on VMS
Enter the elastic FQDN of the Panorama agent to configure on the VMS server. Panorama sends syslog messages to this FQDN. PAN Agent IP on VMS
Enter the elastic IP address of the Panorama agent to configure on VMS server. Panorama sends syslog messages to this IP address. PAN FW/Panorama IP/FQDN
Enter the IP address or FQDN of the Panorama host from which the VMS Panorama agent fetches the HIP report. PAN FW/Panorama API Key
Enter the Panorama API key that fetches the Host Information Profile report from Panorama or Panorama firewall. Tags (Group of Fields) Enter information that describes the XIP EIP service. - Tag Category
Select a category for the XIP EIP service description:
- Active Directory Domain Name
- Name
- Region
- Custom
- Tag Value
Enter a value that corresponds to the value you select in the Tag Category field:
- Active Directory Domain Name—Enter the AD domain name in which the VMS server is located.
- Name—Enter a name for the VMS server.
- Region—Enter the region in which the VMS server is located.
- Custom—Enter a custom value.
- Tag Label
Enter a text string that describes the XIP EIP service. Broker (Group of Fields) Click + Add Broker and click the down arrow to enter information for the following fields.

- Topic Name
Enter the Kafka broker topic name that the broker node handles. - Group Name
(Optional) Enter a name for the group associated with the broker node. - FQDN/IP Address
Enter the hostnname or IP address of the broker node that VMS uses to connect to Versa Concerto through the Kafka broker. For example, 10.43.10.198. - Port
Enter the port number for the broker connection that VMS uses to connect to Versa Concerto through the Kafka broker. For example, 9092. - Certificate (Group of Fields)
Click to use certificates for security. These are the certificates that you generate when you configure the VMS server. For more information, see Configure the Primary VMS Server Using Bash in Install and Configure VMS. Browse to upload the following certificates:

- CA File—Certificate Authority (CA) file to validate certificates.
- Cert File—Client certificate file.
- Key File—Client private key file.
- SASL (Group of Fields)
Click to enable Simple Authentication and Security Layer (SASL) authentication process, and then enter information for the following fields:
- SASL Username—Enter the username used for SASL authentication. This identifies the client to the server.
- SASL Password—Enter the password associated with the SASL username.
- SASL Algorithm—Select the algorithm or method for SASL authentication. The options are:
- Salted Challenge Response Authentication Mechanism (SCRAM)—Uses a salted challenge-response process to authenticate users without sending plain text passwords over the network.
- Oauthbearer—Uses OAuth tokens for authentication and requires a separate authorization flow with an identity provider to obtain tokens.
- SASL Mechanism—Select the Secure Hash Algorithm (SHA) to use in SASL authentication:
- SHA-512
- SHA-256
- Click Submit to add or update the VMS connector.
After you enable XIP EIP, configure a server profile to connect the gateway to VMS and then enable stream feeds for XIP EIP. For more information, see Configure VMS Messaging Service below.
Configure VMS Messaging Service
You configure the VMS messaging service for your VOS device to communicate with the VMS server and to enable VMS services to send and receive stream feeds.
To configure the VMS messaging service, you do the following:
- Configure a messaging server profile for the VOS device to communicate with the VMS.
- Use the server profile to enable VMS services to send and receive stream feeds from the VMS server.
Configure a Messaging Server Profile
You configure a messaging server profile for the VOS device to communicate with the VMS server.
To add a messaging server profile:
- In Director view:
- Select the Administration tab in the top menu bar.
- Select the Appliances in the left menu bar.
- Select a device name in the main panel. The view changes to Appliance view.
- Select the Configuration tab in the top menu bar.
- Select Others > Organization > Messaging Service > Server Profile in the left menu bar.

- Click the + Add icon. In the Add Messaging Service Server popup window, enter information for the following fields.

Field Description Name
(Required)
Enter a name for the messaging server.
Value: Text string from 1 through 127 characters
Default: None
Description Enter a text description for the VMS messaging server. Routing Instance (Required) Select the routing instance through which the VMS messaging server is reachable. CA Chain (Required) Select the certificate authority (CA) chain to use for the server. This adds the certificate file in Versa Director. Port Enter the port number for the VMS messaging server.
Default: 1376
Address
- FQDN
Enter the fully qualified domain name of the messaging server. - Click OK.
Enable Stream Feeds for VMS Services
You can enable VMS services to receive streaming feeds from the VMS server. To do this, you associate a messaging server profile with the services that you configured in VMS connector. For more information, see Configure a VMS Connector.
To enable a VMS service to send or receive streaming feeds:
- In Director view:
- Select the Administration tab in the top menu bar.
- Select an Appliance in the left menu bar.
- Select a device name in the main panel. The view changes to Appliance view.
- Select the Configuration tab in the top menu bar.
- Select Others > Organization > Messaging Service > VMS Service in the left menu bar.

- Click the
Edit icon next to a service. The Edit VMS Service popup window displays.

- In the VMS Profile field, select a VMS server profile. For more information, see Configure a Messaging Server Profile, above.
- Click Enabled to enable the service.
- Click OK.
- Repeat Steps 4 to 7 for each service for which you want to enable stream feeds.
Supported Software Information
VMS Releases 5.1.1 and later support all content described in this article, except:
- Release 5.2.1 adds support for SCIM, UEBA, and VOS aggregator services.
- Release 5.2.2 adds support for threat intelligence.
Additional Information
Install and Configure VMS
Configure Threat Intelligence from VMS