Connect a CSG300 Series Appliance
This article describes how to connect a CSG300 series appliance to an AC power source and to a management console.
Versa recommends an uninterruptible power strategy that prevents power interruptions. A UPS can isolate unpredictable power outages or blackouts, brownouts, lightning, power surges, or spikes.
Step 1: Connect AC Power to a CSG300 Series Appliance
Before you begin connecting AC power to a CSG300 series appliance, ensure that you have:
- Electrostatic discharge (ESD) wrist strap.
- An AC power cord is shipped with the appliances only for U.S. customers. Each power supply has a C14 plug that allows you to plug in standard power cords with C13 termination. The other end of the cord must have appropriate local plug.
To connect a CSG300 series appliance to an AC power source:
- Attach one end of the ESD grounding strap to your bare wrist, and connect the other end to the ESD point on the rack.
- Plug one end of the AC power cord into the AC power adapter.

- Plug the NEMA 5-15 end of the AC power cord into an AC power source outlet.

- Plug the DC end of the power supply unit into the back of the CSG300 series appliance.
Step 2: Configure a Serial Management Console to Connect to a CSG300 Series Appliance
CSG300 series appliances are equipped with an RJ45 serial console port.
To connect to the console port, use the RJ45-to-USB serial console cable supplied with the appliance:
- Plug the RJ45 end of the console cable into the console port located on the rear panel of the CSG300 series appliance.
- Plug the USB end of the console cable into the management console (that is, the laptop).
To communicate with the appliance, you must have a terminal emulation program, such as PuTTY, running on your system. When you set up the connection, use the following default console port settings:
- Speed (baud): 115200
- Data bits: 8
- Stop bits: 1
- Parity: None
- Flow control: None
To connect a management console to a CSG300 series appliance:
- Open the PuTTY application. The PuTTY configuration window displays.

- In the Category navigation pane, click Session, and then in the Connection Type menu, click Serial.

- In the Category navigation pane, click Connection > Serial. The Options Controlling Local Serial Lines page displays.
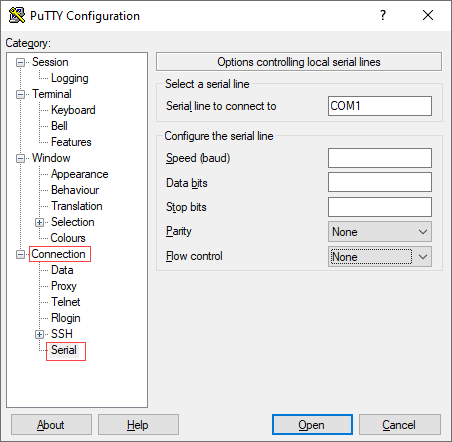
- In the Serial Line To Connect To field, enter the COM port that your device is connected to. The default COM port is COM1.

- In the Configure the Serial Line section, enter the following information.
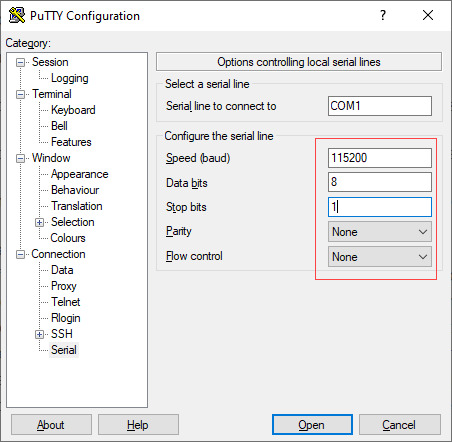
- In the Speed (Baud) field, enter the digital transmission speed. For CSG700 series appliances, the speed must be 115200.
- In the Data bits field, enter the number of data bits used for each character. The recommended value is 8.
- In the Stop bits field, enter the number of bits to be sent at the end of every character. The recommended value is 1.
- In the Parity field, select None. This is the method of detecting errors in transmission.
- In the Flow Control field, select None. This is the method of preventing data overflow.
- Optionally, in the Category navigation pane, click Session, and then in the Saved Sessions field, enter a name to save the session settings.
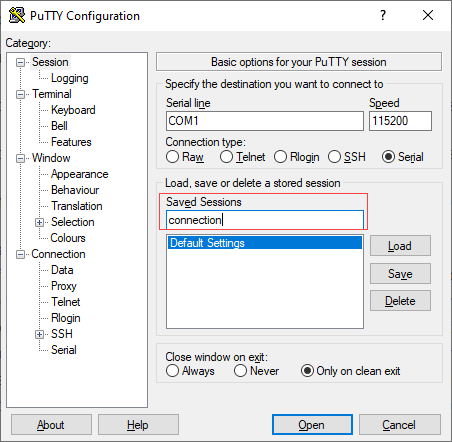
- Click Save.
- To open the session, click Open.

- Log in to the appliance CLI. Please consult Versa technical support for default credentials.

Step 3: Connect a CSG300 Series Appliance to a Network Management Console
You can deploy and manage a CSG300 series appliance from a Director or Concerto node. While you can configure and manage the appliance using a management console, it is recommended that you do so from the Director or Concerto node.
You can perform monitoring and troubleshooting from the CSG300 series appliance's CLI. To access the CLI, connect the appliance to the management console using a cable with an RJ-45 connector. Plug the RJ45 connector into the console port on the CSG300 series appliance, and plug the other end of the cable into the console server or into a management console.