Titan Mobile 8.0.0
![]() For supported software information, click here.
For supported software information, click here.
Getting Started with Titan Mobile
The Versa Titan Mobile application allows cloud management of your Versa Secure SD-WAN from your mobile device, letting you quickly and easily provision, configure, and monitor your SD-WAN appliances. It provides real-time access to the health, status, and performance of your sites. You can also manage WiFi, LTE, Internet, and VPN connectivity, and monitor security events and SD-WAN policies for visibility into SLA violations and threat detection.
Features
Versa Titan Mobile provides the following features:
- Activate Versa appliances using Versable, WiFi, or GZTP
- Quick Pick option automatically configures policy settings
- Corporate and guest WiFi
- Enterprise-class advanced security for appliance and site, including UTM, NGFW, antivirus, antimalware, intrusion detection, and DoS prevention
- Traffic conditioning and QoS for SaaS and business applications
- Internet or site-to-site (VPN) connectivity speed test
- Appliance health and status monitoring in real time
- Access to Versa support through phone, email, chat, online, and the customer support portal
Connect to Titan Mobile
To connect to Titan Mobile:
- After registering with Versa, you will receive an email with a link to the Versa Titan mobile application download. Use the link to download Versa Titan to your Android phone or iPhone. The Versa Titan icon displays on your phone.

- Tap the Versa Titan icon.
- Choose a language from the drop-down menu.
- Enter your valid email ID in the Username field and your password. These are the same login credentials you use with Titan Portal. Tap Login.
Titan Mobile Dashboard
Once you successfully login, Titan Mobile displays the current site on the customer dashboard. The dashboard includes the ![]() Hamburger icon in the upper left, the dashboard menu along the bottom, and the
Hamburger icon in the upper left, the dashboard menu along the bottom, and the ![]() Notification icon upper right. The dashboard also displays the status of the current device. Tap the
Notification icon upper right. The dashboard also displays the status of the current device. Tap the ![]() Notifications icon to display operator notifications.
Notifications icon to display operator notifications.

Dashboard Menu
The dashboard menu displays at the bottom of the dashboard.

| Field | Description |
| Dashboard menu | Tap icon on the dashboard menu to: |
| Dashboard | Return to the customer dashboard screen. |
| Configure | Display the Configure screen for the current device. |
| Connected Devices |
Display user devices that are connected to the appliance. |
| Speed Test | Display the Speed Test screen. See Run a Speed Test. |
Hamburger Menu
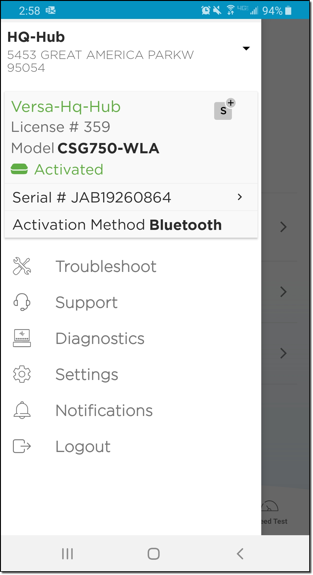
Tap the ![]() Hamburger icon at the top left of the screen to display the Current Site screen. This screen contains current site information and an actions menu. Swipe left to return to the dashboard screen.
Hamburger icon at the top left of the screen to display the Current Site screen. This screen contains current site information and an actions menu. Swipe left to return to the dashboard screen.
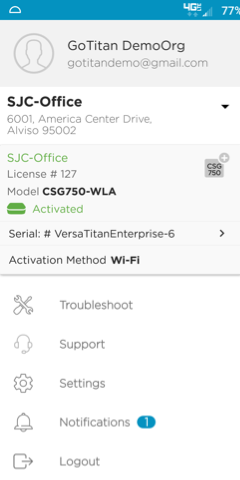
The top portion of the window displays site information.
| Item | Description |
| Organization name | Organization name for your account. In this example, GoTitan DemoOrg. |
| Username | Username used to login to Titan Mobile. In this example, gotitandemo@gmail.com. |
| Site Name | The current site name. To choose a different site, see Change Current Site and Device. |
| Device name | Device name associated with the software license. |
| License | License number of the software license. |
| Model | Model type of the software license. |
| Activation status | Activation status. |
| Serial # | Serial number of appliance. |
| Activation Method | Lists the currently chosen activation method. Titan Mobile automatically uses this activation method when you activate this appliance. See Activate an Appliance. |
The bottom portion of the window displays an actions menu.
| Item | Description |
|---|---|
| Troubleshoot | Access the troubleshoot screen. See Troubleshoot an Appliance. |
| Support | Call, email, chat, open a support ticket, or access the Customer Support Portal. |
| Settings | Manage the site profile, change language settings, view About information. |
| Notifications | Access system notifications. |
| Logout | Log out of the Versa Titan application. |
Change Current Site and Device
Titan performs whichever action you choose on the current device at the current site. For non-HA sites, there is only one device. For HA configurations, you choose one of the devices in the HA pair as the current device.
To change the current site and device:
- Tap the
 Hamburger icon to display the current site screen.

- Tap the down arrow next to the current site name to display an actions drop-down.

- Tap Select a site from the drop-down menu to display the Choose Site menu.

Devices on the site are color coded based on their activation status.Activation Status Color Description Not Deployed orange Device configuration is stored in the Titan cloud, but the configuration has not been deployed. Not Activated gray Device configuration is stored in the Titan cloud and has been deployed, but the device has not been activated. Activated green Device has been activated. Activation publishes the configuration to the device.
- For HA sites:
- Scroll through the site names and tap on the HA site to make it the current site.
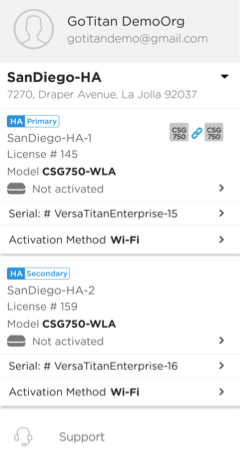
The screen displays the two devices in the HA pair, the HA Primary and HA Secondary devices.
- Tap on either HA Primary or HA Secondary to make it the current device.
- Scroll through the site names and tap on the HA site to make it the current site.
- For non-HA sites, scroll through the site names and tap on a site to make it the current site and its device the current device.
Once you've selected the current site and device, Titan Mobile displays one of the following, depending on the activation status of the device.
- Not Deployed—Titan Mobile displays the Configure screen allowing you to edit network, security, and steering settings for the device.
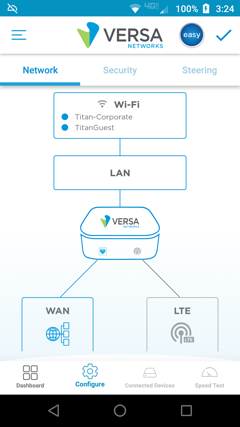
- Not Activated—Titan Mobile displays a screen that allows you to either activate the device or switch to the Configure screen.

- Activated—Titan Mobile displays the Device Status screen.

Access the Configure Screen
The method you use to access the Configure screen depends on the activation status of the site.
To access the Configure screen:
- Make the device to be configured the current device using the procedure in Change Current Site and Device.
- Do one of the following based on the activation status of the site:
- Not deployed—Do nothing. The Configure screen automatically displays when you make an undeployed site the current site.
- Not Activated—Tap Configure Device.
- Activated—Tap the
 Configure icon on the dashboard.
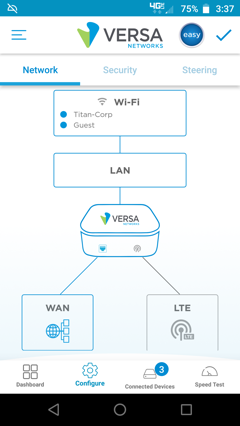
Map View
The Choose Site screen defaults to a list view of your sites. Switch to map view by tapping the Map icon.

Your sites display on a geographic map. Tap a numbered map pin to zoom in on an area. Tap a single pin to make a site current.

Return to list view by tapping the List icon.
Create and Deploy a Site
You can create a non-HA, mesh site from Titan Mobile. To create other site types, use Titan Portal.
- Tap the
 Hamburger icon to display the Current Site screen.
 - Tap the down arrow next to the current site name.

- From the drop-down menu tap Select a site to display the Choose Site screen.
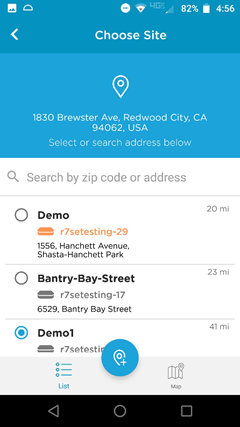
- Tap the
 Add Site icon to open the Create Site screen.
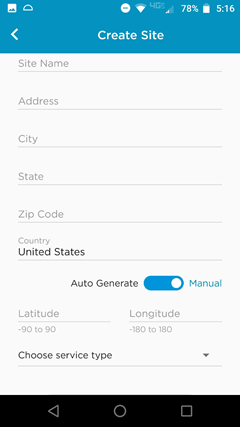
- Enter site information in the fields provided.
- Tap Auto Generate or Manual to set latitude and longitude.
- Tap Choose service type, then tap either CSG300 or CSG700 to display available license for that product series.
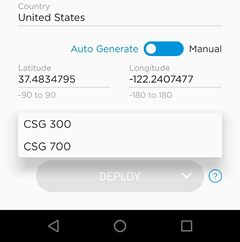
- Scroll through the list of full licenses, or tap the Partial License tab to scroll through a list of partial licenses.

- Tap on a license name to select a license.
- Tap Deploy to display a pop-up menu.
- Tap Deploy, Save, or Cancel. Deploy requires you to choose an activation method before it saves your configuration. Save saves your configuration without requiring you to choose an activation method.

- If deploying, tap the activation method, then tap Continue. Titan Mobile uses this method when you later activate the appliance.
Activate an Appliance
The device configuration for an appliance must be deployed before the appliance can be activated. You can deploy a configuration using either Titan Portal or Titan Mobile. You must use the activation method chosen at deployment to activate the device. To change an appliance's activation method, see Change Activation Method.
Note: You must activate both devices in an HA pair. Activate each one separately.
Change Activation Method
Activation methods are associated with device configurations and you choose a method at the time you deploy the configuration. After deployment, you can still change the activation method from Versable to WiFi or WiFi to Versable. To change the method between GZTP and another method, you need to undeploy and then redeploy the configuration. You can undeploy using Titan Portal, see Undeploy a Device Configuration in the Titan Portal documentation.
To change the activation method for an appliance:
- Make sure the device you wish to activate is the current device. See Change Current Site and Device.
- Tap the
 Hamburger icon.
 - Tap Activation Method.
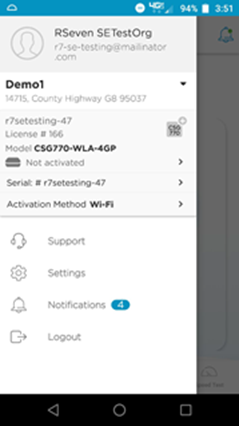
- Tap the new activation method, then tap continue.

Enter Serial Number
The serial number is printed on the appliance. When you replace an appliance, you should update the site information with the serial number from the new appliance.
- Make sure the device with the serial number is the current device. See Change Current Site and Device.
- Tap the
 Hamburger icon to display the current site. Information for the site appliance will display. For HA sites, two appliances will display.

- Tap Serial #.
- Locate the serial number on the appliance.

- Enter the serial number into the serial number dialog box, then tap Continue.
Note: If you mistype the serial number or make any mistakes, you must undeploy the device configuration and redeploy it. You cannot undeploy a configuration using Titan Mobile, use Titan Portal instead. See Manage Device License Inventory in the Titan Portal documentation.
Activate Using Versable
Titan Mobile uses the Versable capabilities of your phone during the Versable activation process. Make sure that Versable is enabled on your phone. The appliance must also establish an internet connection during activation, so either connect WAN port 0 to the internet or ensure that the SIM is inserted for LTE internet connectivity.
To activate an appliance using Versable:
- Put your phone into Versable discovery mode so it can form a pair with the Versa appliance you are activating. Ensure that the appliance is powered on.
- Wait while your phone discovers your Versa appliances.

A list of Versa appliances available for pairing displays.
- Tap on the appliance you wish to activate, then tap CONFIRM.

- Ensure that either the appliance WAN port 0 is connected to the internet or that the SIM card is inserted for LTE.
- Tap Activate Device to begin activation.

The Activating screen displays.
- Wait approximately 10 minutes for your appliance to register, configure and reboot.

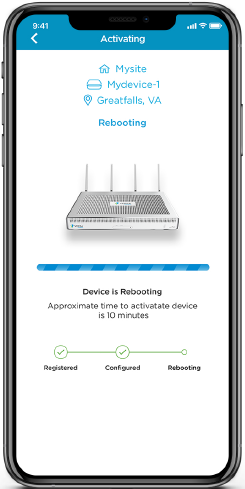
- After rebooting, the appliance will establish a WAN connection. Wait approximately 5 minutes for the connection to complete.
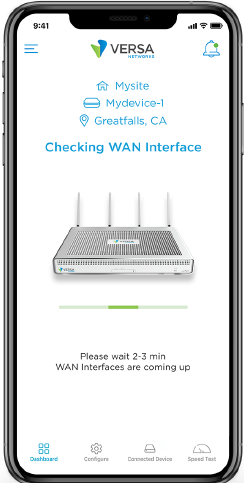
Once the WAN connection is established, a Device is Ready message displays.
- Tap Continue to return to the dashboard screen.

Activate Using WiFi
Titan Mobile uses a local SSID advertised by your Versa appliance for WiFi activation. Only models with WiFi capabilities support WiFi activation. Your phone must be physically close enough to the appliance to connect to this SSID. The appliance must also establish an internet connection during activation, so either connect WAN port 0 to the internet or ensure that the SIM is inserted for LTE internet connectivity. The device configuration must be deployed before you can activate an appliance.
To activate an appliance using WiFi:
- Make sure the device you wish to activate is the current device. See Change Current Site and Device. When you select a deployed device as the current device, Titan Mobile automatically displays the Activate Device screen.

- Tap Activate Device to begin activation.
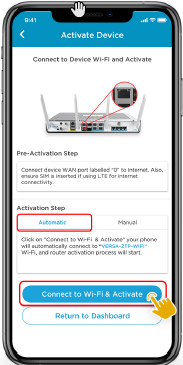
- Make sure your appliance is powered on. Verify that the appliance WAN port 0 is connected to the internet or that the SIM card is inserted for LTE.
- Tap Connect to Wi-Fi & Activate. Titan Mobile automatically connects your phone to SSID VERSA-ZTP-WiFi using password VROOM123. Titan Mobile takes you to the FlexVNF Web-UI screen.

- Tap Start Activation in the FlexVNF Web-UI screen. The setup wizard initiates basic configuration. Setup takes 5 to 10 minutes.
- Wait while the appliance reboots and gets ready.
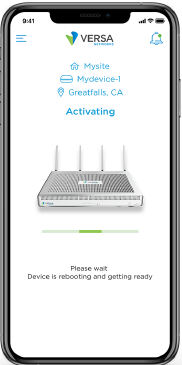
Once completed, the Device Activated message displays.
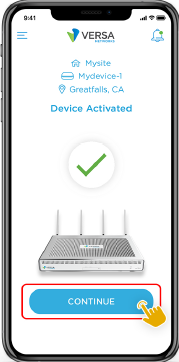
- Tap CONTINUE to return to the dashboard screen.
Activate Using GZTP
You can remotely activate an appliance using GZTP from Titan Mobile. The appliance serial number must be configured and the configuration deployed before activation. See Enter Serial Number. The appliance must also establish an internet connection during activation, so either WAN port 0 must be connected to the internet or the SIM card must be inserted for LTE internet connectivity.
To activate an appliance using GZTP:
- Make sure the device you wish to activate is the current device. See Change Current Site and Device. When you select a deployed device as the current device, Titan Mobile automatically displays the Activate Device screen.

- Tap Activate Device to begin activation.
- Wait approximately ten minutes for the activation to complete.
Troubleshoot Appliance Activation
If the appliance does not successfully establish a connection to the internet or if appliance activation is not successful, you are prompted to try again or contact Versa technical support.

Check the following:
- Make sure that the optical network terminal (ONT) and appliance are connected to the Ethernet. Note that if you are activating over LTE, connectivity to the ONT is not required.
- Make sure that the optical network terminal (ONT) and appliance are plugged in and powered on.
- Make sure that the appliance is able to receive a strong LTE signal.
Configure Networking
In Titan Mobile, you can view your network settings from the Configure screen.
Manage WiFi Radio Settings
Versa appliances that support WiFi include WiFi radios, each radio connecting to a WiFi port. One radio connects to Corporate WiFi at port Wi-Fi-1, which accesses the corporate VPN (SD-WAN), and the other connects to Guest WiFi at port Wi-Fi-2, which accesses the internet. This section discusses configuring radio settings such as SSID and bandwidth. To configure IP addresses for devices connecting to these ports, see Configure WiFi Ports.
To change WiFi radio settings:
- Make sure the device to be configured is part of the current site. See Change Current Site and Device.
- Access the Configure screen. See Access the Configure Screen.
- Tap the Network tab.

- Tap the Wi-Fi box to open the Wireless Networks screen.
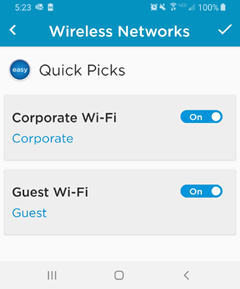
- By default, both corporate and guest WiFi SSIDs are advertised by the appliance. To stop the advertisements, tap the toggle located next to Corporate Wi-Fi or Guest Wi-Fi, to the off position.
The Wireless Networks screen displays the assigned SSIDs and changes when you modify them. In the above example, the corporate WiFi SSID is Corporate and the guest WiFi SSID is Guest.
Edit WiFi Radio Settings
To edit settings for the corporate or guest WiFi radio:
- Tap the SSID for either Corporate WiFi or Guest WiFi in the Wireless Networks screen.

- Tap in the SSID and Passphrase fields to clear the default text, then enter new credentials. Tap Show to view the password, tap Reset to enter a new password.
Note that the Wi-Fi SSID can be no more than 32 characters, and passwords must be between 8-25 characters. Passwords are case-sensitive and should match the password you use for all connected devices.
- Select a WiFi channel.
- Select a Radio frequency: 2.4 GHz (default) or 5 GHz
- Tap the box to the right of Channel Selection to select a WiFi channel from the list:
2.4 GHz
- Auto (default)
- Channel 1 through Channel 11

5 GHz
- Auto (default)
- Channel 36 through Channel 165

- Tap Add to save SSID, password, radio frequency and channel settings, and then tap the checkmark on the Wireless Networks screen when prompted. Tap Save in the pop-up window to publish your changes, or tap Quick Picks to restore default settings.
Configure a LAN Connection
To configure LAN connections to an appliance:
- Make sure the device you wish to configure is part of the current site. See Change Current Site and Device.
- Access the Configure screen. See Access the Configure Screen.
- Tap the Network tab.

-
Tap the LAN box in the Configure Network screen. The LAN screen displays.
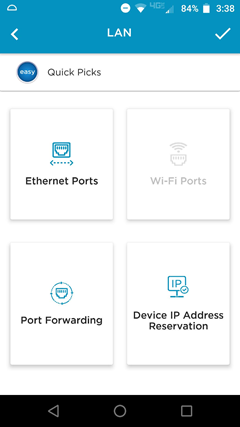
From the LAN screen, you can configure Ethernet ports, WiFi ports, port forwarding, or reserve an IP address by following the instructions below.
Configure Ethernet Ports
You can configure subnet, DHCP, and name server information for Ethernet ports.
To configure parameters for an Ethernet port:
- From the LAN screen, tap Ethernet Ports.


- Choose your port number from the drop-down menu.
- To enable VLAN tagging, slide the toggle to the On position.
- To set the interface address, enter the IP address and mask in the Interface portion of the screen.
- To configure DHCP server, tap DHCP Server then enter information for the following fields.
Field Description IP Subnet Enter a valid IP prefix and length. The length must be /25 using CIDR subnet mask notation, for example, 172.16.4.0/25. IP Start Range
Enter the IP address at the beginning of the DHCP address pool. IP End Range
Enter the IP address at the end of the DHCP address pool.
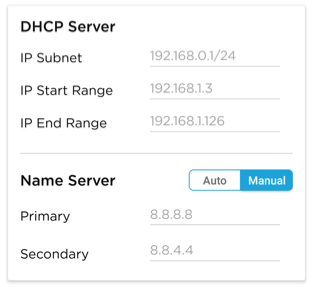
When configuring DHCP you have the option to manually configure a DNS name server. By default, a primary and a secondary DNS name server are configured automatically. -
To manually configure a DNS name server, tap Manual.
-
Enter information for the following fields.
Field Description Primary Server Address Enter the IP address of the primary DNS server. Secondary Server Address Enter the IP address of the secondary DNS server. - To configure DHCP relay, tap DHCP Relay on the Ethernet Ports screen and then enter the relay IP address.

- To configure static addressing, tap Static IP Route.

- Enter information for the following fields and then tap + Add Route to save the settings. A confirmation message displays.
Field Description Destination Enter the IP address and mask of the destination IP address or network. Next-Hop Address Enter the IP address to use to reach the destination IP address or network. -
To enter vendor-specific DHCP option codes, tap DHCP Client Options and then tap + DHCP Option to add the option to the screen.
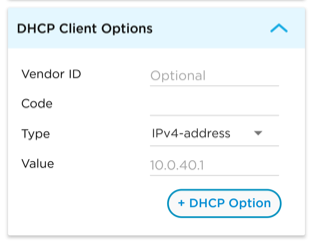
Field Description Vendor ID (optional) Enter vendor ID.
Code Enter DHCP option code. Valid options are 42 (NTP server), 43 (vendor specific), or 66 (TFTP server). Type Enter data type of the value in the Value field. These are the system-defined data types:
- Boolean
- FQDN
- IPv4-address
- String
Value Enter value for the option code in the Code field.
-
To save your LAN settings:
-
Tap the checkmark at the top of the LAN screen to save the changes.
-
Tap Save in the popup window to save the configuration. A confirmation message displays.
-
Configure WiFi Ports
You can assign a range of IP addresses to each WiFi port. To configure WiFi radio settings, such as SSID, for these ports see Manage WiFi Radio Settings.
To configure WiFi ports:
- From the LAN screen, tap WiFi Ports.
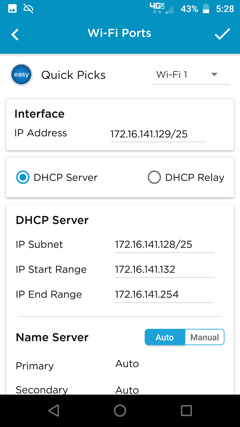
- Tap the drop-down menu to the right of Quick Picks, then tap the WiFi port number.
- To set the interface address, enter the IP address and mask in the Interface portion of the screen.
- To configure DHCP server, tap DHCP Server then enter information for the following fields.
Field Description IP Subnet Enter a valid IP prefix and length. The length must be /25 using CIDR subnet mask notation, for example, 172.16.4.0/25. IP Start Range
Enter the IP address at the beginning of the DHCP address pool. IP End Range
Enter the IP address at the end of the DHCP address pool.
When configuring DHCP you have the option to manually configure a DNS name server. By default, a primary and a secondary DNS name server are configured automatically. -
To manually configure a DNS name server, tap Manual.

-
Enter information for the following fields.
Field Description Primary Server Address Enter the IP address of the primary DNS server. Secondary Server Address Enter the IP address of the primary DNS server. -
To configure DHCP relay, tap DHCP Relay on the WiFi Ports screen.

-
Enter the relay IP address.
-
To save your WiFi port settings:
-
Tap the checkmark at the top of the Wi-Fi Ports screen to save the changes.
-
Tap Save in the popup window to save the configuration. A confirmation message displays.
-
Configure Port Forwarding
NAT port forwarding, also called port mapping, redirects packets from one address and port number pair to another while the packets are traversing the appliance. To allow incoming traffic to reach its destination in the LAN, you configure port forwarding rules. Port forwarding is not enabled by default, you must configure a rule. When a rule is created, it is automatically enabled.
To configure a port forwarding rule:
- From the LAN screen, tap Port Forwarding to display the Port Forwarding screen.
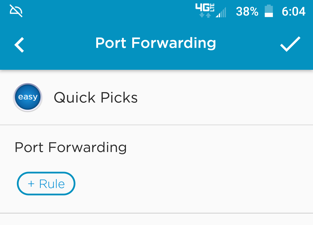
- Tap + Rule to display the Port Forwarding Add Rule screen.
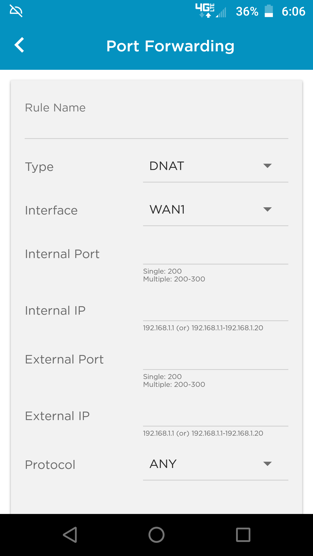
- Enter information for the following fields.
Field Description Rule Name Enter a name for the rule. Type Select DNAT or SNAT from the drop-down menu. Interface Select an interface from the drop-down menu. Internal Port Enter a port number. You can configure a single port number or a range of port numbers; for example, 100 or 100-150. The type of internal port you configure (single or range) must be the same as the type of external port. Internal IP Enter an internal IP address or IP address range. The IP addresses must fall within the start and end IP address range of any of the LAN ports. The internal IP type (single or range) must be the same as the external IP type. External Port Enter a port number. You can configure a single port number or a range of port numbers; for example, 100 or 100-150. The type of external port you configure (single or range) must be the same as the type of internal port. External IP Enter an external IP address or IP address range. The IP addresses must fall within the start and end IP address range of any of the LAN ports. The external IP type (single or range) must be the same as the internal IP type. Protocol Select TCP, UDP, or ANY.
- Tap Add at the bottom of the screen to save the rule to your screen.
- If needed, tap the X icon next to the rule to delete the rule.
- To save your port forwarding settings:
-
Tap the checkmark at the top of the Port Forwarding screen to save the changes.
-
Tap Save in the popup window to save the configuration. A confirmation message displays.
-
Device IP Address Reservation
To permanently assign IP addresses, you can reserve specific addresses in the DHCP pool. To reserve an IP address for a device, you can either add a new device by creating a rule or tap the Add Devices icon to add devices that are already connected.
To add a rule:
- From the LAN screen, tap Device IP Address Reservation to display the Device IP Address Reservation screen.
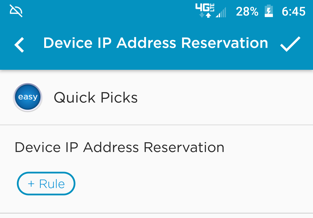
- Tap + Rule to display the Device IP Address Reservation Add Rule screen.

- Enter information for the following fields.
Field Description Rule Name Enter a name for the rule. IP Address Enter the IP address to reserve. MAC Address Enter the MAC address of the device for which you are reserving the IP address.
- Tap Add at the bottom of the screen to save the rule to your screen.
-
To save your Device IP Address Reservation settings:
-
Tap the checkmark at the top of the Device IP Address Reservation screen to save the changes.
-
Tap Save in the popup window to save the configuration. A confirmation message displays.
-
Configure WAN and LTE Settings
To configure WAN and LTE settings from the Titan Mobile application:
- Make sure the device to be configured is part of the current site. See Change Current Site and Device.
- Access the Configure screen. See Access the Configure Screen.
- Tap the Network tab.

From the Network tab on the Configure screen, you can edit WAN or LTE settings. Proceed to the instructions below.
Configure a WAN
To configure WAN settings:
- From the Network tab on the Configure screen, tap WAN to open the WAN screen.
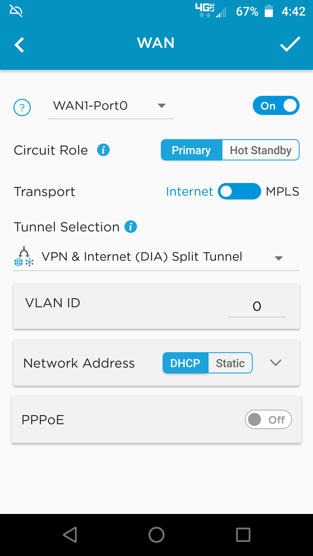
- Select a WAN from the drop-down menu.
- To turn the WAN Off or On, slide the toggle. Note that some WAN ports cannot be turned off.
- To choose a circuit role, tap Primary or Hot Standby. When used as a hot standby, you can create rules to steer traffic on the interface. Titan only sends direct internet access (DIA) traffic to the interface if the primary interface is down.
- To switch the connection protocol between Internet and MPLS, slide the Transport toggle.
- To choose a tunnel type, tap the drop-down menu under Tunnel Selection then tap a tunnel type.
- Internet Only—Traffic is directed to DIA only.
- VPN Only—Traffic is directed to the SD-WAN VPN only.
- VPN & Internet (DIA) Split Tunnel—VPN traffic is directed to the SD-WAN VPN. Internet traffic is directed to DIA.
- Tap to choose a DHCP or Static network address. By default, the DHCP address and gateway are set to Auto.
- If you choose to configure a static address, enter information for the following fields.
Field Description Address Enter a valid IP address and mask. Gateway Enter IP address of the gateway. - To enter name server addresses, tap Name Servers (DNS).

- Enter information for the following fields.
Field Description Primary Enter the IP address of the primary name server. Secondary Enter the IP address of the secondary name server.
To change PPPoE settings, see Manage PPPoE Settings.
- Tap the checkmark at the top right side of the screen.
- Tap Save in the pop-up window to save your settings.
Manage PPPoE Settings
Note that PPPoE can only be configured and enabled before the device is deployed.
Each WAN has two PPPoE options. The PPPoE username and password configured on the WAN interface must match settings on the WAN server to be active; otherwise PPPoE is inactive. You cannot remove or add a new PPPoE instance once a device has been deployed, but you can edit the PPPoE username and password at any time.
When PPPoE is active, you can monitor status within the WAN interface from the Monitoring screen. You can also perform a speed test and view steering options from the Speed Test and Steering screens.
To manage PPPoE settings:
- Make sure the device to be configured is part of the current site. See Change Current Site and Device.
- Access the Configure screen. See Access the Configure Screen.

- From the Network tab on the Configure screen, tap WAN to open the WAN screen.

- Select a WAN interface from the drop-down menu.
- To enable or disable PPPoE, slide the PPPoE toggle On or Off.
- To create a PPPoE instance, tap the down arrow next to the toggle to expand the PPPoE section.

- Enter information for the following fields.
Field Description VPN & Internet Choose an option from the drop-down menu.
- Internet Only—Traffic is directed to DIA only.
- VPN Only—Traffic is directed to the SD-WAN VPN only.
- VPN & Internet Steering—Used mainly in hub and spoke topologies. Traffic is directed to the SD-WAN VPN by default. To direct some traffic to DIA, create steering rules.
- VPN & Internet (DIA) Split Tunnel—VPN traffic is directed to the SD-WAN VPN. Internet traffic is directed to DIA.
Username Enter username. Password Enter password. - Tap the checkmark at the top right side of the screen to save your settings.
- Tap Save in the pop-up window.
- To add an additional instance, tap + PPPoE.
- To edit an existing instance, tap the Pencil icon next to the instance name.
Configure LTE and APN Settings
Note that you can only configure LTE before an appliance is deployed.
The Network Address and Name Server are set to Auto by default. The Access Point Name (APN) is also set to Auto by default, but you can change APN settings manually at any time.
To change LTE settings:
- Make sure the device to be configured is part of the current site. See Change Current Site and Device.
- Access the Configure screen. See Access the Configure Screen.

- From Network tab of the Configure screen, tap the LTE box.

- Tap +LTE to add an additional interface.
- Switch the LTE interface on or off using the toggle.
- Tap a circuit role:
- Primary—SD-WAN and direct DIA traffic are sent through the interface.
- Hot Standby—When used as a hot-standby, you can create rules to steer traffic on the interface. Titan only sends DIA traffic to the interface if the primary interface is down.
- Cold Standby—The interface is operationally down. No traffic flows on the interface until the primary interface is detected as down.
- Select a tunnel type from the drop-down menu:
- Internet Only—Traffic is directed to DIA only.
- VPN Only—Traffic is directed to the SD-WAN VPN only.
- VPN & Internet (DIA) Split Tunnel—VPN traffic is directed to the SD-WAN VPN. Internet traffic is directed to DIA.
- Tap the down arrow next to Network Address to add a network address.
- Tap the down arrow next to Name Servers (DNS) to add a name server.
- To change APN settings, tap Manual then enter information for the following fields:
| Field | Description |
|---|---|
| Access Point Name (APN) | Enter the access point name (APN) you received from your service provider. |
| PIN | For a USB modem that is locked with a PIN, enter PIN number. |
| Username | Enter username provided by the service provider to use to access the wireless WAN. This username is used when a CDMA modem prompts for username. |
| Password | Enter password provided by the service provider to access the wireless WAN. This password is used when a CDMA modem prompts for password. Tap Show/Hide to view the new password. |
- Tap the checkmark at the top right side of the screen to save your settings.
- Tap Save in the pop-up window to save the configuration.
Configure Security
By default, appliance security is enabled and set to Standard. You can customize security settings before or after you activate the appliance.
To change security settings:
- Make sure the device you wish to configure is part of the current site. See Change Current Site and Device.
- Access the Configure screen. See Access the Configure Screen.
- Tap the Security tab.

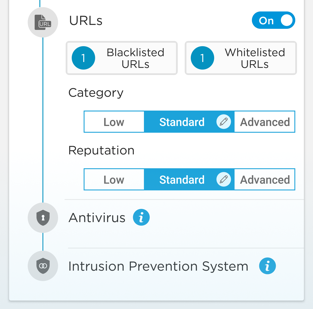
From the Security tab, you can configure firewall policies and manage the security profile definition as described below.
Manage Firewall Policies
To manage firewall policies:
- From the Security tab of the Configure screen, tap Firewall Rules to open the Firewall Rules screen.

The existing firewall rules display. Rules are numbered in the order they are processed. The configuration includes the following default rules:
- Allow_To_SDWAN
- Allow_From_SDWAN
- default_security_rule
- default_security_wifi
- To view rule details, tap a rule name. When finished, tap the left arrow in the upper corner to return to the Firewall Rules screen.
- To add a new rule, tap + Rule.
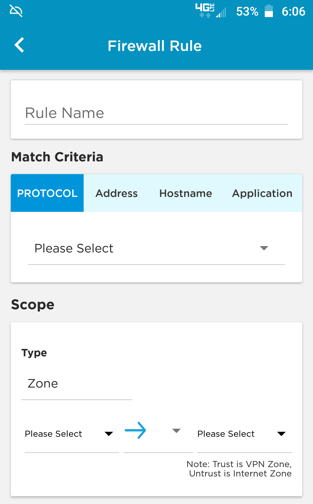
- Enter a name for the rule in the Rule Name field.
- To specify criteria for the rule, tap one or more of the following tabs:
- Protocol—Choose a protocol from the list.
- Address—Enter a valid IP address and port number or range.
- Hostname—Enter a valid hostname.
- Application—Tap Click Here to Add or Modify Applications to add or modify applications. Check or uncheck applications, tap Add, then tap OK in the pop-up to include an application criteria in the rule.
- To specify the scope, enter information for the following fields in the Scope section of the screen.
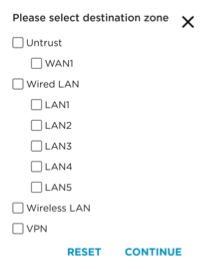
Field Description Type Zone is the only type. Source Zone Tap the down arrow in the first Please Select field. A pop-up window displays the configured interfaces and tunnels.
Choose a source zone then tap Continue.

Arrow Choose a one-way or
two-way connection.
Destination Zone Tap the down arrow in the second Please Select field. A pop-up window displays the configured interfaces and tunnels.
Choose a destination zone then tap Continue.
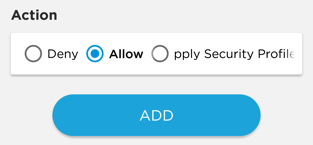
- To specify rule behavior, select one of the following for the Action section of the screen.
Field Description Deny Tap to indicate the rule denies the match criteria in the scope. Allow Tap to indicate the rule allows the match criteria in the scope. Apply Security Profile Tap to display the Apply Security Profile screen. Use the drop-downs to select the security level for each category.

- Tap Add to add the rule. The rule is added to the Firewall Rules screen.
-
Tap the checkmark at the top of the screen to save the changes.
-
Tap Save in the popup window to save the configuration. A confirmation message displays.
Configure the Security Profile Definition
The security profile definition includes specifications for URL allowance and blocking, antivirus protection, and the intrusion prevention system.
To configure the security profile definition:
- Make sure the device you wish to configure is part of the current site. See Change Current Site and Device.
- Access the Configure screen. See Access the Configure Screen.
- Tap the Security tab.


You can configure URLs, antivirus settings, and the intrusion prevention system from the Security Profile Definition section of the screen using the instructions below.
Configure Blacklisted URLs
- From the Security tab of the Configure screen, tap Blacklisted URLs to display the Blacklisted URLs screen.

- Enter the URL that you would like to block into the Add URLs field. You can also enter multiple URLs by separating them with a comma.
- Tap + Add URL to add your entry to the blacklist.
To delete URLs from the list, tap the X next to the URL.
Configure Whitelisted URLs
- From the Security tab of the Configure screen, tap Whitelisted URLs to display the Whitelisted URLs screen.

- Enter the URL that you want to allow on your network in the Add URLs field. You can also enter multiple URLs by separating them with a comma.
- Tap + Add URL to add your entry to the whitelist.
To delete URLs from the list, tap the X next to the URL.
Configure URL Categories
Versa Operating SystemTM (VOSTM) devices categorize and continuously update URLs, and they create a database to store the URL information. The URL cloud database comprises more than 31 billion URLs, and the local database can store up to 20 million URLs. The URL information includes a URL category and a reputation.
Specifying URL categories allows you to choose a low, medium or high filtering level for malicious or suspicious websites or online activity.
To manage URL categories:
- Tap the Security tab on the Configure screen to display the Security screen. The URL section of the screen displays the URL categories.

Categories are grouped into Low, Standard, and Advanced levels.
- Tap Low, Standard, or Advanced to change category level. The reputation level changes in tandem with the category level.
- To edit a category level, tap the level to display a Pencil icon then tap the Pencil icon to display the Category screen.

- Search for a category in the field provided, or scroll to view the list of categories. You can tap the Information icon to read a description of the category.
- Tap the box to make your selection, either Blocked or Alert & Confirm. You can also tap Reset to clear all categories.
- Tap the checkmark at the top right side of the screen to save your changes.
- Tap Save in the pop-up window to save the configuration.
Configure Reputations
You choose a reputation level of Low, Standard, or Advanced in the Reputation area of the Security screen. These levels are assigned behaviors based on a URL's reputation label of Trustworthy, Low Risk, Moderate Risk, Suspicious IP, or High-Risk IP. The reputation labels are based on reputation values of 0 to 100, which are assigned to URLs in the URL cloud database.
The reputation level of Low, Standard, or Advanced is set in tandem to the category level above.
To manage reputation settings:
- Tap the Security tab on the Configure screen to display the Security screen. The URLs section of the screen displays the URL reputation.

- Tap the Pencil icon next to the reputation level to edit reputation actions.
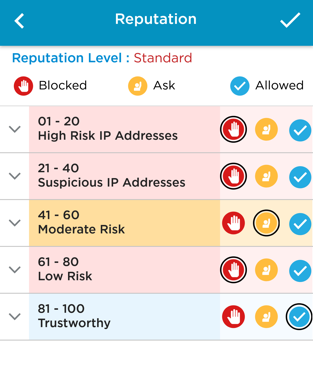
- Tap the down arrow for each entry to read the risk description:
- Trustworthy
- Low Risk
- Moderate Risk
- Suspicious IP Address
- High-Risk IP Address
- Tap the red, yellow, or blue icon to choose whether the risk level should be blocked, asked about, or allowed.
- Tap the checkmark in the top right side of the screen to save your settings.
- Tap Save in the pop-up window to save the configuration.
View Antivirus Security Settings
- Tap the Security tab on the Configure screen to display the Security screen. The Antivirus section of the screen displays the antivirus settings.

- Tap the toggle to turn antivirus On or Off.
- Tap an antivirus level to change the setting:
- Low—Web traffic
- Standard–Email attachments
- Advanced—Web traffic and email attachments
- Tap the checkmark in the top right side of the screen to save your settings.
- Tap Save in the pop-up window to save the configuration.
Configure the Intrusion Prevention System
- Tap the Security tab on the Configure screen to display the Security screen. The Intrusion Prevention System section of the screen displays the IPS settings.

- Tap the toggle to turn the IPS On or Off.
- Tap Low, Standard, or Advanced to change the IPS level.
- Low—All client-side attack detection
- Standard—Standard Recommended Profile. This is the protection level recommended by Versa Networks for providing adequate security and performance.
- Advanced—All attack rules
- To choose a non-standard IPS profile, tap the Pencil icon next to the IPS level to display the IPS screen.

- Tap the toggle after an IPS profile name to choose a new profile. You can choose only one profile.
Field Description All Anomaly Rules Load all the anomaly signatures. All Attack Rules Load all attack signatures. This is the default protection provided when you choose the Advanced setting. Client Protection Load all client-side attack detection. This is the default protection provided when you choose the Low setting. Database Profile Load the Oracle database server vulnerability signatures. ICS Profile Load the Industrial Control system (ICS) vulnerability signatures. Linux OS Profile Detect all attacks related to Linux OS. MAC OS Profile Detect all attacks related to MAC OS. Malware Profile Detect all antivirus attacks. Server Protection Detect server-side attacks. Windows OS Profile Detect attacks specific to Windows OS. - Tap the checkmark at the top right side of the screen to save your settings.
- Tap Save in the pop-up window to save the configuration.
Configure Steering
Configure Steering settings to optimize network traffic.
To edit steering settings:
- Make sure the device you wish to configure is part of the current site. See Change Current Site and Device.
- Access the Configure screen. See Access the Configure Screen.
- Tap the Steering tab to display the Steering screen.
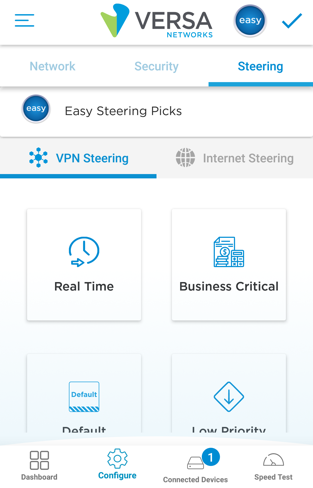
Spoke sites display both VPN Steering and Internet Steering tabs. Non-spoke sites display only VPN Steering.
VPN Steering
From the VPN Steering screen, you can steer the following types of traffic:
- Real Time
- Business Critical
- Default
- Low Priority
Create a VPN Steering Rule
The actions available on the Real Time screen are identical to the Business Critical, Default, and Low Priority screens. The examples below use the Real Time screen.
To create a new VPN steering rule:
- Tap the Steering tab to display the VPN Steering screen.

- Tap a steering category on the VPN Steering screen. Choices are Real Time, Business Critical, Default, and Low Priority.

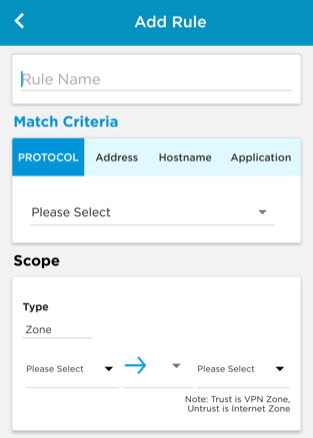
- Tap + Rule to display the Add Rule screen.
- Enter information for the following fields.
Field Description Rule Name Enter a name for the rule. Match Criteria Specify criteria for the rule by tapping one or more of the following tabs:
- Protocol—Choose a protocol from the list.
- Address—Enter a valid IP address and port number or range.
- Hostname—Enter a valid hostname.
- Application—Tap Click Here to Add or Modify Applications to add or modify applications. Check or uncheck applications, tap Add, then tap OK in the pop-up to include an application criteria in the rule.
Scope Source Zone Tap the down arrow in the Please Select field. A pop-up window displays the configured interfaces and tunnels.
Choose a type: Untrust, Wired LAN, Wireless LAN, VPN, or an IPsec tunnel. To create a tunnel, see the Titan Portal documentation.
Arrow Choose a
one-way or
two-way connection.
Destination Zone Tap the down arrow in the Please Select field. A pop-up window displays the configured interfaces and tunnels.
Choose a type: Untrust, Wired LAN, Wireless LAN, VPN, or an IPsec tunnel. To create a tunnel, see the Titan Portal documentation.
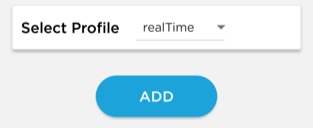
Select Profile Use the drop-down menu to select a profile. To create a new profile, see Create a Steering Profile.
- Tap Add. The rule is saved to the screen but not the Titan cloud.
- Tap the checkmark at the top right side of the screen to save your settings.
- Tap Save in the pop-up window to save the configuration.
Create a Steering Profile
The actions available on the Real Time screen are identical to the Business Critical, Default, and Low Priority screens. The examples below use the Real Time screen.
To create a new profile:
- Tap a steering category on the VPN Steering screen. Choices are Real Time, Business Critical, Default, and Low Priority.
- Tap + Profile to display the Add Profile screen.

- Enter information for the following fields.
Field Description Profile Name Enter name you are assigning to the profile. Select Circuit Select WAN interface. Circuit Selection Criteria Tap the circuit selection criteria, then specify:
- Latency—Tap Low, or tap Ms to specify the amount of latency in milliseconds.
- Packet Loss—Tap Low, or tap Percentage to specify the amount of packet loss by percentage.
- Delay Variation—Tap Low, or tap Percentage to specify the amount of packet loss by percentage.
Loss Recovery Choose the loss recovery method:
- Forward Error Correction (FEC)
- Packet Replication
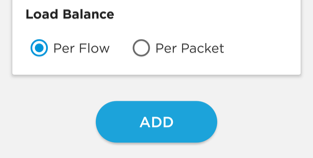
Load Balance Choose the load balancing mechanism:
- Per Flow
- Per Packet
- Tap Add. The profile is saved to the screen but not the Titan cloud.
- Tap the checkmark at the top right side of the screen to save your settings.
- Tap Save in the pop-up window to save the configuration
Internet Steering
You can configure internet steering for spoke sites.
To configure internet steering:
- From the Configure screen, tap the WAN box then tap the Steering tab. See Access the Configure Screen.

- Tap the Internet Steering tab to display the Internet Steering screen.
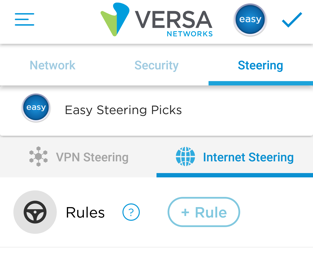
The + Rule icon and the existing steering rules display. - To delete an existing rule, tap the X next to the rule name.
- To add a rule, tap + Rule.

- Enter information for the following fields.
Field Description Rule Name Enter a name for the rule. Match Criteria Specify criteria for the rule by tapping one or more of the following tabs:
- Protocol—Choose a protocol from the list.
- Address—Enter a valid IP address and port number or range.
- Hostname—Enter a valid hostname.
- Application—Tap Click Here to Add or Modify Applications to add or modify applications. Check or uncheck applications, tap Add, then tap OK in the pop-up to include an application criteria in the rule.
Scope Source Zone Tap the down arrow in the Please Select field. A pop-up window displays the configured interfaces and tunnels.
Choose a type: Untrust, Wired LAN, Wireless LAN, VPN, or an IPsec tunnel. To create a tunnel, see the Titan Portal documentation.
Arrow Choose a
one-way or
two-way connection.
Destination Zone Tap the down arrow in the Please Select field. A pop-up window displays the configured interfaces and tunnels.
Choose a type: Untrust, Wired LAN, Wireless LAN, VPN, or an IPsec tunnel. To create a tunnel, see the Titan Portal documentation.
- Tap Add. The rule is saved to the screen but not the Titan cloud.
- Tap the checkmark at the top right side of the screen to save your settings.
- Tap Save in the pop-up window to save the configuration.
Monitor Appliance Status
You use the Titan Mobile dashboard to monitor the status of activated appliances.
To monitor a site:
- Make sure the site you wish to monitor is the current site. See Change Current Site and Device.
- Tap the Dashboard icon in the bottom menu bar.
The Dashboard screen displays general appliance status for the current site and information about the network, network security, and deployed appliances. If the network, network security, and appliances are operational and active, the status message Everything looks good displays. If there are any issues with network, security, or devices, an alert displays.
The following sections describe how to monitor network, security, and appliance settings from the Titan Mobile dashboard.
Monitor Network Status
You monitor appliance status and activity for activated appliances from the Titan Mobile dashboard.
To monitor appliance status:
- Tap the Dashboard icon in the bottom menu bar.

A message displays describing system status. If there are alerts on the system, you are prompted to investigate.
- Tap Network to check the status of the WAN, LTE, and LAN interfaces.

- On the Network screen, WAN, LTE, and LAN status are displayed as follows:
- Internet WAN status—ON or OFF, status Up or Down. The IP address is visible only when the interface is ON.
- LTE status—ON or OFF, status Up or Down. Strength Strong.
- Internet LAN status—ON or OFF, status Up or Down. The IP address is visible only when the interface is ON.
- Tap Routes to check the status of the routing table. To find a route, use the Search feature.

- Tap Ping to check that the router is available and connected. Enter a valid hostname or IP address, and then tap Start.

The following sample output displays a summary of the ping command.

- Tap Traceroute to measure packet transit delays across the network. Enter a valid hostname or IP address, and then tap Start.

The following sample output displays a summary of the traceroute command.

To display more information about an interface's circuits and the applications running on the interface, tap the > to the right of the interface's name.
View WAN Bandwidth Usage
When an appliance is activated, you can view bandwidth usage.
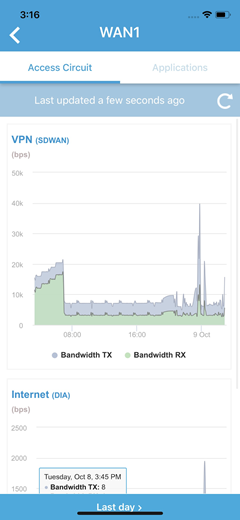
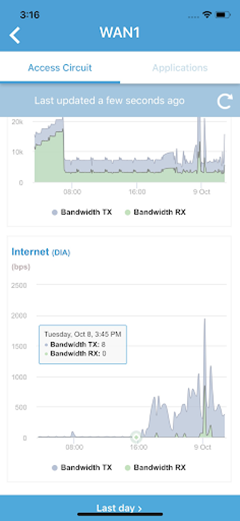
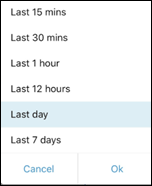
- Tap the interface and then tap Access Circuit to view bandwidth usage for VPN (SD-WAN) and Dedicated Internet Access (DIA). The graph displays the bps time interval in Minutes, Hours, and Days:
- Last 15 minutes
- Last 30 minutes
- Last 1 hour
- Last 12 hours
- Last day
- Last 7 days
The following is an example of VPN (SD-WAN) bandwidth information shown on the WAN1 > Access Circuit screen. Tap the ![]() Refresh icon to see the most current information.
Refresh icon to see the most current information.
The following is an example of Internet (DIA) bandwidth information seen on the WAN1 > Access Circuit screen. Tap the ![]() Refresh icon to see the most current information.
Refresh icon to see the most current information.
- Tap to select the time interval in the WAN1 > Access Circuit Time Interval Options pop-up window.
- Tap OK to save your selection.
View Application Bandwidth Usage
Tap the interface and then tap Applications to view application bandwidth used. The graph displays the bps time interval in Minutes, Hours, and Days. You can sort the following details in the pie chart:
- Application
- Session
- Bandwidth RX (bps)
- Bandwidth TX (bps)
To see the most current status, tap the ![]() Refresh icon.
Refresh icon.

Monitor Security Status
Tap Dashboard > Security to view the following data on the Security screen:
- URL category
- URL Reputation
- Bandwidth Usage
To see the most current status, tap Refresh.
View the URL Category
Tap Security > URL Category to view URL browsing analytics in graph form. All sites that are blocked (blacklisted) during URL Category configuration are recorded here in 7-day summary.
- Tap the day of the week to view records specific to that day.
- Tap Category and Count to view lists of browsed websites that have been blocked.
- Tap the graph to check status in pie chart format.
To see the most current status, tap the ![]() Refresh icon.
Refresh icon.

View URL Reputation Settings
Tap Security > URL Reputation to view URL risk levels in a pie chart:
- High-Risk IP Address
- Suspicious IP Address
- Moderate Risk
- Low Risk
- Trustworthy
Risk Hits and Percentage show statistics relating to information shown in the pie chart. Tap the pie chart or the entries in the URL Reputation list to view individual website links.
To see the most current status, tap the ![]() Refresh icon.
Refresh icon.

Monitor Device Status
Tap Dashboard > Device to monitor the following information:
- Appliance Information
- Bandwidth Usage
Monitor Appliance Information
Tap Dashboard > Device Information to view disk, CPU, and memory usage statistics. Tap the ![]() Refresh icon to see the most current data.
Refresh icon to see the most current data.
The following example shows the device information in graph form.
To see the most current status, tap Refresh.

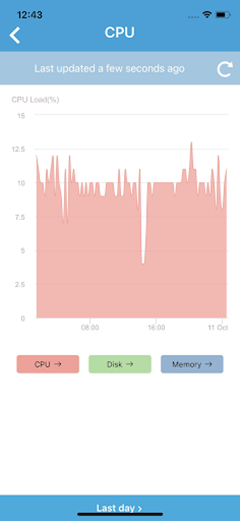
The following is an example of CPU usage in graph form.
To see the most current status, tap the ![]() Refresh icon.
Refresh icon.
The following is an example of disk usage in graph form. To see the most current status, tap the ![]() Refresh icon.
Refresh icon.

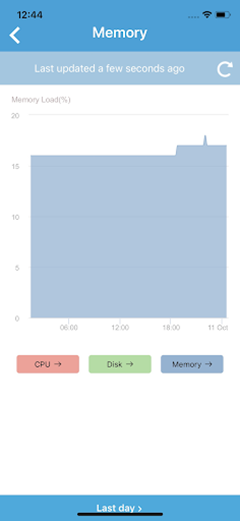
The following is an example of memory usage in graph form. To see the most current status, tap the ![]() Refresh icon.
Refresh icon.
View Bandwidth Usage
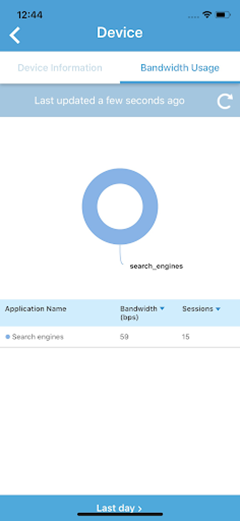
Tap Dashboard > Bandwidth Usage to manage the following:
- Tap the pie chart to view a list of applications.
- View and sort entries in the Application Name, Bandwidth, and Sessions columns.
To see the most current status, tap the ![]() Refresh icon.
Refresh icon.
View Connected Devices
To view user devices that are connected to the appliance, tap the Connected Devices icon in the bottom menu bar.

Troubleshoot an Appliance
You can troubleshoot the following issues from the Titan mobile application:
- Internet connection
- WiFi connection
- Slow connection
- Website access
- Appliance activation
Use Troubleshooting Tools
To troubleshoot active sites on Titan Mobile, follow these steps:
- Make sure the site you wish to troubleshoot is the current site. See Change Current Site and Device.
- Tap the
 Hamburger icon to display the Current Site screen.
- Tap Troubleshoot to open the Troubleshoot screen.
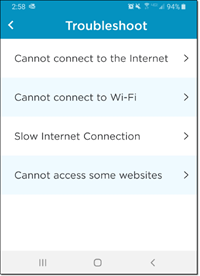
From this menu you can troubleshoot the following issues:- Cannot connect to the Internet (See Cannot Connect to the Internet)
- Cannot connect to Wi-Fi (See Cannot Connect to WiFi)
- Slow Internet connection (See Slow Internet Connection)
- Cannot access some websites (See Cannot Access Some Websites)
Cannot Connect to the Internet
If you cannot connect to the internet:
- Make sure the appliance is powered up and that the Ethernet cable is connected to WAN1 or WAN2.
- Make sure the SIM card is inserted if you are using LTE for internet connectivity.
- From the Troubleshoot screen, tap Cannot connect to the Internet to display the Check Connection screen.

- Tap Check Connection to check network connectivity to the appliance.

If the appliance is reachable, the system shows that connectivity is successful. You have the option to go to the device dashboard or back to the Troubleshoot screen.

If the appliance is not reachable, you have the option to tap Try Again or to tap Manual Reset Device. Note that you can tap Try Again several times to attempt to reach the appliance. If attempts are not successful, physically reset the appliance.
Physically Reset the Appliance
To physically reset the appliance, switch the appliance power to OFF for approximately 30 seconds, and then turn appliance power ON. Note that by resetting the appliance, all connected devices are temporarily disconnected. Your current settings and appliance configuration are saved.
Tap Manual Reset Device to access the Manual Reset screen and follow directions on the screen to physically reset the appliance.
Cannot Connect to WiFi
If you cannot connect to WiFi, follow these steps:
- From the Troubleshoot screen, tap Cannot connect to the Internet to display the Check Connection screen.
- Tap Cannot connect to Wi-Fi to check your WiFi settings.
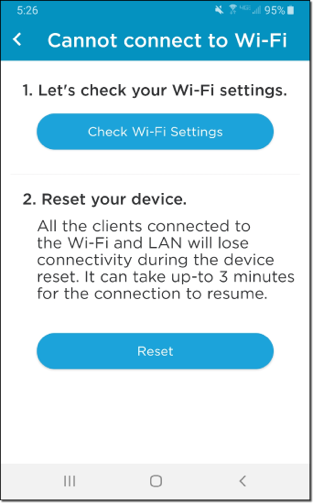
- Tap Check Wi-Fi Settings to verify WiFi status on the Wireless Networks troubleshooting screen:
- Corporate Wi-Fi—Tap the toggle to enable Corporate WiFi, or tap to open the Edit Wireless Networks window to update settings. See Activate an Appliance.
- Guest Wi-Fi—Tap the toggle to enable Guest WiFi, or tap to open the Edit Wireless Networks window to update settings.

You can also choose to reset the device.
Reset the Device
If you cannot connect to WiFi from the Wireless Networks screen, you can reset the device to default settings. When you reset an appliance, all clients connected to the WiFi and Intranet will lose connectivity while the appliance reboots. It can take up to three minutes for the connection to resume. When reboot is complete, wait another three to five minutes for the appliance to become active.
To reset the appliance, follow these steps:
- From the Troubleshoot screen, tap Cannot connect to the Internet to display the Check Connection screen.
- Tap Cannot connect to Wi-Fi.

- Tap Reset to open the reset screen.

- Tap Continue to begin the reset process. Wait approximately three minutes, then return to the device dashboard and tap the
 Refresh icon to check device status.
Slow Internet Connection
You can view internet settings and run a test to check internet connectivity speed on your reachable online devices from the Speed Test screen. If PPPoE is available for WAN interfaces, you can run a speed test for those devices from this screen.
Run speed tests approximately one minute apart. The system issues an alert if speed tests are performed too close together or if a speed test has been issued from another device simultaneously. The system allows you to run a maximum of 20 speed tests in a single 24 hour period.
To initiate an Internet connectivity speed test on Titan mobile, follow these steps:
- From the Troubleshoot screen, tap Cannot connect to the Internet to display the Check Connection screen.
- Tap Slow Internet Connection to display the Slow Internet Connection screen.
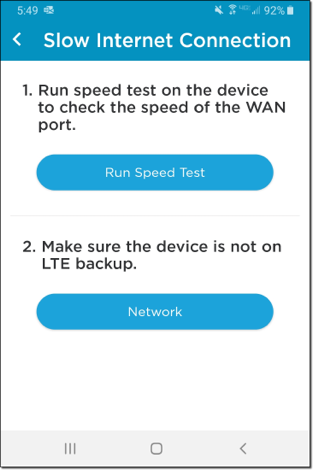
- Tap Run Speed Test to open the Speed Test screen then follow the instructions below.
Run a Speed Test
You can run an internet or VPN speed test from the Speed Test screen.
Note: If an interface is down, refresh the screen before running a speed test. Refresh by swiping down on the Speed Test screen.
To run a speed test:
- Access the Speed Test screen either using the instructions above in Slow Internet Connection or by tapping the Speed Test icon in the bottom menu bar.
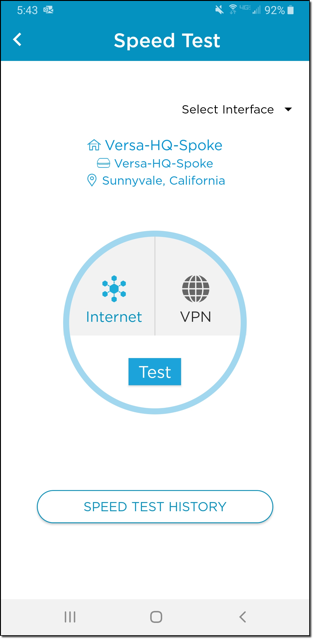
- If you have recently run a speed test, refresh by swiping down on the Speed Test screen before running a second test.
- To run an internet speed test:
- Tap Select Interface, then select an interface from the drop down menu.
- Tap the Internet icon.
- To run a VPN speed test:
- Tap the VPN icon then tap inside the Search box to display the Search screen.

- Scroll through the site list or use the search feature to find a site, then tap on the site name.
- Tap the VPN icon then tap inside the Search box to display the Search screen.
- Tap Test to initiate the test. Test results show the average download and upload speed.
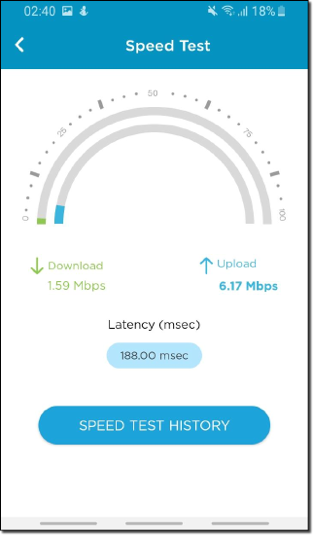
- Return to the Speed Test screen by tapping the left arrow.
- Tap Speed Test History to view the complete speed test history for the device. Tap Clear to clear speed test history.
Check LTE Signal Strength
If LTE is available, signal strength is displayed on the Speed Test screen.
Signal strength above >65 is considered strong; a signal below this value is considered weak.
Tap Reload to refresh any device connected with LTE to troubleshoot connectivity. Wait one minute, then tap Start Speed Test again to check for updated status. Note that you cannot run a speed test on LTE.
Cannot Access Some Websites
If you cannot access some websites, follow these steps:
- From the Troubleshoot screen, tap Cannot Access Some Websites to display the Cannot access some websites screen.

- Perform one of the following:
- Tap Check Blacklisted Sites to see if the particular website is blocked. If a site is blocked, you can remove it from the blacklist.
- Tap Add Sites to Whitelist to add the URLs that you want to allow on your network.
- Tap IP Reputation to check if websites are blocked due to configured risk level. If needed, change the risk level.
- Tap URL Category to allow more sites to be accessible. To stop blocking a site, deselect the Blocked or Alert & Confirm checkboxes.
Check Appliance Settings
If the appliance does not successfully establish a connection with the internet or if appliance activation is not successful, you are prompted to try again or contact Versa technical support. If there is a problem, a pop-up window displays on the dashboard to guide you through troubleshooting appliance settings:
- Tap Get Started in the pop-up window and follow the prompts.

- Make sure the appliance is connected.
- Tap Next to continue.

- Make sure that the appliance is plugged in and has power.
- Tap Next to continue.

- Check the following:
- If you are activating over LTE, make sure that the appliance is able to receive a strong LTE signal.
- Check that the optical network terminal (ONT) and appliance are connected to the Ethernet. Note that connectivity to the ONT is not required with LTE.
- If appliance activation is still not successful, tap Contact Support to access Versa support options.

Contact Support
Contact Versa Support from any screen in the Titan application by tapping the ![]() Hamburger icon and then selecting Support. The Versa Support screen allows you to choose from the following options:
Hamburger icon and then selecting Support. The Versa Support screen allows you to choose from the following options:
- Call
- Chat
- Ticket
You can also tap the button at the bottom of the Support screen to connect with the Customer Support Portal.
Supported Software Information
Release 8.0.0 supports all content described in this article.
