Configure QoS Elements on Concerto
![]() For supported software information, click here.
For supported software information, click here.
You can configure the following types of QoS elements in Concerto:
- Classification
- Traffic-class scheduler
- Rewrite rule (for Releases 10.2.1 and later)
- Interface scheduler
Configure QoS Classification Elements
You use QoS classification elements to categorize all ingress traffic packets based on their importance and to place related packets into their own forwarding class. You can also configure the loss priority and rate limits for each classification, and you can rewrite the Differentiated Services Code Point (DSCP) and 802.1p bits in the packet headers.
To configure a QoS classification element:
- Go to Configure > Profile Elements > Elements > QoS > Classification.

The QoS Classification screen displays.

- Click + Classification to create a new Classification element. In the Create Classification screen, enter information for the following fields.

Field Description Name Enter a name for the classification. Forwarding Class (Group of Fields) - Category
Select the category: - Assured
- Best Effort
- Expedited
- Network Control
- Class
Select the forwarding class to apply to the classification:
- Forwarding Class 0 through Forwarding Class 3 (for the Network Control category)
- Forwarding Class 4 through Forwarding Class 7 (for the Expedited category)
- Forwarding Class 8 through Forwarding Class 11 (for the Assured category)
- Forwarding Class 12 through Forwarding Class 15 (for the Best Effort category)
- DSCP Rewrite
Click to enable the rewriting of the DSCP bits in the headers of outbound traffic. - 802.1P Rewrite
Click to enable rewriting of the 802.1P bits in the headers of outbound traffic. Advanced (Group of Fields) - Loss Priority
Select the loss priority:
- High
- Low
- Rate Limit

Select the type of rate limited:
- Peak Burst Size—Enter the peak burst size, in bytes.
- Peak Rate—Enter the peak rate, in kbps
- Select the Permissions tab, or click Next.
- Update the permissions, if desired, and then click Save.
Configure QoS Traffic-Class Schedulers
You can configure traffic-class schedulers to assign different types of traffic to different outbound queues, which associate drop profiles with a high and a low drop-low priority. Schedulers are grouped into a scheduler map, which assigns the schedulers to a traffic class.
To configure a QoS traffic class scheduler:
- Go to Configure > Profile Elements > Elements > QoS > Traffic Class Scheduler.

The QoS Traffic Class Scheduler screen displays.

- Click + Traffic Class Scheduler to create a new traffic class scheduler. The Create Traffic Class Scheduler screen displays.

- Select the General tab.
- Enter a name for the traffic class scheduler.
- Click Add Rate Type, and then select a rate type, which can be Guaranteed Rate or Transmit Rate.

- Enter a value in the field to the right of Type, and then select the units, either percentage (%) or Kbps.
- Click Advanced.

- For each queue, select a weight value. The value can be 1 through 16.
- Select the Permissions tab, or click Next.
- Update the permissions, if desired, and then click Save.
Configure QoS Rewrite Rules
You configure rewrite rules to remark, or change, bits in the header of outgoing packets. A rewrite rule examines a packet's forwarding class and loss priority and sets the CoS bits to the value defined in the rule. Rewrite rules apply the packet loss priority and forwarding class information to determine the DSCP on outbound packets or streams.
In Concerto Releases 10.2.1 and later, you can configure QoS rewrite rules and make them eusable profile elements. Once you create rewrite rules, you can use them in any Interface policy under Configure Profiles > Profile Elements > >Policy Elements > Device > Interface.To configure QoS rewrite rules:
- Go to Configure > Profile Elements > Elements > QoS > Rewrite Rule.

The QoS Rewrite Rule screen displays.

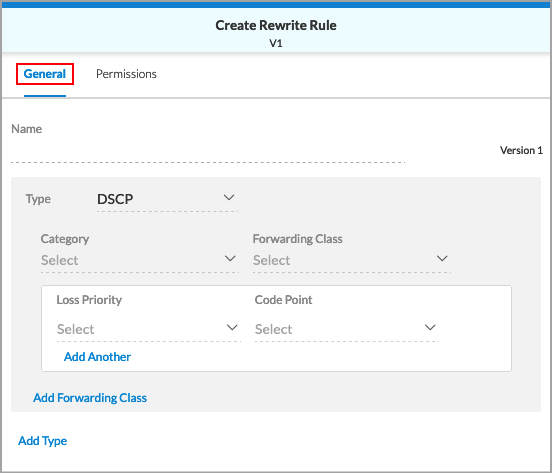
- Click + Rewrite Rule to create a new rewrite rule. In the Create Rewrite Rule screen, enter information for the following fields.

Field Description Name Enter a name for the rewrite rule. Type Select the rewrite table type:
- DSCP
- DSCPv6
- IEEE 802.1p
Category Select the category: - Assured
- Best Effort
- Expedited
- Network Control
Forwarding Class Select the forwarding class to which to apply the rewrite rule. Certain forwarding classes are available for each category:
- Forwarding Class 0 through Forwarding Class 3 (for the Network Control category)
- Forwarding Class 4 through Forwarding Class 7 (for the Expedited category)
- Forwarding Class 8 through Forwarding Class 11 (for the Assured category)
- Forwarding Class 12 through Forwarding Class 15 (for the Best Effort category)
Loss Priority Select the drop loss priority at which the DSCP, DSCPv6, or IEEE 802.1p value should be rewritten: - Low
- High
Code Point Select the standard code point to associate with the forwarding class and the drop loss priority. Add Forwarding Class Click to add another forwarding class, if desired. Add Type Click to add another type, if desired. - Select the Permissions tab, and edit the permissions if desired.
- Click Save to create the reusable rewrite rule.
Use a QoS Rewrite Rule in an Interface Policy
- Go to Configure > Profile Elements > >Policy Elements > Device > Interface.

The Device: Interface screen displays.

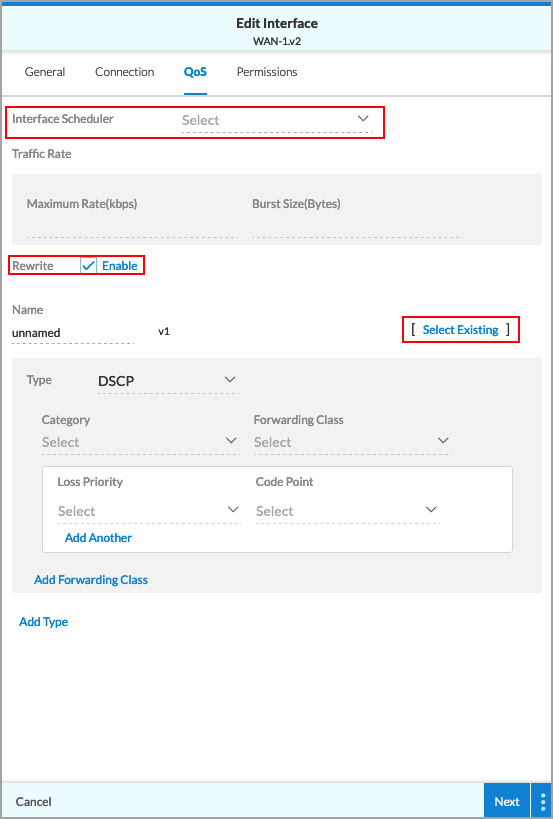
- Click an interface name. The Edit Interface screen displays.

- Select the QoS tab.
- Select an Interface Scheduler .
- Click the Enable Rewrite box.
- Click Select Existing. The reusable rewrite rules display.

- Select a rewrite rule, and then click Add. The details of the rewrite rule are added to the QoS tab of the Edit Interface screen.
Apply a QoS Rewrite Rule to SD-WAN Overlay Tunnels
For Releases 12.1.1 and later.
You can apply a QoS rewrite rule to all SD-WAN overlay tunnels so that the inner packets of all egress traffic are rewritten with the DSCP options specified in the rewrite rule.
To apply a QoS rewrite rule to SD-LAN overlay tunnels:
- Go to the tenant home screen, and then select Settings > SD-WAN Overlay > Tunnel CoS in the left navigation bar.

The following screen displays.

- Select a rewrite rule.
- Click Save.
Configure QoS Interface Schedulers
You can use QoS interface schedulers to assign traffic class schedulers to QoS forwarding class categories.
To configure a QoS interface scheduler:
- Go to Configure > Profile Elements > Elements > QoS > Interface Schedulers.

The QoS Interface Scheduler screen displays.

- Click + Profile to add a new interface scheduler. The Create Interface Scheduler screen displays.

- Enter a name for the new interface scheduler.
- For each category, select an option from the drop-down list on the right. The options are TC1, TC-2, and TC-BE.
- Select the Permissions tab or click Next.
- Update the permissions, if desired, and then click Save.
Supported Software Information
Releases 10.2.1 and later support all content described in this article, except:
- Release 12.1.1 allows you to apply a QoS rewrite rule to all SD-LAN overlay tunnels.
