Configure BGP Import and Export Rules
![]() For supported software information, click here.
For supported software information, click here.
You can configure BGP import and export policies at the BGP peer level so that you have more control over the BGP policies.
To configure BGP import and export rules at the BGP peer level:
- From the Tenants screen, choose the tenant for which you want to configure the BGP import and export rules.
- Go to Configure > Secure SD-WAN > Profile Elements > Policies > Routing > BGP Peer Policy.

The configured BGP peer policies display in the main pane.

- Click a policy in the main pane. The Edit BGP Peer Policy screen displays.

- Select the Policy Terms tab. The Edit BGP Peer Policy screen displays the configured terms.

- To set the order in which the policy terms are applied, reorder the terms by clicking a term and then dragging and dropping it in the desired position in the list.
- To edit a policy term, click an existing term name. The Edit Policy Term screen displays.
- To enable the policy term, select the General tab and lick the slider to the right.

- To configure policy match criteria, select the Criteria tab and enter information for the following fields. You can parameterize any field inline, or you can enter absolute values. For more information about parameterizing variables, see Parameterized Variables with Type.

Field Description Community
Enter the BGP community string to match. A BGP community is a group of destinations with a common property. This path attribute in BGP update messages identifies community members and performs actions at a group level instead of at an individual level. BGP communities help identify and segregate BGP routes, enabling smooth traffic flow.
Extended Community
Enter the extended BGP community string to match. In an extended community, you can group a larger number of destinations than in a community. The extended community string must be 16 characters long.
Range: 0000000000000000 through FFFFFFFFFFFFFFFF
Default: None
AS Path Enter the AS path number to match. Metric (For Releases 12.2.1 and later.) Enter the metric value to assign to the route. Range: 0 through 4294967295
IPv4 Prefix Enter information about the IPv4 prefix:
- IPv4 Subnet—Enter the IPv4 prefix.
- Minimum Length—Enter the minimum prefix length to match.
Range: 0 through 32
Default: None - Maximum Length—Enter the maximum prefix length to match.
Range: 0 through 32
Default: None
IPv6 Prefix Enter information about the IPv6 prefix:
- IPv6 Subnet—Enter the IPv6 prefix.
- Minimum Length—Enter the minimum prefix length to match.
Range: 0 through 128
Default: None - Maximum Length—Enter the maximum prefix length to match.
Range: 0 through 128
Default: None
Action Select the action to take on the routes:
- Accept—Accept routes with this prefix.
- Reject—Reject routes with this prefix.
- Click the Action tab, and enter information for the following fields. You can parameterize any field or give absolute values.

Field Description Action Select the action to take on the routes:
- Accept
- Reject
Local Preference Enter the local preference value to use to choose the outbound external BGP path.
Range: 0 through 2147483647
Next Term (For Releases 12.2.1 and later.) Select the name of the next term to evaluate. You can use this field to create a sequence of terms, and then you use the Next-Term Action field to configure the sequence as an AND or OR series. Next Term Action (For Releases 12.2.1 and later.) When you use the Next Term field, select whether to create an AND series and an OR series: - AND Series—Add this term to an AND series.
- OR Series—Add this term to an OR series.
Enabled ECMP for BGP Routes in RIB
Select to perform equal-cost multipath (ECMP) for BGP paths in the route table. BGP performs ECMP load-balancing when two or more routes have the same administrative distance. Route Preference
Enter a route preference value for routes learned from EBGP.
Range: 0 through 255
Default: None
Metric Action
Select one of the following:
- Set Value
- IGP (interior gateway protocol)
- Add
- Subtract
Metric
Enter a number from 0 through 2147483647.
Note that this field does not apply to the IGP metric action.
Community (Group of Fields) - Community Action
Select how to match the community list for a route:
- Ignore the community field.
- Remove all communities from the route.
- Replace all communities with the value of community value.
- Remove all communities that match community value.
- Append the value of community value into the communities list.
- Community Value
Enter the community value. Enter the value as a set of communities separated by a space, in the format 2-byte decimal:2-byte decimal. Note that not all extended community actions require a community value.
Range: 0 through 65535
Default: None
- Extended Community Action
Select how to match the community list for a route:
- Ignore the community field is ignored.
- Remove all communities from the route.
- Replace all communities with the value of community value.
- Remove all communities that match community value.
- Append the value of community value into the communities list.
- Extended Community Value
Enter the extended BGP community string to match. In an extended community, you can group a larger number of destinations than in a community. The extended community string must be 16 characters long.
Range: 0000000000000000 through FFFFFFFFFFFFFFFF
Default: None
AS Path (Group of Fields) - AS Path Action
Select a regular expression to match the AS path for the route:
- No AS path action.
- Prepend the local AS the number of times specified by the local AS prepend count value.
- Remove all AS numbers that match the AS path.
- Remove all AS numbers that match the AS path and prepend the local AS the number of times specified by the local AS prepend count value.
- AS Path Prepend
Select how to prepend the AS number to an AS path. If you select the No AS Path Action, you do not need to configure an AS prepend value.
Range: 1 through 4294967295
Default: None
- Local AS Path Count
Enter the number of times to prepend the local AS number to the AS path.
Range: 1 through 255Default: None
- Click Save.
After you configure BGP peer policies, attach them to one or more device profiles:
- Go to Configure > Secure SD-WAN > Profiles > Subprofiles > Device.

The screen displays the currently configured devices.

- Click a configured device in the main pane. The Edit Device Subprofile screen displays.

- Select the Policy tab.

- Click +Policy, and then select BGP Peer Policy.

- Select Choose Existing. The Choose Policies screen displays.

- Select a BGP policy to attach to the device profile, and then click Add. The BGP Peer Policy is added to the Edit Device Subprofile screen.
To attach the BGP import and export policies to an interface policy element:
- Go to Configure > Profile Elements > Policy Elements > Device > Interface.

The main pane displays the configured interface policy elements.

- Optionally, click a LAN or WAN interface. The Edit Interface screen displays.
- If you select a LAN interface, select the Address and Routing tab, and then select Static.

- If you select a WAN interface, select the Connection tab, select Static, and then enter the IPv4 address and next-hop address.

- If you select a LAN interface, select the Address and Routing tab, and then select Static.
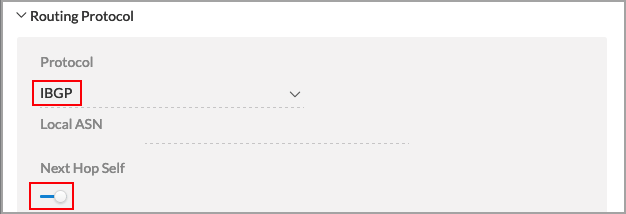
- Under Routing Protocol, select EBGP or IBGP in the Protocol field and then enter the local ASN number. By default, Next-Hop Self is enabled for IBGP. For Releases 11.3.1 and later, you can disable Next-Hop Self by clicking the slider to the left. Note that you can also disable Next-Hop Self at the Basic Master Profile level by following this path: Configure > Master Profiles > Basic > Edit Master Profile > Profile tab > Network tab > Edit WAN Interface > Connection tab > Routing Protocol.

- To configure Bidirectional Forwarding Detection (BFD), click the slider under BFD to the right, and then enter information for the following fields.

Field Description Interval Enter the minimum time interval to receive routes, in milliseconds.
Range: 1 through 255000 milliseconds
Default: 1000 milliseconds
Multiplier Enter the multiplier value used to calculate the final minimum receive interval and minimum transmit interval.
Range: 1 through 255
Default: 3
- Under Neighbor, click Add Neighbor. Enter the IP address and ASN number of the neighbor, and then select a BGP import policy and an export policy and enter a password.

- Select the Permissions tab, and then click Save to save the configuration.
After you have attached a BGP peer policy to a Device > Interface policy element, ensure that the same version of the Device > Interface policy element is used in any Standard Master Profile to which the peer policies are attached. Otherwise, the system displays an error message when you next attempt to publish the configuration.
Supported Software Information
Releases 10.2.1 through 12.2.2 support all content described in this article, except:
- Release 11.3.1 adds support for disabling next-hop self for IGBP.
- Release 12.2.1 adds support for the Metric field for policy term match criteria, and Next Term and Next Term Action fields for policy term actions.