Configure Intrusion Detection and Prevention
![]() For supported software information, click here.
For supported software information, click here.
A security vulnerability is an unintended flaw that allows malicious users to surreptitiously attack a network. Attackers can exploit such vulnerabilities to break into and damage the network by changing, destroying, or stealing secured or confidential information, or by installing malware.
To protect a network against security vulnerabilities, the Versa Operating SystemTM (VOSTM) unified threat management (UTM) capabilities include intrusion detection and prevention (IDP). IDP is a preemptive approach to network security that identifies potential threats and responds to them based on user-defined policy. IDP comprises two components:
- Intrusion detection system (IDS) is the process of examining the network for indications of vulnerabilities and for detecting inappropriate or anomalous activity.
- Intrusion prevention system (IPS) is the process of stopping vulnerabilities by responding to inappropriate or anomalous activity. Responses can include dropping data packets and disconnecting connections that are transmitting unauthorized data.
Security analysts can use network IDS systems to examine network traffic and the network protocols, applications, and operating systems running on the network. To inspect and process the desired traffic, an IDS system can be placed inline. However, they are commonly connected to a switch's spanning port or attached to a hub, or they make use of network taps.
You commonly place an IPS system at the perimeter of a corporate network.
IPS performs the following types of vulnerability detection to help prevent attacks, including zero-day attacks such as worms or viruses:
- Signature-based detection—Signatures are a set of rules that a vulnerability profile uses to detect intrusive activities. With signature-based detection, a security profile compares a software or application pattern with a database of signatures, identifying malicious activity by matching patterns to those in the database. Versa security packs (SPacks) provide a set of predefined signatures, and you can also create custom signatures.
- Anomaly detection—Anomaly detection monitors a network for unusual events or trends. You configure the vulnerability profile that compares an observed event with the baseline of the normal traffic. Anomaly detection detects patterns that are normally not present in the traffic, so it is useful for detecting new attacks.
Implementing a properly tuned and managed IPS solution at all corporate ingress and egress points helps to ensure that new and previously identified threats are dropped at the perimeter, while allowing legitimate traffic to pass.
Having an IPS deployment at the edges of the network provides the preventative measures and control needed to combat new and existing threats, and including an IDS inside the firewall and at critical internal network nodes provides visibility into internal activity.
The following figures illustrate how an IDS/IPS solution can be deployed within an enterprise:
The first figure illustrates how traffic travels between an enterprise corporate network and the public internet. An edge router, a firewall, and a Layer 3 switch are positioned between the internet and the corporate network. The switch connects to a VOS device that is configured as an IDS security device. This switch has four ports, two regular network ports (one on the WAN side and one on the LAN side) and two mirror ports that connect to the VOS device. The two mirror ports send copies of the packets they receive to the VOS device for IDS processing and analysis. The green mirror port (on the left) mirrors packets received from the public internet, and the blue mirror port (on the right) mirrors packets received from the corporate LAN. Having two mirror ports allows the Layer 3 switch to process incoming and outgoing data streams concurrently on separate paths, thus ensuring that all traffic flowing across the network is monitored by the VOS IDS capability. In this type of deployment, a keepalive session is maintained between the Layer 3 switch and the VOS device to prevent network outages.

In the following figure, traffic between an enterprise corporate network and the public internet passes through a VOS device that is configured as an IPS security device. The IPS system analyzes data traffic for vulnerabilities before the traffic is forwarded towards its destination. In this scenario, if the VOS device goes down and the IPS system is no longer available, a network outage can occur.

To use IDP, you configure IDS and IPS vulnerability profiles, as described in this article. It is recommended that you use the predefined vulnerability profiles, or you can create custom vulnerability profiles. You then associate the vulnerability profiles with a next-generation firewall (NGFW) security profile (also called an access policy profile) in an NGFW policy, as described in Configure a Security Access Policy. In the policy you define the traffic to match based on various parameters, such as zones and applications, and you configure the policy to enforce the action defined in vulnerability profile.
This article discusses how to configure and use IDP:
- Install the Versa IDP signature database
- Use predefined vulnerability profiles
- Create custom vulnerability profiles
- View vulnerability statistics and logs
Install the Versa IDP Database
The Versa security research team provides an IDP signature database, and provides regular updates to the database in security packages (SPacks). To obtain the current signature database, download the latest SPack. For more information, see Use Security Packages.
Use Predefined Vulnerability Profiles
View Predefined Vulnerability Profiles
Versa provides a set of predefined vulnerability profiles, including the Versa Recommended Profile, which detect vulnerabilities against servers and clients.
To view the predefined profiles:
- In Director view:
- Select the Administration tab in the top menu bar.
- Select Appliance in the left menu bar.
- Select an appliance in the main pane. The view changes to Appliance view.

- Select the Configuration tab in the top menu bar.
- Select Objects & Connectors > Objects > Predefined > Vulnerability in the left menu bar. The main pane lists the predefined vulnerability profiles, which are explained in the following table.

Vulnerability Profile Description All Anomaly Rules Load all the anomaly signatures. Anomaly rules have threshold values; to change the threshold value of a protocol anomaly, see Configure Security Scanners.
All Attack Rules
Load all attack signatures. Client Protection Load all client-side attacks. Database Profile Load the Oracle database server vulnerability signatures. ICS Profile Load the industrial control system (ICS) vulnerability signatures. Lateral Movement Detection Detect post-exploitation activities in Windows OS. Linux OS Profile Detect all attacks specific to Linux OS. Mac OS Profile Detect all attacks specific to Mac OS. Malware Profile Detect all antivirus attacks. Server Protection Detect server-side attacks. Windows OS Profile Detect attacks specific to all Windows OSs. Versa Branch Profile Enable rules to detect vulnerabilities against servers and client, but by using less memory. These profiles cover common vulnerability scoring system (CVSS) range 6 through 10 vulnerabilities for the last 5 years and CVSS range 7 through 10 for the last 10 years. The Versa Branch Profile requires a minimum of 8 GB of RAM. Versa Recommended Profile Enable rules to detect vulnerabilities against servers and clients. These profiles cover CVSS range 6 through 10 vulnerabilities for the last 10 years and critical vulnerabilities older than 10 years. The Versa Recommended Profile requires a minimum of 16 GB of RAM. It is recommended that you use the Versa-Recommended Profile.
View Filter Values for Predefined Vulnerability Profiles
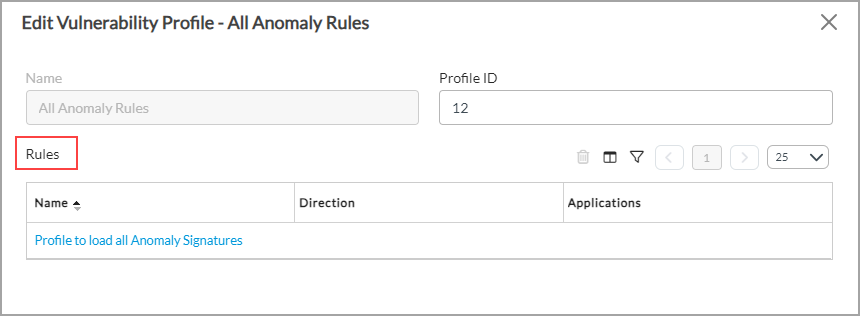
Each predefined vulnerability rule consists of a rule or a set of rules that define filter values such as action, CVSS score, and rule type. To view the filter values:
- In Director view:
- Select the Administration tab in the top menu bar.
- Select Appliance in the left menu bar
- Select an appliance in the main pane. The view changes to Appliance view.
- Select the Configuration tab in the top menu bar.
- Select Objects & Connectors > Objects > Predefined > Vulnerability in the left menu bar.

- Select a Predefined Vulnerability profile in the main pane.
- Select the Rules tab, and and then select a rule to view the profile's filter values.
Modify a Predefined Vulnerability Profile
To modify the parameters in a predefined vulnerability profile, you create an override profile:
- In Director view:
- Select the Administration tab in the top menu bar.
- Select Appliance in the left menu bar.
- Select an appliance in the main pane. The view changes to Appliance view.

- Select the Configuration tab in the top menu bar.
- Select Services > Next-Gen Firewall > Security > Profiles > Predefined Vulnerability Profile Override in the left menu bar.

- Click the
 Add icon. In the Add Predefined Vulnerability Profile Override popup window, enter information for the following fields.
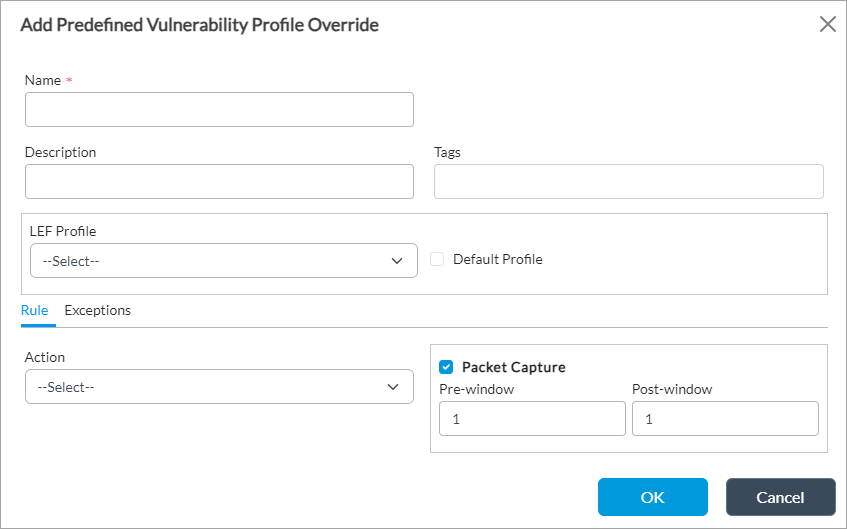
Field Description Name (Required)
Enter a name for the modified vulnerability profile.
Description
Enter a text description for the vulnerability profile.
Tags
Enter a keyword or phrase that allows you to filter the profile name. This is useful when you have many profiles and want to view those that are tagged with a particular keyword.
LEF Profile
Select a log export functionality (LEF) profile to use to record logs for the profile. For information about configuring a LEF profile, see Configure Log Export Functionality. For information about associating a LEF profile with a feature or service, see Apply Log Export Functionality. Default Profile Select to send logs to the default LEF profile. For information about configuring a default LEF profile, see Configure Log Export Functionality. -
Select the Rule tab to configure a vulnerability profile rule. In the popup window, enter information for the following fields.

Field Description Action Select an action. This action overrides the action in the predefined vulnerability profile.
Packet Capture (Group of Fields)
Click to enable packet capture. Packet capture information is automatically sent to the Analytics node, where you can view and download it. For more information, see View Packet Capture Logs, below.
- Pre-window
Enter the number of packets immediately preceding the attacked packet that you want to capture. - Post-window
Enter the number of packets immediately following the attacked packet that you want to capture. -
Select the Exceptions tab to configure a vulnerability profile exception. Click the
 Add icon, and in the Add Exception popup window, enter information for the following fields.
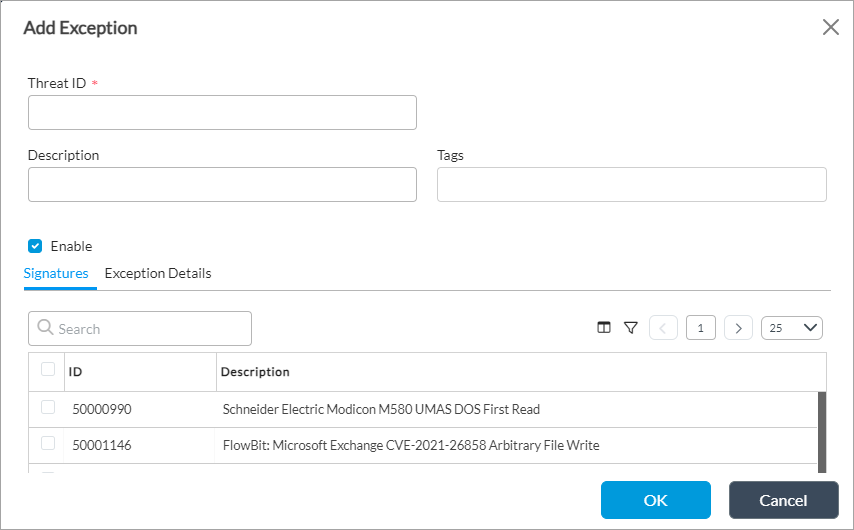
Field Description Threat ID (Required)
Enter the threat ID.
Description
Enter a text description for the threat.
Tags
Enter a keyword or phrase that allows you to filter the threat exception. This is useful when you have many threat exceptions and want to view those that are tagged with a particular keyword.
Signatures (Tab) Select the vulnerability signatures to add to the vulnerability profiles exception rule. Exception Details (Tab) - Exempt IP Address
Click the
 Add icon to enter IP addresses that are exempt from the vulnerability rule.
- Threshold (Group of fields)
Select the threshold application on the exempted IP address:
-
Track By—Select the threshold tracking based on either source address, destination address, or both source and destination addresses.
-
Interval—Enter an interval, in seconds.
-
Threshold—Enter the number of hits per interval based on the traffic direction.
- Action
Select the action to take:
- Allow
- Alert
- Drop packet
- Drop session
- Reject
- Reset client
- Reset server
- Packet Capture (Group of Fields)
Click to enable packet capture:
-
Pre-window—Enter the number of packets immediately preceding the attacked packet that you want to capture.
-
Post-window—Enter the number of packets immediately following the attacked packet that you want to capture.
- Click OK.
After you override a predefined vulnerable profile, you must re-apply it to the security access policy rule, as described in the Associate Vulnerability Profiles with Access Policy Profiles section, below.
Create Custom Vulnerability Profiles
- In Director view:
- Select the Administration tab in the top menu bar.
- Select Appliance in the left menu bar.
- Select an appliance in the main pane. The view changes to Appliance view.

- Select the Configuration tab in the top menu bar.
- Select Services > Next Gen Firewall > Security > Profiles > Vulnerability in the left menu bar
- Click the
 Add icon to create a new vulnerability profile.
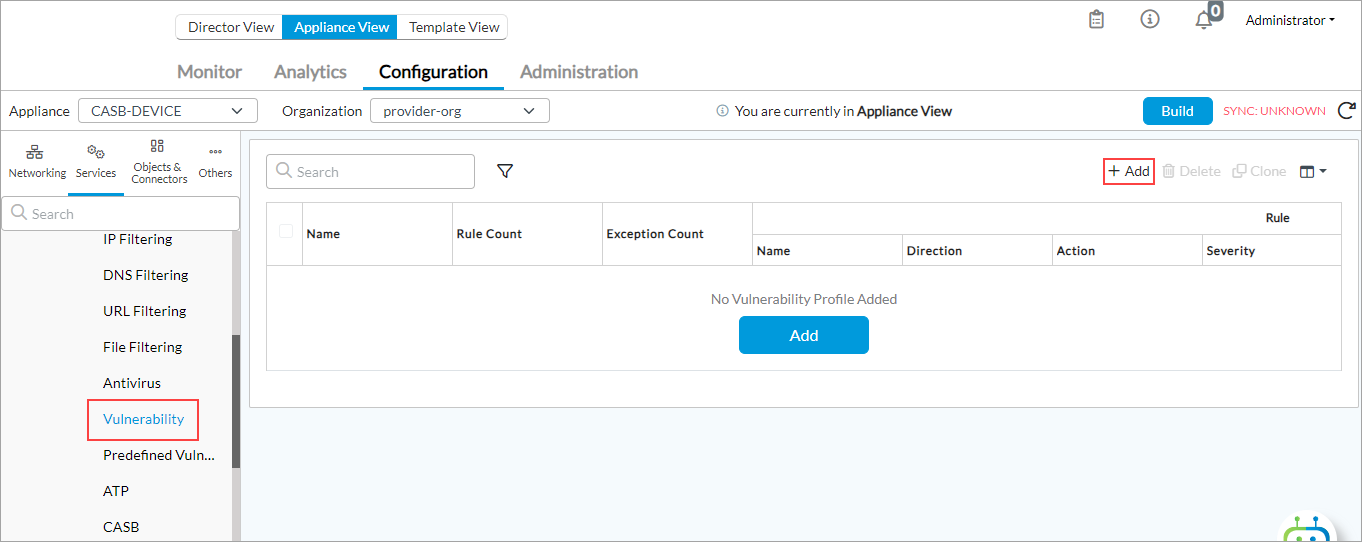
- In the Add Vulnerability Profile popup window, enter information for the following fields.
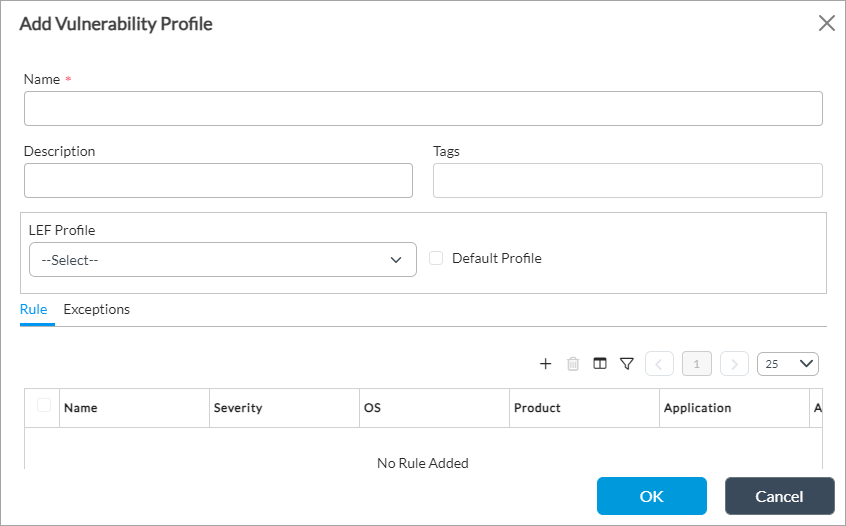
Field Description Name (Required)
Enter a name for the vulnerability profile.
Description
Enter a text description for the vulnerability profile.
Tags
Enter a keyword or phrase that allows you to filter the profile name. This is useful when you have many profiles and want to view those that are tagged with a particular keyword.
LEF Profile
Select a log export functionality (LEF) profile to use to record logs for the vulnerability profile. For information about configuring a LEF profile, see Configure Log Export Functionality. Default Profile Click to send logs to the default LEF profile. For information about configuring a default LEF profile, see Configure Log Export Functionality. -
Select the Rule tab to configure a vulnerability profile rule. Click the
 Add icon, and in the Add Rule popup window, enter information for the following fields. You can add one or more rules in a single vulnerability profile. After you have created a rule, you can modify and save it without altering the functionality of the existing vulnerability profile.

Field Description Name (Required)
Enter a name for the vulnerability profile rule.
Description
Enter a text description for the vulnerability profile rule.
Tags
Enter a keyword or phrase that allows you to filter the profile rule name. This is useful when you have many rules and want to view those that are tagged with a particular keyword.
CVE Year
Click the
 Add icon and select the common vulnerabilities and exposures (CVE) year. The CVE year matches the signature in the database and identifies the attacks. For example, select 2016 to block attacks for CVE 2016.
Signature Set
Click the
 Add icon and select predefined, user-defined, or both types of signatures.
Enable
Click to enable the vulnerability profile rule.
General (Tab) Configure general parameters for signatures to match. - Confidence
Click the
 Add icon and select the confidence level to match. Confidence indicates the effectiveness of a signature to detect vulnerability. In certain cases, Versa has deliberately kept confidence levels lower to mitigate false positives and to address performance concerns. Signatures match if the confidence level is greater than or equal to the selected level.
 Value: 0 through 9, Unspecified. The higher the value, the higher is the confidence. For example, 9 is the highest confidence level and 0 is the lowest. It is recommended to choose a signature value from 6 through 9.
- Class Type
Click the
 Add icon and select a class type to match.
- Direction
Click the
 Add icon and select the traffic direction for applying the rule to signatures:
-
Both
-
Client
-
Server
- Rule Type
Click the
 Add icon and select a rule type to match:
-
All rules
-
Anomaly rules
-
Signature rules
- Action Filter
Click the
 Add icon and select the action to take if the signatures match the rule:
-
Alert
-
Drop session
-
Reject
- CVSS Score
Click the
 Add icon and select the CVSS score for the signatures to match.
OS/Product (Tab) Configure operating system and product parameters for signatures to match. - OS Name (Required)
Select the name of the operating system to match and click the
 Add icon.
- OS Version
Select the version of the operating system to match and click the
 Add icon.
- Product Name (Required)
Select the name of the product to match and click the
 Add icon.
- Product Version
Select the version of the product to match and click the
 Add icon.
Application (Tab) Configure application for signatures to match. - Applications
Click the
 Add icon and select the application to match.
Reference/Severity (Tab) - Reference Type (Required)
Select and use signatures that match a specific reference type, as specified in the database. Click the
 Add icon to add the reference type to the rule.
- Reference Value
Select and use signatures that match a specific reference value, as specified in the database. Click the
 Add icon to add the reference value to the rule.
- Severity
Click a severity to limit signatures to those that match that severity type:
-
Any
-
Critical
-
High
- Informational
- Low
-
Medium
-
Unspecified
Enforce (Tab) - Action
Select an action to take on matching traffic. The action applies to both predefined and custom vulnerability profiles.
- Default
- Predefined
- Allow
- Alert
- Drop packet
- Drop session
- Reject
- Reset client
- Reset server
- Predefined Persistent
- Versa action block SIP
- Versa action block SP
- Versa action block DIP
- Versa action block DP
- Versa action block SIP SP
- Versa action block DIP DP
- Versa action block SIP SP DIP DP
- Versa action block SIP SP DIP DP Protocol
- Packet Capture (Group of Fields)
Click to enable packet capture:
- Pre-window—Enter the number of packets immediately preceding the attacked packet that you want to capture.
- Post-window—Enter the number of packets immediately following the attacked packet that you want to capture.
-
Select the Exceptions tab to configure a vulnerability profile exception. Click the
 Add icon, and in the Add Exception popup winter, enter information for the following fields.

Field Description Threat ID (Required)
Enter a name for the threat ID.
Description
Enter a text description for the threat ID.
Tags
Enter a keyword or phrase that allows you to filter the threat ID. This is useful when you have many threat ID and want to view those that are tagged with a particular keyword.
Enable Click to enable the exception. Signatures (Tab) Select the predefined or custom vulnerability signatures to add in the vulnerability profiles exception rule. - Predefined (Tab)
Select the predefined vulnerability signatures to add in the vulnerability profiles exception rule. - User-defined (Tab)
Select the custom vulnerability signatures to add in the vulnerability profiles exception rule. Exception Details (Tab) - Exempt IP Address
Click the
 Add icon and enter IP addresses to exempt from the vulnerability rule.
- Threshold (Group of Fields)
Configure the thresholds for the exempted IP address:
-
Track By—Select how to track the IP address:
-
Destination address
-
Source address
-
Source and destination addresses
-
-
Interval—Enter a time interval, in seconds.
-
Threshold—Enter the number of hits per interval based on the traffic direction.
- Action
Select the action to take:
- Predefined
- Allow
- Alert
- Drop packet
- Drop session
- Reject
- Reset client
- Reset server
- Packet Capture
Click to enable packet capture:
- Pre-window (Required)—Enter the number of packets immediately preceding the attacked packet that you want to capture.
- Post-window—Enter the number of packets immediately following the attacked packet that you want to capture.
- Click OK.
Associate Vulnerability Profiles with Access Policy Profiles
To perform intrusion detection and prevention on incoming traffic, you associate a vulnerability profile with an access policy:
- In Director view:
- Select the Administration tab in the top menu bar.
- Select Appliance in the left menu bar.
- Select an appliance in the main pane. The view changes to Appliance view.

- Select Configuration in the top menu bar.
- Select Services > Next Gen Firewall > Security > Policies in the left menu bar.
- Click the Rules tab to display the access policy rules.

- Select the desired access policy rule. The Add Rule popup window displays.
- Select the Enforce tab.
- In the Actions section, select Apply Security Profile. When you select this field, the Profiles section, on the lower part of the popup window, is then selected.
- Click Vulnerability and select the vulnerability profile to associate with the security access policy rule. The drop-down includes both predefined and custom vulnerability profiles.

- If you select a predefined vulnerability profile, the Predefined Vulnerability Profile Override field is selected, and you must select an override profile. For more information, see Modify a Predefined Vulnerability Profile, above.
- Click OK.
- Check the compilation state of the vulnerability profile. For more information, see View Signature Compilation Status and Loaded Signatures.
To disable the vulnerability profile for an access profile, unselect the Vulnerability field.
For more information about access policies, see Configure a Security Access Policy.
Configure Custom Vulnerability IPS Signatures
You can configure a custom vulnerability IPS signature that includes both predefined and custom signatures. A VOS device scans the network traffic for both predefined and custom vulnerabilities and enforces the configured security action if a match is found.
You can import and use your own custom IPS signatures. To do this, upload the signatures to the Director node and then push the IDS signatures to any VOS device that is managed by the Director node. Then, you can enable and configure a vulnerability profile that includes the custom IPS signature.
Create Custom IPS Signatures
When you create custom IPS signatures, they must be in the Snort rule format. For more information, refer to the publicly-available Snort documentation.
The following is an example of a Snort rule:
alert tcp $EXTERNAL_NET any -> $HOME_NET $HTTP_PORTS (msg:"Directory Traversal"; flow:to_server; content:"GET"; depth:3; nocase; http_method; content:"|2e 2e 5c|"; http_uri; classtype:web-application-attack; sid:1910000001; ) |
Currently, VOS devices do not support the following keywords in custom signatures: hash, protected_content, http_encode, and byte_math.
It is recommended that a custom signature be in the SID range 4293000000 through 4294000000.
Configure Custom IPS Signatures
An IPS signature file contains vulnerability rules. To configure a custom IPS signature file:
- In Director view:
- Select the Administration tab in the top menu bar.
- Select Appliance in the left menu bar.
- Select an appliance in the main pane. The view changes to Appliance view.
- Select the Configuration tab in the top menu bar.
- Select Objects and Connectors > Objects > Custom Objects > Vulnerability Rules in the left menu bar.

- In the main pane, select the Director tab.
- To upload a custom vulnerability rules file to the Director from a local folder:
- Select the
 Upload icon.

- Click Browse, select the desired file from a local folder, and then click OK.

- Select the
- (For Releases 21.2 and earlier.) To download a custom vulnerability rules file from the Director to a local folder:
- Select the file in the main panel and click the
 Download icon.

- Enter a name for the file and click Save.
- Select the file in the main panel and click the
- To delete a custom vulnerability rules file, select the file in the main pane and then click the
 Delete icon.

- To associate a VOS device with a custom vulnerability rules file, select the Appliance tab.
- To upload a custom vulnerability rules file to the Director node from a local folder:
- Select the
 Upload icon.
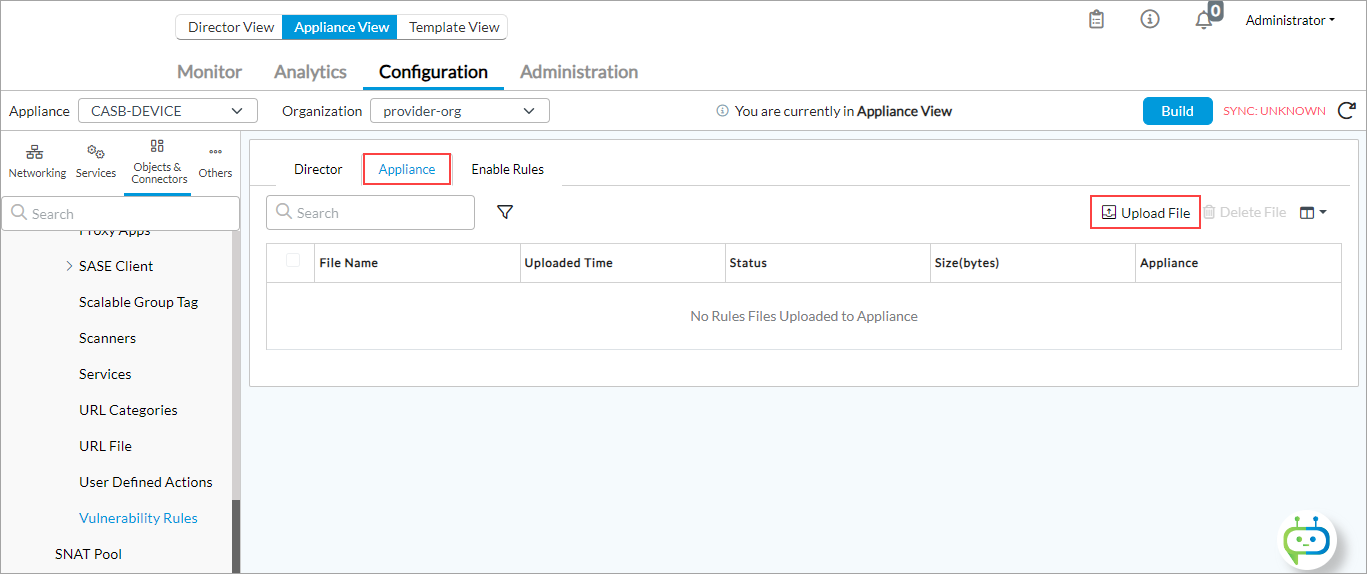
- Select a rule in the Custom Rule field and click OK.

- Select the
- To delete custom vulnerability rules file, select the file in the main pane and then select the
 Delete icon.
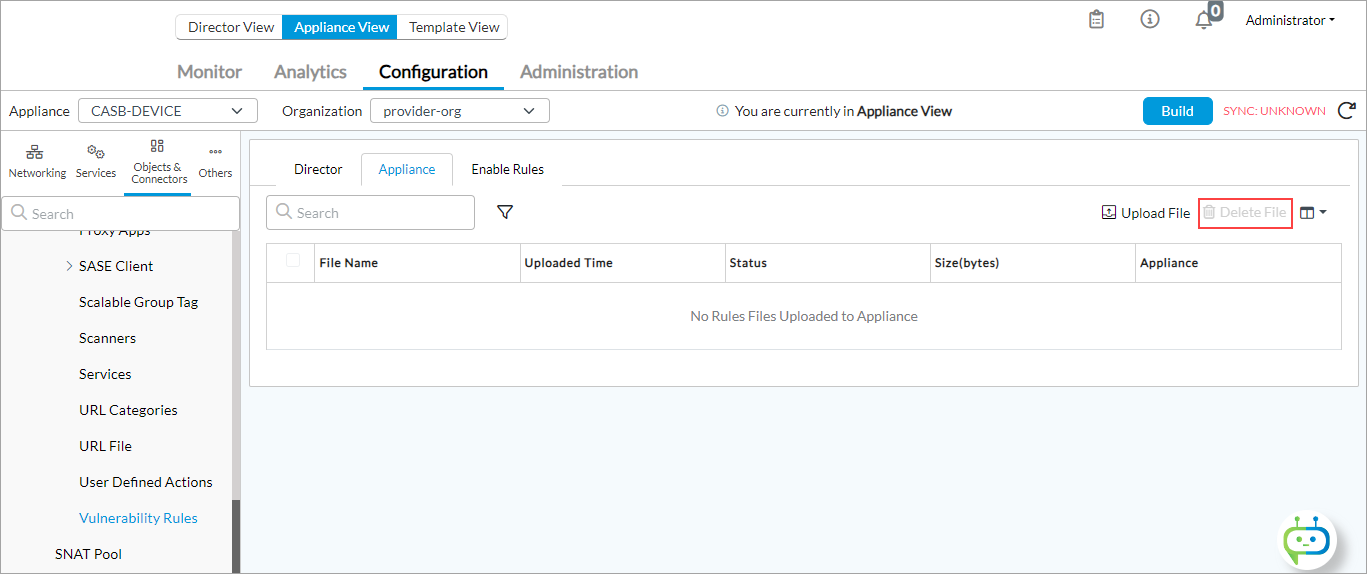
- To enable the custom IPS signature for vulnerability profiles on a tenant:
- Select the Enable Rules tab, select the rule from the main pane, and click the
 Edit icon.

- Click the Enable checkbox to enable a rule for the custom IPS signature.

- Click OK.
- Select the Enable Rules tab, select the rule from the main pane, and click the
Deactivate Custom IPS Signatures for Custom Vulnerability
To deactivate a custom IPS signature for custom vulnerability:
- In Director view:
- Select the Administration tab in the top menu bar.
- Select Appliance in the left menu bar.
- Select an appliance in the main pane. The view changes to Appliance view.
- Select the Configuration tab in the top menu bar.
- Select Objects and Connectors > Objects > Custom Objects > Vulnerability Rules in the left menu bar.
- Click the Enable Rules tab.
- Click the
 Edit icon in the main pane to edit the setting in Enable Rules window.

- Deselect the Enable checkbox.

- Click OK.
View Signature Compilation Status and Loaded Signatures
If you change the vulnerability profile in an existing access policy rule, the database is recompiled and it takes some time for the new vulnerability profile to take effect. During this transition, you can view the status of the profile from the time you change the profile to time a profile takes effect.
To check the compilation status:
- In Director view:
- Select the Configuration tab in the top menu bar.
- Select Devices > Devices in the horizontal menu bar.
- Select a device in the main pane. The view changes to Appliance view.

- Select the Monitor tab in the top menu bar.
- Select Services > NGFW > Vulnerability in the left menu bar.

- Select IPS Compile Status from the drop-down. The extended window displays the details of the profile.

The following table explains the fields in the output:
Field Description Brief Status Status of the compilation:
- Ready—IPS signature compilation is done.
- Compiling—IPS signature is being compiled.
- Abort-LowMem—If you enable the vulnerability profile in an access policy profile and the available RAM is less than 1 GB, the traffic is dropped. You must disable the vulnerability profile in the access policy profile for the traffic to be accepted.
Load IPS Signature Number of loaded signatures. Ignore IPS Signature Number of ignored IPS signatures. Fail IPS Signature Number of failed IPS signatures. Load App ID Signature Number of loaded Application ID signatures. Ignore App ID Signature Number of ignored Application ID signatures. Fail App ID Signature Number of failed Appli ID signatures. Compile Time Time taken for the compilation. process
To check the compilation status:
- In Director view:
- Select the Configuration tab in the top menu bar.
- Select Devices > Devices in the horizontal menu bar.
- Select a device in the main pane. The view changes to Appliance view.
- Select the Monitor tab in the top menu bar.
- Select Services > NGFW > Vulnerability in the left menu bar.
- Select the Vulnerability Signatures tab.
- Select an option from the drop-down, and click view for the vulnerability profile you loaded.

Modify IPS System Parameters
To change the IPS system parameters:
- In Director view:
- Select the Configuration tab in the top menu bar.
- Select Devices > Devices in the horizontal menu bar.
- Select a device from the main pane. The view changes to Appliance view.

- Select Configuration in the top menu bar.
- Select Others > System > Configuration > Configuration in the left menu bar.

-
In the Parameters pane, click the
 Edit icon to edit the IPS parameters. In the Edit Parameters popup window, select General tab and enter information for the following fields.

-
Select DPI/IPS Custom Config tab and enter information for the following fields.
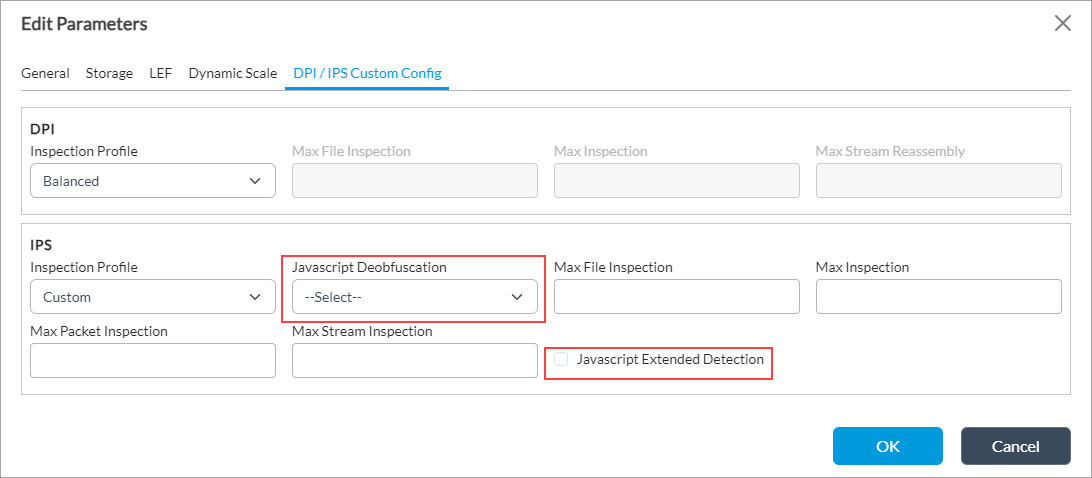
For Releases 21.2 and earlier:
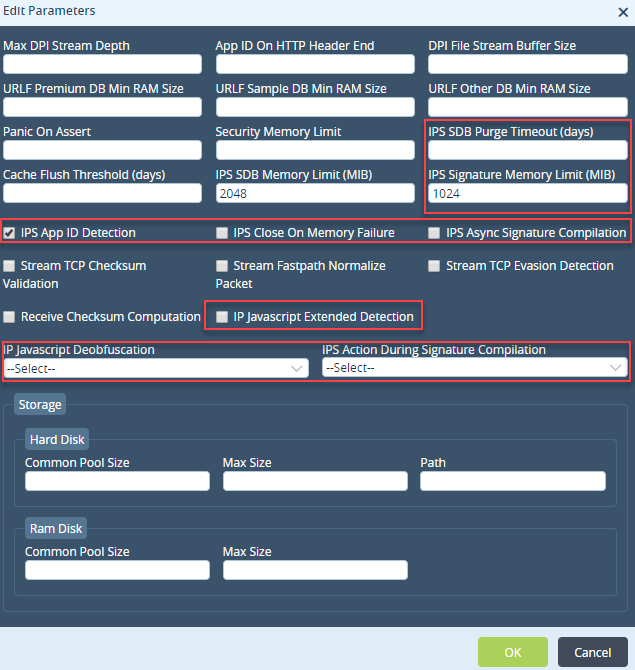
Field Name
Description
IPS SDB Purge Timeout
Enter how long to save the compilation details in the IPS signature database when you compile the IPS signature.
This file is deleted after the specified number of days, and a new file is generated the next time you recompile the IPS signature.
Range: 0 through 65535 days
IPS SDB Memory Limit Enter the memory limit of the signature database. If system RAM is below this value, you must delete data in the IPS database file.
IPS Signature Memory Limit Enter the memory limit of the IPS signature database. If the memory of the IPS database is below this value, the IPS signatures fail to load.
Default: 1024 MB
IPS App ID Detection
Click to have both the IPS engine and the application engine perform application identification.
Default: Enabled
IPS Close On Memory Failure
Click to drop a session if memory is not available.
Default: Disabled
IPS Async Signature Compilation (For Releases 22.1.3 and later.) Click to have the IPS signature compilation occur in parallel with control operations. IPS signature compilation then takes place in a separate thread without blocking the other ongoing control operations. While a new version of IPS signature is being compiled, traffic is processed using the previous version of IPS signature.
IPS Javascript Extended Detection Click to perform extended Javascript detection after deobfuscation completes. IPS Javascript Deobfuscation Select an option to convert a Javascript or an HTML program to a simple, understandable program.
IPS Action During Signature Compilation Select the action to take when a signature compilation is in progress. You can either allow or reject traffic. -
Click OK.
Note: You can set other IPS parameters from the CLI.
View Vulnerability Information
To view information about a VOS device's vulnerability, you can do the following:
- View vulnerability profile statistics and logs
- View vulnerability threats and logs
- View packet capture logs
Display Vulnerability Profile Statistics and Logs
To view profile statistics for predefined profiles:
- In Appliance view, select the Monitor tab in the top menu bar.
- Select Services > NGFW > Vulnerability.
- In the drop-down menu, select Predefined.

- Click the
 right arrow next to the name of the predefined profile.

To view profile statistics for custom profiles:
- In Appliance view, select the Monitor tab in the top menu bar.
- Select Services > NGFW > Vulnerability.

- In the drop-down menu, select User Defined .
- Click the
 right arrow next to the name of the custom profile. The extended window displays the statistics.

View Vulnerability Threats and Logs
When an attack is detected, the IPS engine blocks the traffic, and the Director node logs the details on the Analytics node.
To view the vulnerability threats:
- Log in to the Analytics node that is integrated with the Director node.
- Select Dashboard in the top menu bar.
- Select Security > Threats in the left navigation bar. The following window displays, showing the security panes with top data.

To view the vulnerability logs:
- Log in to the Analytics node that is integrated with the Director node.
- Select Dashboard in the top menu bar.

- Select Logs> IDP in the left navigation bar. The following window displays, listing the detailed logs.

View Packet Capture Logs
To view the packet capture logs:
- Log in to the Analytics node that is integrated with the Director node.
- Select Dashboards in the left menu bar.
- Select Logs > Packet Captures in the left menu bar. The following window displays, showing details of the packets captured.
Troubleshoot IDS/IPS
Run these CLI commands to troubleshoot vulnerability-based security issues:
- show orgs org tenant-name sessions ips brief
- show orgs org tenant-name sessions ips detail
- show orgs org-services tenant-name security ips statistics
- show orgs org-services tenant-name security profiles ips signature predefined-profile
- show orgs org-services tenant-name security profiles ips signature user-defined-profile
- show orgs org-services tenant-name security profiles ips statistics signature predefined-profile
- show orgs org-services tenant-name security profiles ips statistics signature user-defined-profile
- show orgs org-services tenant-name security profiles ips statistics predefined
- show orgs org-services tenant-name security profiles ips statistics user-defined
Supported Software Information
Releases 20.2 and later support all content described in this article, except:
- Release 22.1.3 makes changes to the IPS Async Signature Compilation option.
