Configure WiFi
![]() For supported software information, click here.
For supported software information, click here.
To configure WiFi and a WiFi access point on a Versa Operating SystemTM (VOSTM) device, you do the following:
- Configure the WiFi interface
- Configure the WLAN to activate the access point
Configure a WiFi Interface
- In Director view:
- Select the Administration tab in the top menu bar.
- Select Appliances in the left menu bar.
- Select an appliance from the main panel. The view changes to Appliance view.

- Select the Configuration tab from the top menu bar.
- Select Networking > Interfaces from the left menu bar. The Interfaces dashboard displays.
- Select the WiFi tab from the horizontal menu in the main pane, and then click the + Add icon to create a new WiFi interface.

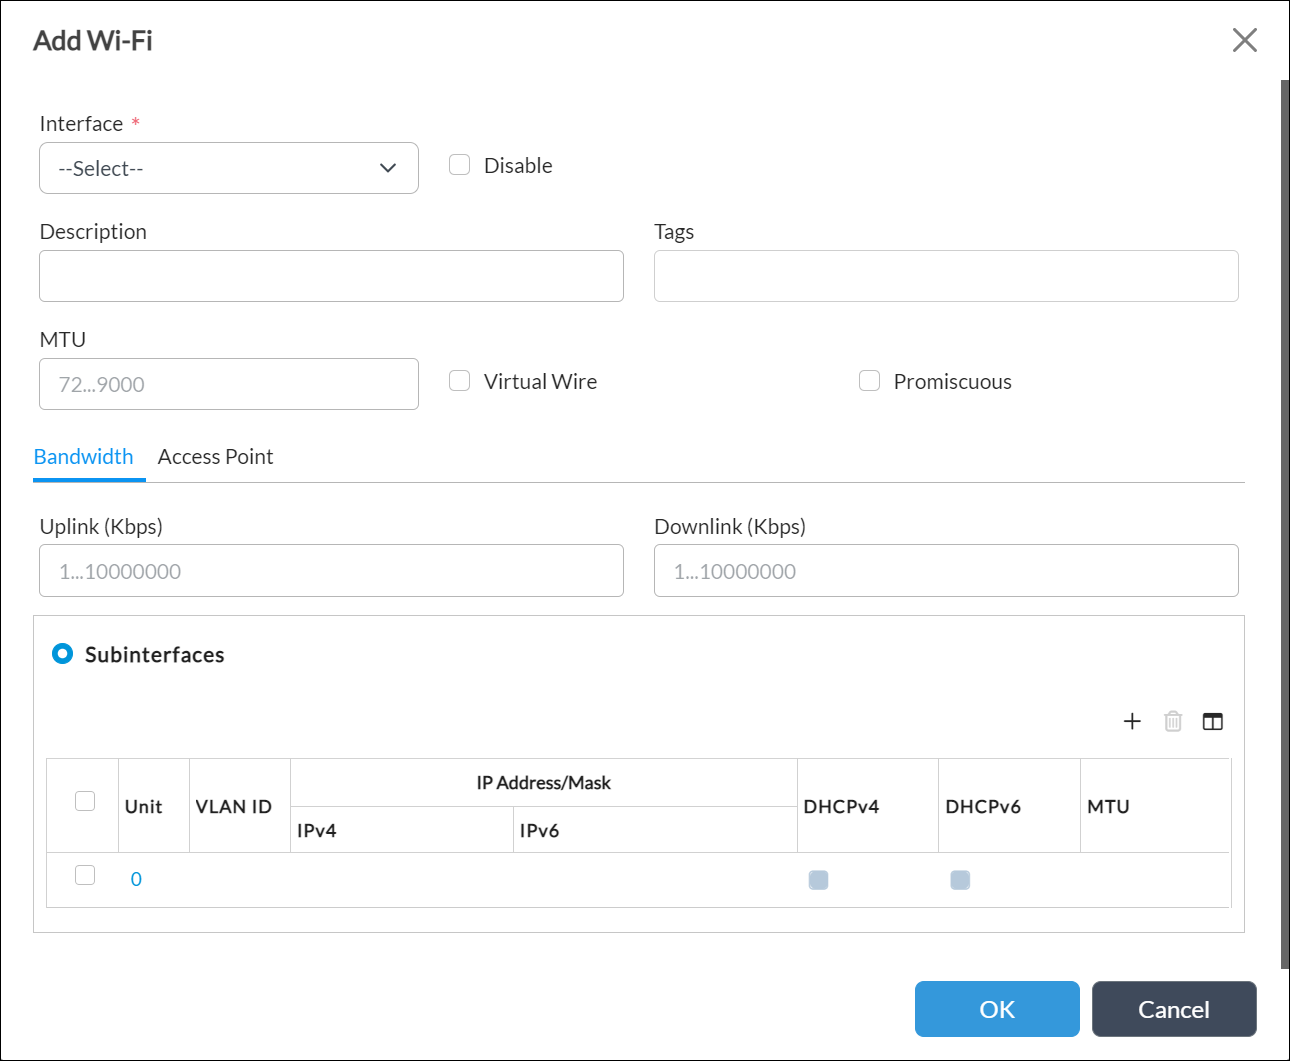
- Click the + Add icon. In the Add WiFi popup window, enter information for the following fields.

Field Description Interface Select the Ethernet interface on which to configure WiFi. Disable Click to disable the WiFi configuration on the interface. Description Enter a text description of the interfaces. Tags Enter a keyword or phrase that allows you to filter the WiFi interface. This is useful when you have many profiles and want to view those that are tagged with a particular keyword. MTU Enter a value for the maximum transmission unit (MTU), which is the size, in bytes, of the largest protocol data packet that the port can receive or transmit.
Virtual Wire Click to enable virtual wire on the interface. Promiscuous Click to enable promiscuous mode on the interface so that the interface forwards all traffic it receives. Bandwidth Tab - Autoconfiguration
Click to disable autoconfiguration. Then, enter the URI for the WiFi interface. - URI
If you disable autoconfiguration, enter the Uniform Resource Identifier (URI) for the WiFi interface. - Uplink
Enter the data uplink limit, in Kbps. The default depends on the type of Ethernet. For example, a 1-GB Ethernet interface supports a maximum of 1 GB of data. - Downlink
Enter the data downlink limit, in Kbps. The default depends on the type of Ethernet. For example, a 1-GB Ethernet interface supports a maximum of 1 GB of data. - Subinterfaces
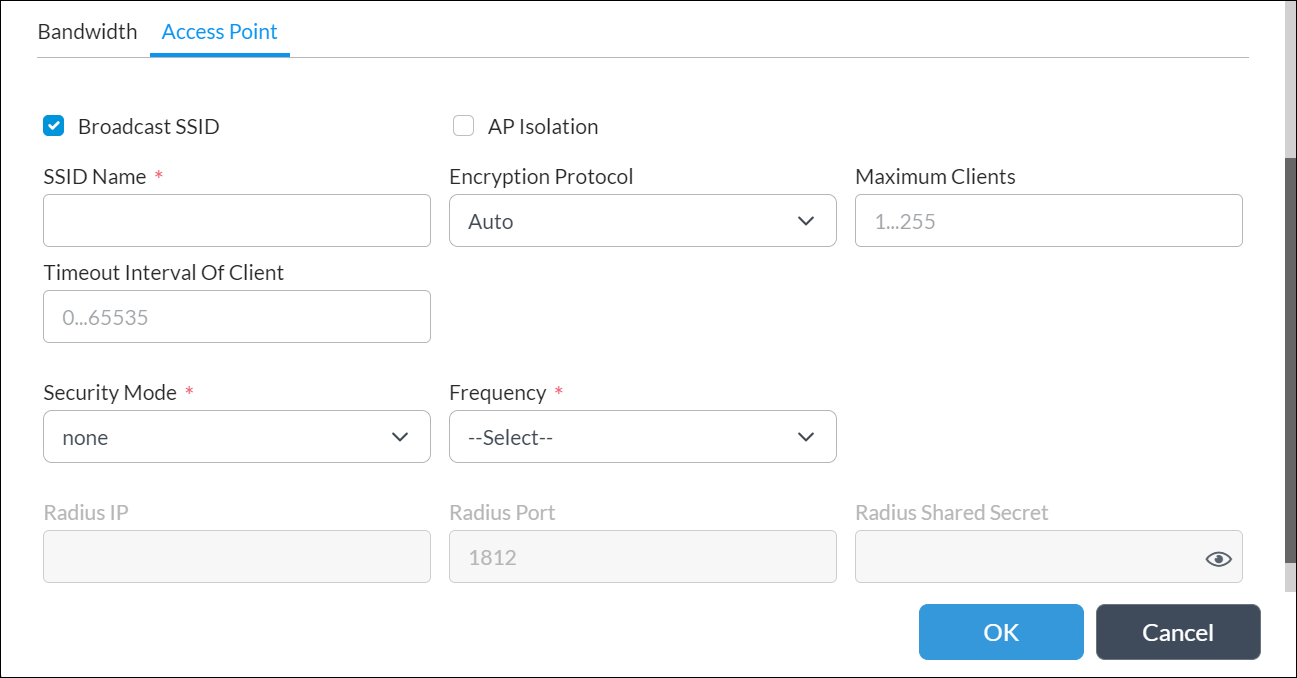
Click to create VLAN based subinterface. For more information, see Configure Interfaces. - Select the Access Point tab, and enter information for the following fields.

Field Description Broadcast SSID Click to allow the access point to broadcast its SSID to nearby devices. AP Isolation This option is not supported. SSID Name Enter the Service Set Identifier (SSID) for the network. The SSID name can be from 1 through 32 characters, and it can contain alphanumeric and special characters. Encryption Protocol Select the encryption protocol to use to access the AP:
- CCMP
- TKIP
Maximum Clients Enter the maximum number of clients that can connect to the AP. Timeout Interval of Client Enter the timeout interval for the client to connect to the AP. Security Mode Select the security mode to use to transmit data from the AP:
- wep-auto
- wep-open
- wep-shared-key
- we-enterprise
- wep-psk
- wpa/wpa2-auto-enterprise
- wpa/wpa2-auto-psk
- wpa2-enterprise
- wpa2-psk
Radius IP For WPA-enterprise authentication, enter the IP address of the RADIUS server to use for authentication. Radius Port For WPA-enterprise authentication, enter the port number of the RADIUS server to use for authentication. Radius Shared Secret Enter the password for the RADIUS server.
- Click OK.
If you are using WPA2-enterprise authentication for users connecting, via WiFi, to a RADIUS server, the following is a sample configuration for the RADIUS server:
admin:/usr/local/etc/raddb$ sudo cat eap.conf  | grep eap
##  eap.conf -- Configuration for EAP types (PEAP, TTLS, etc.)
#  EAP types NOT listed here may be supported via the "eap2" module.
   eap {
      default_eap_type = peap
      ignore_unknown_eap_types = no
        private_key_file = /usr/local/etc/raddb/eap-user1/newkey.pem
        certificate_file = /usr/local/etc/raddb/eap-user1/newcert.pem
        CA_file = /usr/local/etc/raddb/eap-user1/cacert.pem
        dh_file = /usr/local/etc/raddb/eap-user1/dh
        random_file = /usr/local/etc/raddb/eap-user1/random
      peap {
        default_eap_type = mschapv2

admin:/usr/local/etc/raddb$ sudo cat users  | grep user1
User1LteWifi Cleartext-Password := "password123"

admin:/usr/local/etc/raddb$ sudo cat clients.conf
client LTEWIFIuser1 {
   ipaddr = 10.128.0.21
   secret  = password123
Configure the WLAN
- In Director view, select the Configuration tab in the top menu bar.
- Select Networking > WLAN in the left menu bar to view the WLAN and interfaces configuration details.

- Click the
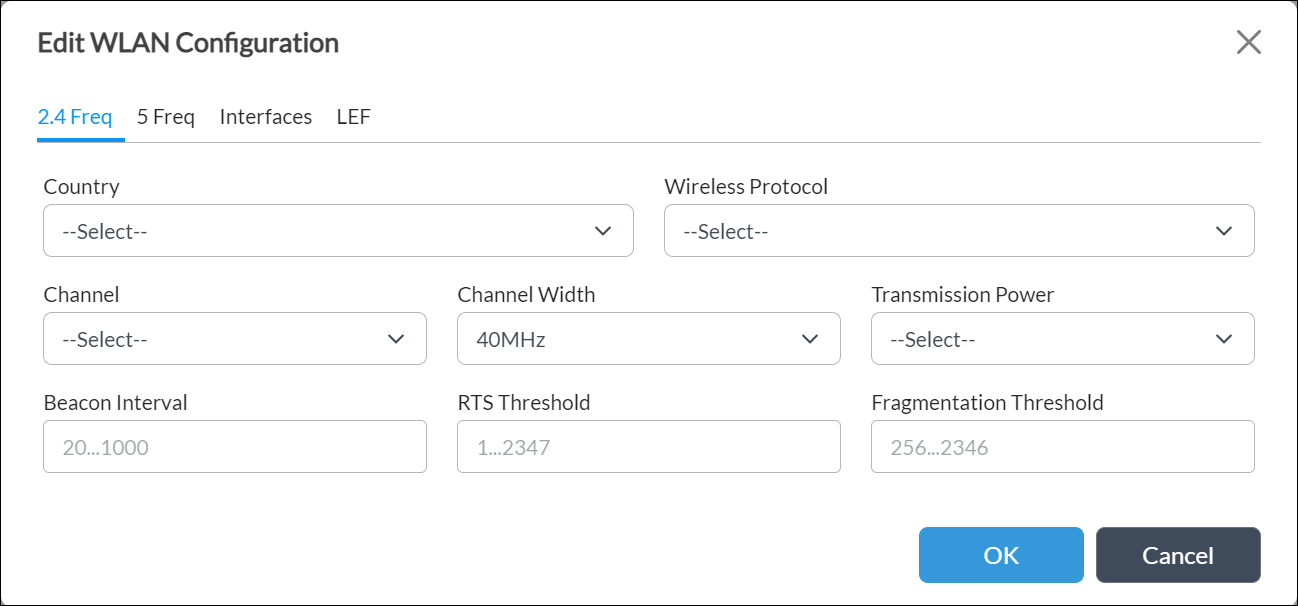
 Edit icon in the WLAN configuration section to modify the WLAN configuration. In the Edit WLAN Configuration popup window, enter information for the following fields, in both the 2.4 Frequency tab (for b,g and n radios) and the 5 Frequency tab (for n and ac radios).

Field Description Country Select the country where the device is located. Wireless Protocol Select the wireless protocol range for the radios. Channel Select the WLAN channel for the wireless protocol range. Channel Width Select the channel width. Transmission Power Select the transmission power. Based on the wireless protocol range and channel, each country applies its own power levels. The power can be:
- High
- Medium
- Low
RTS Threshold Enter the request to Send (RTS) threshold for the access point, in bytes. The RTS threshold is the maximum size of the data packet before it is fragmented into multiple packets.
Range: 1 through 2347 bytes
Default: NoneBeacon Interval Enter a value for the beacon frequency interval, in milliseconds. A beacon is a packet broadcast from the router to synchronize the wireless network.
Range: 20 through 1000 milliseconds
Default: NoneFragmentation Threshold Enter the fragmentation threshold limit, in bytes. This value limits the maximum frame size and reduces the time required to transmit a frame.
Range: 256 through 2346 bytes
Default: None
- (For Releases 21.2.1 and later.) Click Interfaces tab, and enter the number of WiFi interfaces to configure. You can configure 1 through 8 interfaces, and the default is 4 interfaces. If you change the WiFi interface count value, then you must do a service restart.

- Click OK.
- Click LEF tab, and click Default LEF Profile to use the default LEF profile.

- Click OK.
Supported Software Information
Releases 20.2 and later support all content described in this article, except:
- Releases 21.2.1 and later support configuring the WiFi interfaces count.
