Install a CSG2500 Appliance
This article provides instructions about how to unpack a Cloud Services Gateway (CSG) 2500 appliance and how to install it. You can mount a CSG2500 appliance directly in a 19-inch rack, or you can install a slide rail in a 19-inch rack and then mount the CSG2500 appliance on the slide rail. The minimum depth of the slide rail is 698 mm (27.48 inches) and the maximum depth is 998 mm (39.39 inches).
Unpack a CSG2500 Appliance
The CSG2500 appliance is packed in a plastic bag, and it is shipped in a cardboard carton, secured with foam packing material. The carton also contains an accessory box. It is recommended that you unpack the appliance only when you are ready to install it.
To unpack a CSG2500 appliance:
- Open the top flaps of the cardboard carton.
- Remove from the box the foam packing material holding the appliance and the accessories in place. See Figure 1.
- Remove the accessory box and the appliance from the foam packing material.
- Remove the accessories from the accessories box.
- Verify the components against the packing list that is included in the box.
Figure 1: Unpack a CSG2500 Appliance

Note: It is recommended that you save the shipping carton and packing material when unpacking the appliance, in case you need to later move the appliance or return it. See How To Return Hardware.
Packing List for a CSG2500 Appliance
The cardboard carton in which a CSG2500 appliance is shipped contains a packing list. Check the packing list against the parts that you receive in the shipping carton.
Table 1 lists the parts shipped with a CSG2500 appliance.
Table 1: Parts Shipped with a CSG2500 Appliance
| Components | Quantity |
|---|---|
| CSG2500 appliance chassis | 1 |
| Power cable (US only) | 1 |
| Grounding wire (#18 AWG) | 1 |
| Rear-post brackets | 2 |
| Rear-post bracket ears | 2 |
| Screws for ear locking | 2 |
| Screws for rack mounting | 4 |
| Screws | 20 |
Mount a CSG2500 Appliance in a Rack
You can mount a CSG2500 appliance in a four-post 19-inch rack.
To mount the appliance, ensure that you have the following tools:
- Number 2 Phillips (+) screwdriver
- Tape measure
To mount a CSG2500 appliance in a four-post 19-inch rack:
- Place the appliance chassis on a flat, stable surface.
- Check the internal dimensions of the rack with a tape measure. The appliance is 43.8 mm wide (about 17.24 inches) and must fit within the mounting posts.
- Attach the two rear post brackets to the appliance chassis using the six bracket screws that are shipped with the appliance. Use the rack screws to secure the switch in the rack.
- Lock the position of the rear post bracket ears using the included position-locking screws. You can adjust the rear post bracket ears to fit different rack depths, from 56 cm to 75 cm.
Mount a CSG2500 Appliance on a Slide Rail
You can install a slide rail in a 19-inch rack and then install a CSG2500 appliance on the slide rail. You can purchase an optional slide rail kit when you purchase a CSG2500 appliance.
To install a slide rail in a 19-inch rack and install a CSG2500 appliance on the slide rail:
- Push the lever down and pull the inner rail all the way out of the middle rail.

- Align the holes on the inner rail with T-studs on the side of the chassis. Slide the inner rail backward until it clicks into the locked position.

- Adjust the die-cast fittings on the outer rail if the rack has round mounting holes. Press the latch to transfer from square to round mounting hole.

- Push rear bracket backward to lock position.

- Push the pegs on the rear of the outer rail into the rear rack holes. Turn the latch to the open position and push the pegs into the front rack holes.

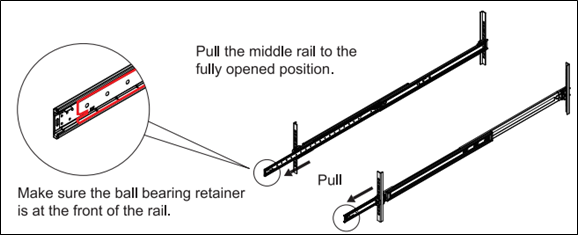
- Pull the middle rail to the fully opened position. Make sure the ball bearing retainer is at the front of the rail.
- Mount the chassis. Align and push the inner rails into the extended middle rails. After the chassis is mounted in the middle rails, hold down the locking lever to push the chassis all the way into the rack.
