Titan Order Management for MSPs
![]() For supported software information, click here.
For supported software information, click here.
As a Managed Service Provider (MSP), you can create reseller and customer accounts, create orders, manage subscriptions, and create customer requests. The MSP can order private SASE gateway services and provide SASE services to customers also. This article describes how to perform these tasks.
Order Process Overview
An MSP or Reseller can initiate hardware and software license purchases for their customers.
A guest can initiate hardware and software license purchases using the Get a Quote request process. The order process occurs in the following sequence:
- The guest places a quote request.
- The administrator assigns this quote request to a reseller.
- The reseller creates a new customer and places an order for the guest quote. Customers with shop access can look up quotations and order information from their accounts.
- After the order is processed, the customer can use their new software licenses in the Titan Portal and Titan Mobile applications.
Create a Customer Account
- Browse to the Versa Titan Shop page, https://titan.versa-networks.com/shop/

- Click Sign In to display the login screen if you have an account. Then enter your username and password, and click Login.

- In the Customers grid, click your display name to display the drop-down menu to select other options.

- Click the +New Customer button. The Add New Customer screen displays.

- In the Add New Customer popup window, enter the following information, and then click Create Customer.

Field Description First Name Enter your first name. Last Name Enter your last name. Email Enter organization email ID. Mobile Number Select country code and then enter mobile number. Two-Factor Authentication Click to enable two-factor authentication. Company Name Enter company name. Custom Keyword Enter a custom keyword. Select Reseller Select the reseller associated with the MSP store. start typing the reseller name or ID and select the reseller from the list. Region Select a Director region. Select Installation Methods Select an activation method:
- Versable
- WiFi
- GZTP
VD Customer Role Select the Versa Director customer role:
- Tenant Dashboard Operator
- Tenant Operator
- Tenant Security Admin
- Tenant Super Admin
Privileges Write Access:
- Grant permission to modify network (WAN, LTE, WiFi, and LAN), security, steering, DNS proxy, and miscellaneous settings. Note that the DNS proxy tab is displayed only on devices that use secure application optimization license tier.
Read Access
- Versa Director—Grant access to the Director and Live Monitoring dashboard in the Titan Portal.
- Versa Analytics—Grant access to the Analytics and Live Monitoring dashboard in the Titan Portal.
- Shop—Grant access to the support portal, quote management, and access to Shop portal for subscription view, addresses, quotes, profile, and orders.
- Audit Logs—Grant access to the Audit Logs dashboard in the Titan Portal.
Additional Features Versa Ticketing Support Portal Access—Click to enable access to the Versa support portal for ticketing in Titan Portal dashboard. On the support portal, you can submit a new support ticket, check ticket status, and access knowledge base information. If you enable Versa ticketing, a confirmation email is automatically sent to the user to set a password for the Freshdesk ticket portal. User can set the password or ignore this email as you click on support link in Titan Portal dashboard, logs into ticket portal automatically. - A confirmation email is automatically sent to the customer. The email directs customers to the login screen and allows them to set their password.

- Click Click To Proceed to set a password.
- Enter the Password and Confirm Password, and then click Set Password.
Customer Actions
To perform a customer action from the Customers dashboard:
- Locate the customer in the dashboard, and then click the Select drop-down in the Actions column to display the available actions.

- Click an action:
- Delete—Delete the customer. See Delete a Customer Account.
- Update Keyword—Update a keyword.
- Manage—Manage a customer. See Create an Order without a Quote Request
- Dashboard—Open the Titan Portal dashboard.
- Edit—Edit an existing account for which the customer does not exist. See Edit an Account.
Delete a Customer Account
- Log in to your MSP account, locate the customer in the grid. Then, in the Actions column, click Select to display the drop-down menu. Click Delete.

- Click Ok to delete the customer or Cancel to cancel the operation.

Edit an Account
After you create a new customer, you can edit the customer account if you need to make updates. Note that you cannot edit the organization name, region, and select reseller fields.
- Log in to your MSP account, and locate the customer in the grid. Then, in the Actions column, click Select to display the drop-down menu. Then click Edit.

- Edit the following information.

Field Description First Name Enter the customer's first name. Last Name Enter the customer's last name. Email Enter an email address for the customer. Mobile Number Select the country code and enter the mobile number for the customer. Two-Factor Authentication Click to enable two-factor authentication. Select Installation Methods - Versable
- WiFi
- GZTP
VD Customer Role Select the Versa Director customer role:
- TenantDashboardOperator
- TenantOperator
- TenantSecurityAdmin
- TenantSuperAdmin
Privileges Write Access—Grant permission to modify the selected network (WAN, LTE, WiFi, and LAN), security, steering, DNS proxy, and miscellaneous settings. Note that DNS proxy tab is displayed only on devices that use secure application optimization license tier.
Read Access—Grant view permission:
- Versa Director—Grant access to the Live Monitoring dashboard in the Titan Portal.
- Versa Analytics—Grant access to the Analytics and Director dashboards in Titan Portal.
- Shop—Grant access to the support portal, quote management, and access to Shop portal for subscription view, addresses, quotes, profile, and orders.
- Audit Logs—Grant access to the Audit Logs dashboard in the Titan Portal.
Versa Ticketing Support Portal Access Click to enable Versa support portal access for ticketing. - Click Update.
Create an Order
You can create an order for a customer with an account. You create an order in one of the following ways:
- Convert a quote request into an order from the Quotes tab. See Convert a Quote Request into an Order.
- Create an order from the Provision Device tab without a quote. See Create an Order without a Quote Request.
Note: Guests can request a quote only from a reseller, not from an MSP. However, an MSP can see a quote request for a reseller that is created under the MSP if the guest uses that reseller's ID.
Convert a Quote Request into an Order
When a guest requests for a quote, the quote is assigned to the reseller according to the reseller name or ID. If the guest does not have a reseller name or ID, the admin assigns the quote to a reseller. The reseller then creates a new customer account for the guest and places a new order for the quote.
To convert a guest quote request into an order:
- Log in to your reseller account. Click your display name to display the drop-down menu, and then select Customers.

- Locate the customer in the grid, and then click Select in the Actions column to display a drop-down menu. Click Manage.

- The Manage Orders screen displays. This screen displays the customer's name, phone, email address, and area, along with a set of tabs.

- Select the Quotes tab.
- Click Select in the Actions column, and then click Proceed to Checkout. A confirmation popup window displays.

- Click Cancel to return to the previous screen or Ok to display the Cart.

- If you click Ok, the cart displays. The order has been created but is not yet placed. You must complete the cart checkout process to complete the order. See Complete an order at the Cart Check Out.
Create an Order Without a Quote Request
If the customer has not created a quote request, you can place an order for them on the Provision Device tab.
To create an order:
- Log in to your MSP or Reseller account. Click your display name to display the drop-down menu, and then select Customers.

- Locate the customer in the grid, and then click Select in the Actions column to display a drop-down menu. Click Manage.

- In the Provision Device tab, select a hardware appliance tab to display the options for that hardware series:
- Versa Appliances
- CSG300
- CSG700
- CSG1000
- Versa Virtual Appliances (AWS)
- vCSG Medium
- vCSG Large
- vCSG X-Large
- Versa Cloud Gateway
- Cloud Appliances (Any)
- cCSG Medium
- cCSG Large
- cCSG X-Large
- Whitebox
- Dell

- Versa Appliances
- For series that include appliances, click on the appliance model you want to add. Click Compare Specs to display a chart of hardware and subscription tier offerings for appliances within that series.
- Choose the ordering details on the right side of the screen.

Field Description Region Choose a region:
- Americas & EMEA
- Asia
Wireless Interface Click to display the wireless interface menu, and then select wireless interface. Add-on NIC Click to display the add-on NIC menu, and then select the add-on. Software License Tier Select the software license:
- Enterprise Security—Standard license.
- Advanced Security—Advanced security features.
- Secure Application Optimization—Enable DNS proxy configuration. This license is available on all devices except CSG350 and CSG730 appliances.
Subscription Duration Select the length of the subscription:
- 1 year
- 3 years
- 5 years
Hardware Replacement Select the hardware replacement time:
- Next business day
- Same business day
Quantity Enter the number of hardware devices to order. - Click Add to add the item to your cart.
- Repeat Steps 3 through 6 to add more items.
- Click View and Provision to continue to the Device Provisioning screen. You can adjust the content of your cart, apply discounts, and enter autodeployment information for an appliance.
The order has been created but is not yet placed. To complete the order, you must complete the cart checkout process. See Complete an Order at the Cart Check Out.
Complete an Order at the Cart Checkout
Some order management tasks include processing your cart. This section describes the cart checkout process, called device provisioning. After device provisioning is done, an order is complete.
To complete an order:
- Make sure you are on the Device Provisioning screen. If needed, adjust your item quantities by entering a new quantity. Then click the
 cart icon to update the cart. If needed, delete an item from your cart by clicking on the trash icon. Click Continue.

- If the cart contains only one appliance, the Place Order screen displays the autodeploy option. If the Place Order screen does not display this option, enter the purchase order license start date and purchase order number, and then click Place Order.

- To configure the appliance for automatic deployment, click Auto Deploy the Device with Default Configuration and enter the following information.

- Click Add Address to enter site information for the appliance. Enter the site address, latitude, and longitude. Slide the Latitude and Longitude toggle to Auto to generate the numbers. Click Add Address. Available site addresses display, including the address you added.

- Click an address to identify the site location for the appliance.
- Select Click Device Role to display a drop-down menu, and then choose a device role:
- Any to Any
- Spoke
- Click Select Installation Method to display a drop-down menu, and then choose an appliance activation method:
- Versable—Activate the appliance from the Titan Mobile application using a Versable connection between your phone and the appliance.
- WiFi—Activate the appliance from a laptop using an SSID broadcast by the appliance.
- Click the Serial No column in the Hardware row, and then enter a valid appliance serial number.
The serial number is printed above the MAC address on the appliance.

- Click Add Address to enter site information for the appliance. Enter the site address, latitude, and longitude. Slide the Latitude and Longitude toggle to Auto to generate the numbers. Click Add Address. Available site addresses display, including the address you added.
- After the order information is complete, click Place Order to place the order.

A message displays to confirm the order.
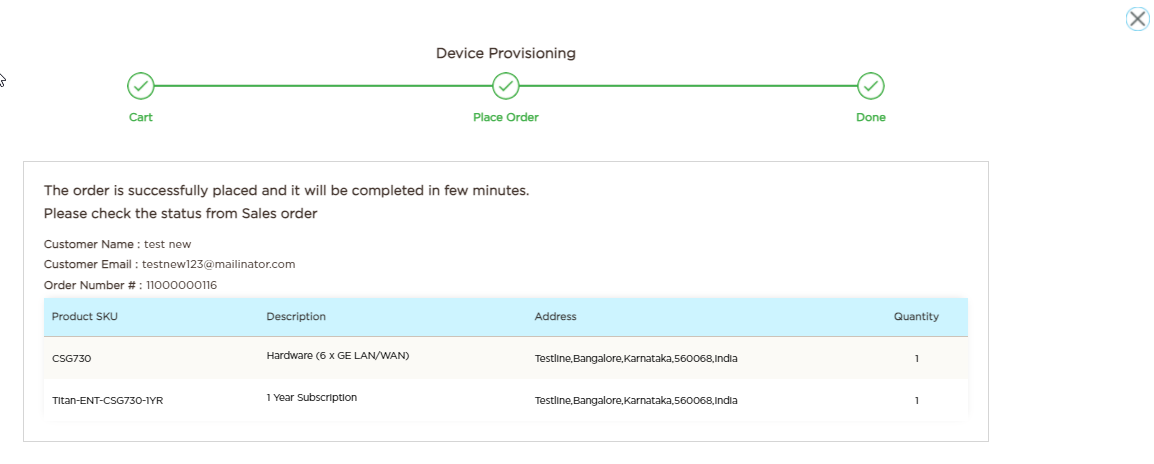
- After a few minutes, select the Orders tab to check the status of the order.

After the order is processed, new and upgraded licenses are available from the customer's Titan Portal and Titan Mobile applications. If you autodeploy an appliance during check out, the new site information displays in Titan Portal and Titan Mobile. - To determine the device status after an upgrade, log in as the customer and click Enterprise portal.

Upload Bulk Orders
A store admin, MSP, or reseller can upload bulk orders.
To upload a bulk order:
- Log in to your MSP account. Click your display name to display the drop-down menu, and then select Customers.

- Locate the customer in the grid. Click to display the Select menu in the Actions column, and then click Manage.

- Click the Import Orders tab, and then click Import Orders.
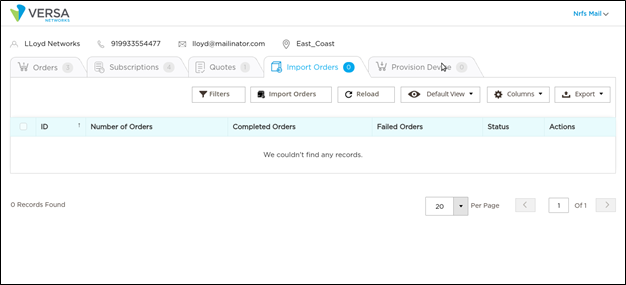
- In the Import Orders popup window, click the description help file link to download the Excel template to use to create an Excel template.

- Open the Excel file, and in the Order tab, add the information for bulk order upload. Refer to the Description tab in the Excel file for information regarding all fields in the Order tab.
- Click Browse file to add the Excel file with bulk order details, and then click Upload.

- Click Start Import Now to import the bulk order. Click Cancel to cancel the operation at any time.

- Click the refresh icon in the Status column to send the request again if the status shows processing.

- Click View Items in the Actions column to view the order items.

Manage a Subscription
After a customer purchases an initial software license subscription and you have added an appropriate license to the customer account, you can manage the subscription from the Subscriptions tab.
To manage customer subscriptions:
- Log in to your MSP account. Click the display name to display the drop-down menu, and then select Customers.

- Locate the customer in the grid. Click to display the Select menu in the Actions column, and then click Manage.

- Select the Subscriptions tab.

- Click the
 Column icon to choose which columns are displayed in the subscription section.

Field Description ID ID number for the subscription. Device Type Model of appliance associated with this subscription. Device Name Device name. License Number License number for this subscription. Serial Number Serial number of the appliance using this subscription. The serial number is printed on the appliance. License Type License type of this subscription; enterprise security or advanced security.
Director Region Versa Director region. Site Address Address of the site where device is deployed. Period (days) Duration of the license, in days Summary Summary displays the device model, subscription years, security type, SBDR, NBDR, or nothing. Status License status. Expiration Date The expiration date of the subscription. Subscriptions are valid for the number of days purchased. PO Start Date The license period starts from the purchase order license start date.
PO Number Purchase order number. Actions Contains the select button for each subscription that you use to manage subscriptions. - Locate the subscription in the grid, and then click Select in the Actions column to display the drop-down menu.

- To synchronize device information from the Titan backend with your subscription data, select Sync and then click Ok.

- To delete the subscription and associated device information from the Titan backend, select Delete, and then click Ok.

- To upgrade a subscription from enterprise to advanced security or secure application optimization, select Upgrade, and then click Ok. Advanced security is only available for the following products: CSG355, CSG365, CSG750, CSG770, and Versa Cloud Gateway. The secure application optimization license is available on all devices except CSG350 and CSG730 appliances. This menu option displays only for these subscription types. The Device Provisioning window displays. To process your cart, see Complete an Order at the Cart Check Out.

- To renew a license, select License Renewal. Enter the number of days to extend the renewal period (as per Versa approved conditions), and then click Renew. The customer receives an upgrade and renewal notification in the Titan Portal dashboard notification area and through email. To process your cart, see Complete an Order at the Cart Check Out.

- To enter your appliance serial number for the software subscription, select Update Serial No. The serial number is printed on the appliance. If you replace an appliance, this number must be updated to reflect the current appliance.

- Enter the serial number and click Update.

The updated serial number displays in the Subscription dashboard.

Deploy SASE Gateway Services from Shop
You can order and manage the following SASE gateway services from Shop:
- Versa Secure Access (VSA) service
- Versa Secure Web Gateway (SWG) service
The following Versa Networks hardware appliances support SASE gateway devices and services:
- Versa Appliances
- CSG700 series appliances
- CSG770 model
- CSG1000 series appliances
- CSG1300 model
- CSG1500 model
- CSG700 series appliances
- Cloud Appliances (Any)
- cCSG Large model
- cCSG X-Large model
- Versa Virtual Appliances (AWS)
- vCSG-L model
- vCSG-XL model
MSPs and resellers with provider organization can log in to Shop, purchase a private SASE gateway device, activate the device, and purchase SWG and VSA services. After uploading certificates, an MSP or a reseller can buy SASE gateway services for their customers. These features are not available for guest customers.
To order and manage SASE gateway service:
- Browse to the Versa Titan Shop page, https://titan.versa-networks.com/shop/
- Click Sign In to display the login screen, and then enter your MSP username and password and click Login.

- Click your display name to display the drop-down menu, and then select My Orders.

- Select any hardware appliance that supports SASE gateway devices and services, and select Private Gateway.

- In the SASE Gateway Options popup window, enter the following information.

Field Description Versa Secure Web Gateway (SWG) Service Select the SWG service. - Service Tier
Select the service tier:
- Essential
- Professional
- No. of Users
Enter the number of users. You must add a minimum 50 users. Versa Secure Access (VSA) Service Select the VSA service. - Service Tier
Select the service tier:
- Essential
- Professional
- Client Users
Enter the number of client users. You must add a minimum 50 users. - Click Submit.
Next, go to the Titan Enterprise portal to deploy and activate the private SASE gateway device. See Configure and Activate SASE Gateway Devices
Configure and Activate SASE Gateway Devices
This section provides step-by-step procedures for configuring and activating SASE gateway devices on supported Versa Networks hardware appliances.
To configure and activate SASE gateway devices:
- Create a site using a software license.
- Create a device configuration for the site. When you save the device configuration, it is stored in the Titan cloud portal. You should configure WAN interfaces before deployment.
- Deploy the device configuration to the Versa Controller node, to inform the Controller node that the configuration exists.
- Activate the appliance.
Note: You can deactivate a private SASE gateway and delete a tenant only from Titan Portal. See Perform Inventory-Related Actions.
Create a Site for the SASE Gateway
To create a site for the CSG770, CSG1000 series, cCSG, and vCSG series appliances:
- Log in to Titan Portal as an MSP.
- Enter your username and password, and click Login.
- In the Organizations dashboard, click the MSP provider organization in the grid.

- Click Configure in the left menu bar to display the Configure dashboard.
- Click one of the license package icons to display the available license packages. To add the site to the honeycomb, drag the license package onto the dashboard.
- CSG700 Series
- CSG1000 Series
- cCSG Series
- vCSG Series

- In the New Site: Configuration window, select a region and click Continue.
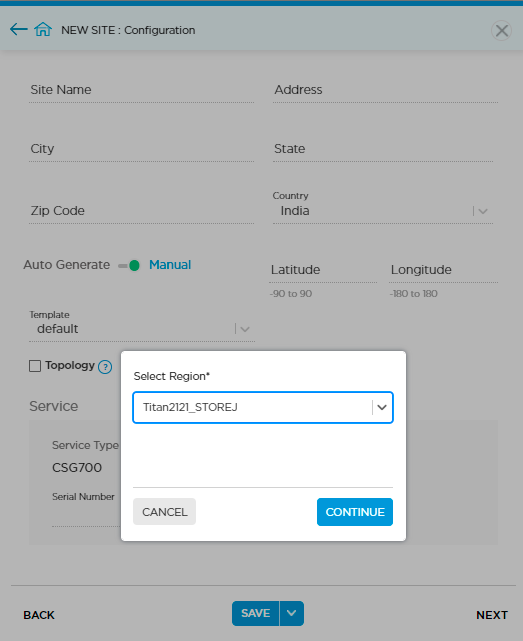
- Enter information for the following fields, and then click Next.

Field Description Site Name Enter a name for site. Address Enter the street address, zip code, city, state, and country. Latitude and Longitude - Auto Generate—Click the Auto Generate toggle to enable the determination of latitude and longitude coordinates automatically.
- Manual—Click the Manual toggle to enable the determination of latitude and longitude coordinates manually. This is the default.
Device FQDN Enter the FQDN for the device. When you create a certificate, the device FQDN name and the VSA certificate domain name must be the same. Topology Click to configure the site role:
- Configure as Hub—Configure the device as a hub in a hub-and-spoke topology
- Configure as Hub Controller—Configure the device as a hub controller in a hub-and-spoke topology. This device takes up a dual role of a hub and a Controller node. This function is typically required when branches are connected to a private MPLS network that has no direct access to the Versa Networks–hosted Controller node in the public internet.
Note that you can select the hub–controller topology only if you subscribe to the Secure Application Optimization license tier. The asterisk (*) mark in the device model in honeycomb view indicates that the device uses this license tier.
If you do not select a topology, only the SASE gateway is attached.
Service View device details.
- Serial Number—Enter the serial number of the appliance.
- Click the WAN box to display the Network > WAN screen.
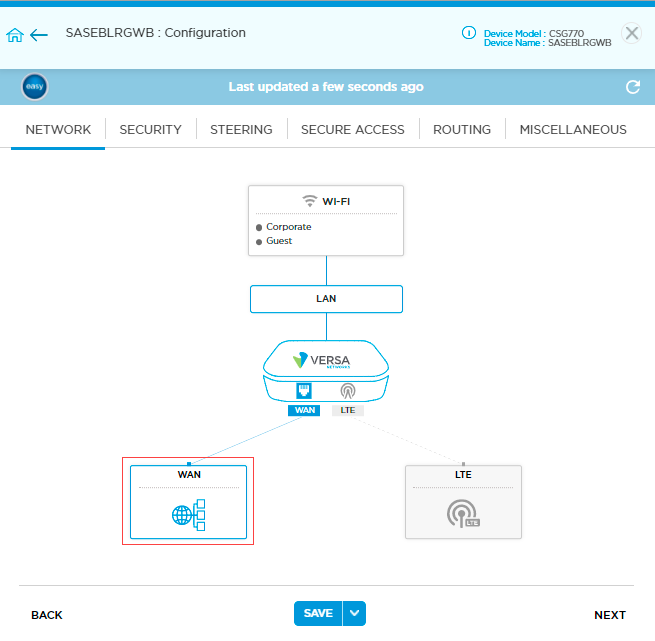
- Enter the static IP address for the WAN1 Port0 interface, and then click Save.

- Click the LAN box to open the Network > LAN > Ethernet Ports screen.

- Select LAN1 Port1 from the drop-down, and click the delete icon to delete the LAN port.

- Go to Network > WAN and click +WAN to configure Port1 as the WAN2 secondary port.

- Click Continue.

- Click Save, and then click the down arrow next to Save to display the Deploy popup window.
- Click Deploy. Note that you can deploy a SASE gateway like a normal device and you can activate it using the global GTP, WiFi, and Versable methods. To deploy and activate a device, see Deploy a Device Configuration and Activate an Appliance in the Titan Portal document.
Install Certificates for VSA
A certificate authority (CA) is an entity that issues digital certificates that are used to verify the ownership of a public key. The digital certificates allow a party to trust the signature that is made by a private key that corresponds to the certified public key.
After a Titan device requests a certificate from a CA server, the CA server issues the certificate. You then need to upload the certificate to the CA database so that it can be used for verification.
Note: After a SASE gateway device is activated, you need to log in as an MSP user and install all necessary certificates for VSA. MSP must create a tenant only after uploading the VSA certificate. When an MSP user creates a tenant, Titan copies the necessary VSA certificates to the tenant. You need to install the VSA certificate only if a SASE gateway is purchased for VSA service.
The following table describes information about SASE gateway certificate management.
| SASE Gateway Certificate Management | MSP Provider Organization | MSP Tenant Organization | Branch or Hub | Notes |
|---|---|---|---|---|
| VSA certificates | MSP user must upload necessary certificates to the provider organization. | Titan copies necessary certificates to the tenant organization. | NA | User must upload a VSA certificate after the SASE gateway device is activated. When the user creates other tenant organizations, the same certificate is copied to all tenants. |
| System-generated TLS decryption certificate | TLS decryption profile configured with default certificate. The certificate name and provider organization name are the same. | TLS decryption profile configured with default certificate. The certificate name and tenant organization name are the same. | TLS decryption profile configured with default certificate. The certificate name and tenant organization name are the same. | System generates TLS decryption certificate with the organization name using Versa root certificate. |
| User-generated TLS decryption certificate | User can upload their own certificate. | User cannot upload their own certificate. | User can upload their own certificate. | Only device owner can upload their own certificate. |
Before you upload a CA certificate, you must upload a key file with the extension .key.
To upload a key file:
- Locate the device in the grid, and then click the 3-dot icon in the Action column to display available actions.

- Click Upload CA Certificates and then click Upload Key.

- In the Add Key popup window, enter the following information.

- Enter a key name and password.
- Click Browse file to select the key file to upload. The file must be in .key format.
- Click Add.
- Click Upload CA Certificates, and then click Upload Certificate.
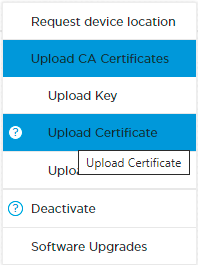
- In the Add CA Certificate popup window, enter the following information.

- Enter a certificate name.
- Select the key file name.
- Click Browse file to select the CA certificate file to upload. The file must be in .crt, .cer, or .pem format.
- Click Add. The certificate file is displayed.
- Click the
 icon to download the file.
- Click Upload CA Certificates and then click Upload CA Chain.

- In the Add CA Chain popup window, enter the following information.

- Enter a CA chain name.
- Click Browse file to select the CA chain file to upload. The file must be in .crt format.
- Click Add.
Add the SASE Gateway Service
An MSP can select cloud gateway services and order the SWG and VSA services for the MSP and for its customers. You can select available SASE gateways and advanced services such as VLAN and port details. Note that you can select cloud gateway services as a SASE gateway to get the service. If you have already added a SASE gateway, but then you cannot select the cloud gateway option.
- Browse to the Versa Titan Shop page, https://titan.versa-networks.com/shop/
- Click Sign In to display the login screen, and then enter your MSP username and password and click Login.

- Click your display name to display the drop-down menu.
- To purchase ;SWG and VSA services for the MSP, select My Orders.

- Select the Versa Cloud Gateway tab, and then select cloud gateway service. Click Add.

- Select the Versa Cloud Gateway tab, and then select cloud gateway service. Click Add.
- To purchase SWG and VSA services for the customer, select Customers.

- Locate the customer in the grid, and then click Select in the Actions column to display a drop-down menu. Click Manage.

- Select the Versa Cloud Gateway tab, and then select cloud gateway service. Click Add.

- Locate the customer in the grid, and then click Select in the Actions column to display a drop-down menu. Click Manage.
- To purchase ;SWG and VSA services for the MSP, select My Orders.
- Click View and Provision to continue to the Device Provisioning screen. You can adjust the content of your cart and enter auto deployment information for an appliance.
The order has been created but is not yet placed. You must complete the cart checkout process to complete your order. See Complete an Order at the Cart Check Out.
Upgrade SASE Gateway Licenses
An MSP or reseller can upgrade the services that are in the order list. You can upgrade the following options that are listed in the upgrade popup:
- Secure access users—Display the user range, which is a value from 1 to 10000.
- Service tier—Upgrade the service tier from Essential to Professional. If you do not want to upgrade, choose Essential. If the service tier has already been upgraded to professional, this option is hidden.
- Software license tier—Upgrade from enterprise security to advanced security. Choose Enterprise if you do not want to upgrade. If the license tier has already been upgraded to advanced, this option is hidden.
- User DB—Displays only when you select Versa Secure Access.
- Versa SASE gateway regions—Display the available gateways. If all gateways are already ordered, the gateway section is hidden.
To upgrade the SASE gateway licenses:
- Browse to the Versa Titan Shop page, https://titan.versa-networks.com/shop/
- Log in to your MSP or reseller account. Click your display name to display the drop-down menu.
- To upgrade the license for the MSP, select My Orders.
- To upgrade the license for the customer, select Customers.

- Click the Subscriptions tab and locate the Versa Cloud Gateway device type in the grid.
- Click to display the Select menu in the Actions column, and then click Upgrade.

- In the Upgrade Options popup window, enter the necessary values as per the requirements, and then click Upgrade.
- For an MSP account login, enter the following information:
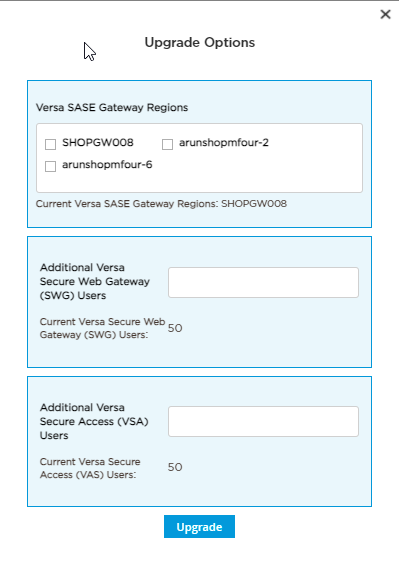
Field Description Versa SASE Gateway Regions Select the SASE gateway regions.
Additional Versa Secure Web Gateway (SWG) Users Enter the number of additional licenses required for SWG. The minimum number of gateway users is 50. Additional Versa Secure Access (VSA) Users Enter the number of additional licenses required for VSA. The minimum number of VSA users is 50. - For reseller account login, enter the following information:

- Versa SASE Gateway Regions—Select the SASE gateway regions.
- Additional Versa Secure Web Gateway (SWG) Users—Enter the number of additional licenses required for SWG. The minimum number of gateway users is 50.
- Secure Access Service Tier—Select Professional.
- Additional Versa Secure Access (VSA) Users—Enter the number of additional licenses required for VSA. The minimum number of VSA users is 50.
- For an MSP account login, enter the following information:
- In the Device Provisioning page, click Continue.

- Enter PO License Start Date and PO Number, and click Place Order.

A message displays to confirm the order.

Renew SASE Gateway Licenses
An MSP or reseller can renew the SASE gateway services for a minimum of one day and a maximum of 1825 days (5 years). Only an administrator can change the maximum limit of renewal days.
To renew SASE gateway licenses:
- Browse to the Versa Titan Shop page, https://titan.versa-networks.com/shop/
- Log in to your MSP or reseller account. Click your display name to display the drop-down menu.
- To upgrade the license for the MSP, select My Orders.
- To upgrade the license for the customer, select Customers.

- Click the Subscriptions tab and locate the Versa Cloud Gateway device type in the grid.
- Click to display the Select menu in the Actions column, and then click License Renewal.

- In the License Renewal popup window, enter the number of days for renewal. Click Renew.

- In the Device Provisioning page, click Continue.

- Enter PO License Start Date and PO Number, and click Place Order.

A message displays to confirm the order.
Look Up Guest Quotes
You can look up quote requests from both guests and existing customers. Requests submitted using the Get a Quote process by a customer who is not logged in are called guest quote requests.
- Log in to your Reseller account.
- Click your display name to display the drop-down menu, and then select Guest Quotes.

- To download a PDF copy of a guest quote request, click Download in the Actions column. To create a customized view from the Guest Quotes screen, see Customize and Export a View.

The PDF file contains guest information and the details of the hardware and software license requests. For example:

- To create an order for a guest quote, you must create a customer account for the guest. See Create Customer Account. You can then proceed with the normal process of placing an order for a customer. See Create an Order.
Assign a Quote to a Reseller
To assign a quote to a reseller:
- Browse to the Versa Titan Shop page, titan.versa-networks.com/shop/versaadmin
- Click Sign In to log in as an admin, and then enter your username and password and click Login.

- In the left navigation bar, click Sales and select Quotes.

- In the Actions column, click Select, and then click Edit.

- In the Reseller ID field, enter reseller information to search and select a reseller, and then click Submit.


A confirmation email is automatically sent to the customer, administrator, and sales team.
Customize and Export a View
You can create a custom view for a Versa Networks order, subscription, or quote information. Custom view allows you to:
- Choose filters to display only specific data.
- Choose which columns to display.
- Save view parameters for future use.
- Export the current view to a CSV or Excel XML file.
Screens that allow custom views display the following buttons and drop-down menus:

To create a custom view:
- Click Filters to display the Filters form. Filters allow you to narrow down the displayed data based on the information in your columns. A filter option for each column appears on the form.
- Enter your criteria into the Filters form, then click Apply Filters. To cancel the filter selection and close the filter window, click Cancel.
- Click Reload at any time to refresh the screen.
- Click Columns to display the Columns card, and then check or uncheck the boxes to specify which columns to display. Click Reset to return to the default columns. Click Columns again to close the card.
The screen is updated to display your new column selection. Once you have applied your filters and columns, you can save the settings as a customized view. If you have multiple filter and column combinations, you can create a view for each combination.
To save the settings:
- Click Default View from the drop-down menu, and then click Save View As.
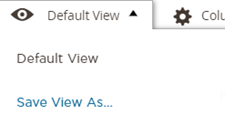
- Enter a name for your view, and then click the right arrow to save. The current filter and column selection are saved.

- After saving, your view is available from the Default View drop-down menu. If you apply a different filter and column selection, you can create an additional view.
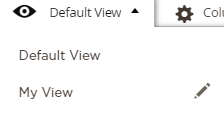
To delete a customized view, click the Pencil icon next to the customized view name on the Default View menu, and then click the Trash icon.
To return to the default view, click Default View on the Default View drop-down menu.
To export the current view to a file:
- Apply filters and select columns as described above.
- Click Export to display a drop-down menu. Click the CSV or Excel XML radio button to specify comma-separated values (CSV) or Excel XML format, and then click Export to save the current view's data in a file.

Supported Software Information
Releases 8.0.0 and later supports all content described in this article.
