Configure VRRP and DHCP Relay on LAN Interfaces in Concerto
![]() For supported software information, click here.
For supported software information, click here.
The Virtual Router Redundancy Protocol (VRRP) allows you to have one or more backup routers when you are using a statically configured router on a LAN. If the active, or master, router fails, a backup router takes over and continues to forward packets. For VRRP, you configure a virtual IP address, either manually or with DHCP, that is shared among two or more routers. One router is designated as the master and the others are backup routers. If the master router fails, the virtual IP address is mapped to the IP address of one of the backup routers.
Configure VRRP
To configure VRRP in Concerto:
- In Tenant view, select the Configure lifecycle in the left menu bar.
- Select Profiles > Master Profiles.
- Select a basic master profile in the main pane. The Edit Master Profile screen displays.
- Select the Profile tab. The Network subtab displays by default, showing a diagram of the default interface configuration.

- Click the LAN box. The LAN screen displays the existing LAN interfaces.

- Click Add Interfaces > Create New to create a new LAN interface. In the Create Interface screen, select the General tab, and enter information for the following fields.

Field Description Name Enter a name for the LAN interface. Type Select Physical. Enabled Click the slider to enable the interface. Block ICMP Click the slider to block ICMP messages on the interface. Category Select LAN. Sub Category Select Wired. Location Select a VNI interface for wired interfaces. VLAN ID Enter a VLAN ID.
Range: 0 through 4094
Default: None
- Select the Address and Routing tab, click the slider to enable VRRP, and then enter information for the following fields.
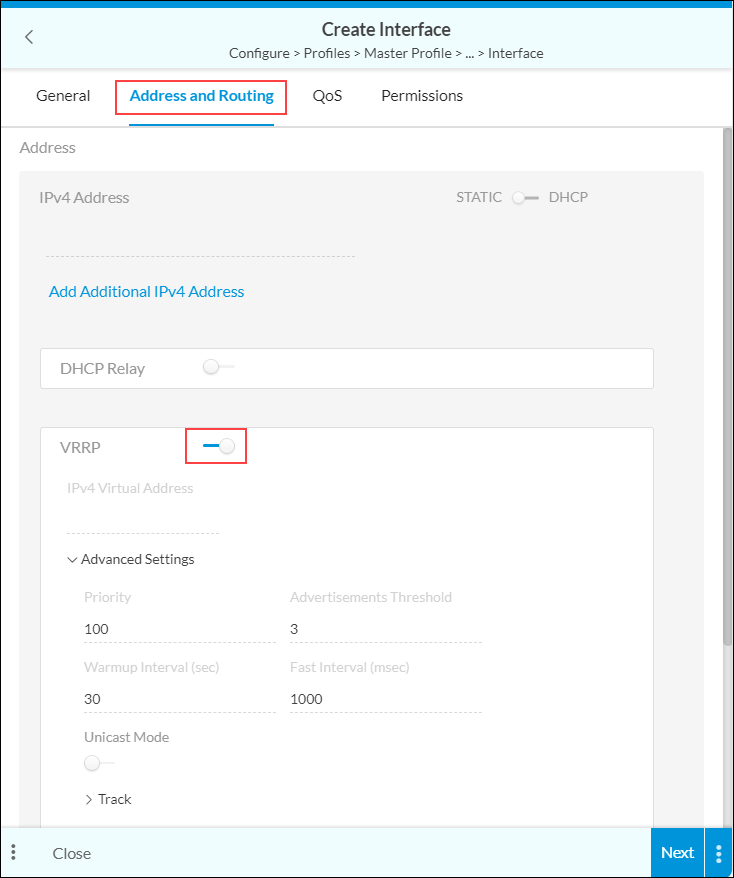
Field Description IPv4 Virtual Address
Enter a valid IPv4 address, and then click the  Check-mark icon or press the Enter key. You can add additional IPv4 addresses if desired.
Advanced Settings (Group of Fields)
- Priority
Enter the priority to assign to the interface. The interface with the higher or highest priority becomes the VRRP master router.
When you configure a VRRP priority value, be aware that value can be reduced by various objects that VRRP can track, such as interfaces, routes, monitor objects, and HA state. When you choose a priority value, you must make sure that you account for a worst-case scenario so that the priority never goes below 0. As an example, consider a VRRP group that is configured on the interface vni-0/0.0 with priority of 200 and that is tracking the interface vni-0/1.0, which has a priority cost of 20. When the vni-0/1.0 goes down, its priority cost is subtracted from the configured priority of 200. As a result, the current (dynamic) priority becomes (200 – 20), or 180. In this example, the vni-0/1.0 interface is the tracking object.
Range: 1 through 254
Default: 100- Advertisements Threshold
Enter the number of VRRP advertisements that the backup router can miss before declaring the master router to be down.
Range: 1 through 15
Default: 3- Warmup Interval
Enter how long the interface waits before determining which VRRP router is the master and which is the backup.
Range: 1 through 3600 seconds
Default: 30 seconds- Fast Interval
For VRRP Version 3 only, enter how often the master and backup routers exchange VRRP advertisement messages.
Range: 1 through 50000 milliseconds
Default: 1000 milliseconds- Unicast Mode
Click the slider to enable unicast mode on the interface, and then enter the unicast peer address, which is the address to which the packets will be sent.
Note that by default, VRRP interfaces are set to multicast mode. However, for cloud deployments, the mode must be set to unicast.

Track (Group of Fields) Click the Track down-arrow to display additional fields. VRRP tracking allows the VOS device to decrease the priority of its VRRP group when one or multiple events occur. At any given time, the VRRP device with the highest priority owns the IP address on the interface. VRRP tracking allows you to configure which events cause the interface to give up its IP address to a VRRP peer. You can configure VRRP to track interface, route, or monitor objects. Note that these objects are mutually exclusive; you can configure VRRP tracking for only one of them.

- Priority Hold Time
Enter the virtual router priority hold time, in seconds. This timer controls how long a device that is a master keeps the IP address when an event occurs that lowers its priority. For example, suppose a route on the device is tracked and the route becomes unavailable. If the hold time value is 10, the device keeps the IP address for 10 seconds. If, after 10 seconds, the device still has a lower VRRP priority than its neighbors, it gives up the IP address. If both the VRRP master and VRRP backup router lose the same route, they decrease their priorities equally, and no IP address switchover occurs.
Range: 1 through 3600 seconds
Default: None (0 seconds)- Interfaces

- Connection Name—Click in the Connection Name field, and then select the primary interface on the master router in the VRRP group.
- Priority Cost—Enter the value to subtract from the VRRP group priority if the interface goes down.The VRRP router with the highest priority in the VRRP group then becomes the master (active) router.
You can track more than one interface at a time, and if one of the interfaces goes down, each interface monitor individually subtracts its priority cost. For example, suppose you track two interfaces and set the priority cost for each of them to 100. If one of the interfaces goes down, the VRRP group priority decreases by 100. If both interfaces go down, the VRRP group priority decreases by 200.
Range: 1 through 254
Default: 100
- Routes

- Prefix—Enter the IPv4 or IPv6 prefix and length of the interface on which VRRP group is configured.
- VPN/Connection Name—Click in the VPN/Connection Name field, and then select the VPN or connection name (routing instance) to which the route applies.
- Priority Cost—Enter the value to subtract from the VRRP group priority if the interface goes down.The VRRP router with the highest priority in the VRRP group then becomes the master (active) router.
You can track more than one prefix at a time. Each prefix is tracked separately, and the priority cost is subtracted if the prefix is no longer available.
Range: 1 through 254
Default: 100
- Monitors

- Name—Enter the name of the application monitor to use for tracking. For more information, see Configure Application Performance Monitoring.
- Source Interface (Release 11.4.1)—(Optional) Enter the source interface to use when creating an IP SLA monitor in VOS.
- Priority Cost—Enter the value to subtract from the VRRP group priority if the interface goes down. The VRRP router with the highest priority in the VRRP group then becomes the master (active) router.
You can add more than one monitor. Each monitor is tracked separately, and each subtracts its priority cost if it goes down.
Range: 1 through 254
Default: 100
Configure Multiple DHCP Relay Addresses
For Releases 11.3.1 and later.
You can add multiple IPv4 addresses to configure redundant DHCP forwarders.
To configure multiple IPv4 addresses for DHCP forwarders:
- Select Configure > Profile Elements > Policy Elements > Device > Interface to display the Create/Edit Interface screen.
- Select a LAN interface.
- Select the Address and Routing tab.
- In the IPv4 Address field, click the slider to select Static, and then enter a valid IPv4 address and subnet.
- Click the slider to enable DHCP Relay, and then enter two or more IPv4 addresses.

- Select the Permissions tab.
- Click Save.
Supported Software Information
Releases 11.3.1 through 12.2.2 support all content described in this article, except:
- In Release 11.4.1, when configuring VRRP advanced settings, you can specify the source interface to use when creating an IP SLA monitor in VOS.
Additional Information
Configure Aggregated Ethernet Interfaces in Concerto
Configure Application Performance Monitoring