Configure LAN Connections
On the Network LAN screen, you can configure LAN profiles, DHCP address pools, static routes, a DNS name server, and port forwarding. You can also reserve an IP address that is assigned by DHCP to a device. You configure these parameters for both Ethernet and WiFi ports.
To restore the default configuration, click Easy Quick Picks. Click the Refresh icon to update information on the screen.
Configure a LAN
- Click Configure in the left menu bar to open the Configure dashboard.
- Hover over the instance in the honeycomb, and click Configure to open the site information window.

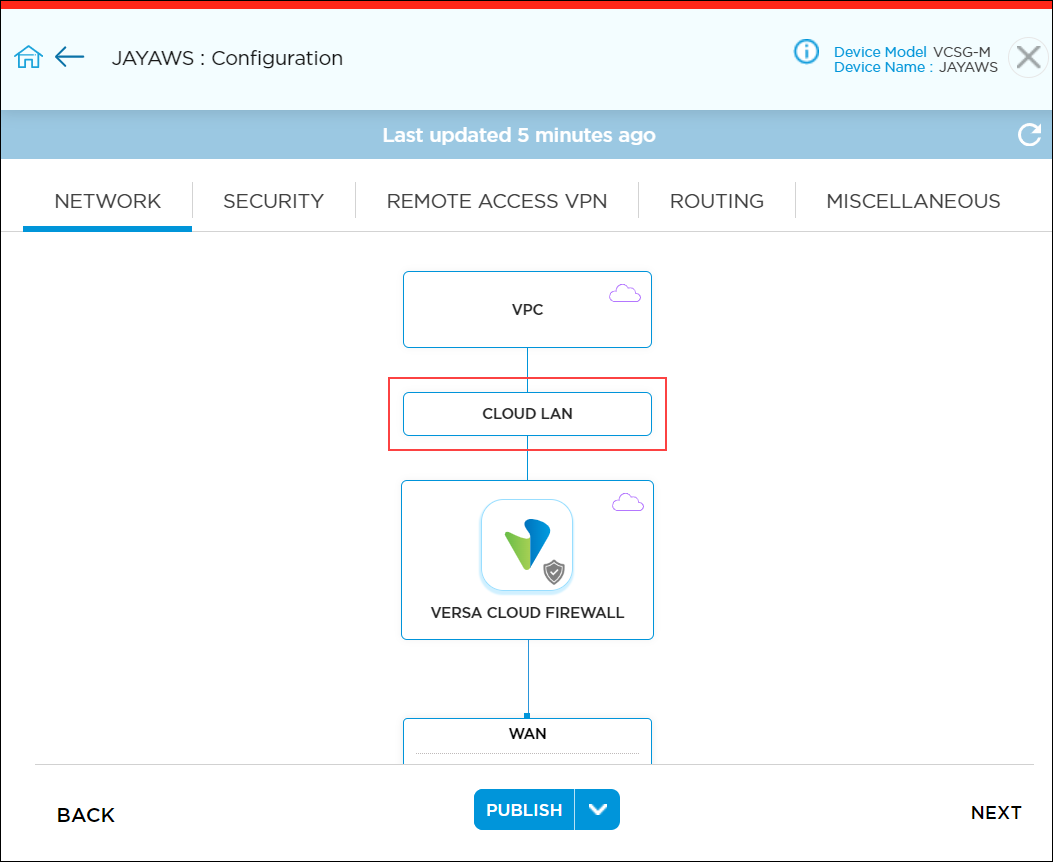
- Click the Cloud LAN box to open the Network > LAN screen.

- Click to configure the following:
- Ethernet Ports
- Port Forwarding
- Device IP Address Reservation

The following sections describe how to configure each of these LAN components.
Configure Ethernet Ports
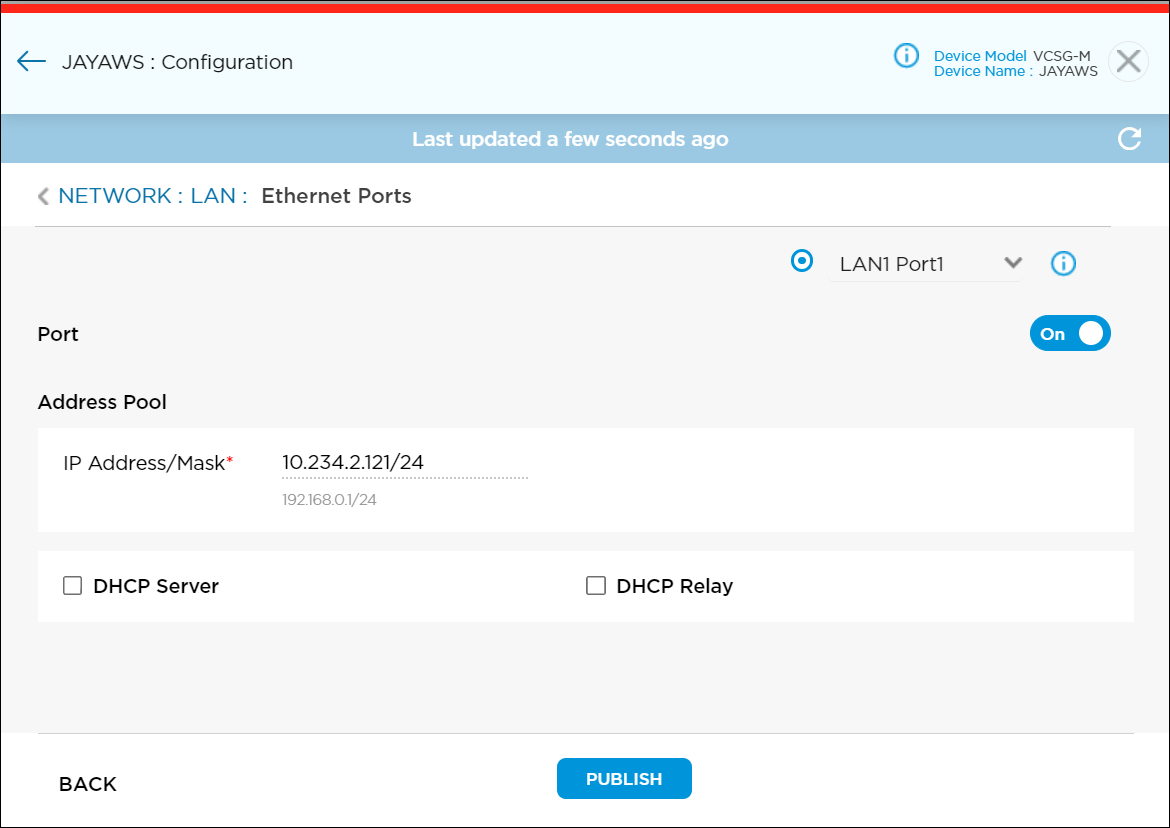
You can assign an IP address to an Ethernet port and configure DHCP addressing from the Ethernet Ports screen. The first part of the interface name indicates whether it is a LAN or a WAN interface. The second part of the interface name, with Port followed by a number, refers to the port number printed on the CSG appliance. For example, the interface name LAN1-Port2 indicates the LAN interface 2 that you must connect to the port 2 on the CSG appliance.
To configure an Ethernet port on a LAN:
- Hover over the instance in the honeycomb, and then click Configure to open the instance information window.
- Click the Cloud LAN box to open the Network > LAN screen.

- Click the Ethernet Ports box to open the Network > LAN > Ethernet Ports screen.

- In the Ethernet Ports screen, enter information for the following fields.

Field Description Port Click the Port toggle button to enable or disable the LAN port. Address Pool - IP Address/Mask (Required)
Enter the AWS private IPv4 address for the LAN port. This IP address is retrieved from AWS. For example, the following screenshot shows the private IPv4 address in AWS.

- DHCP Server
Click to configure DHCP server settings and DHCP custom options. See Configure DHCP Settings, Add a DHCP Lease Profile, and Configure DHCP Custom Options. - DHCP Relay
Click to configure DHCP relay settings. See Configure DHCP Relay Settings. - Click Publish.
Configure DHCP Settings
On Versa Portal, you can configure a Dynamic Host Configuration Protocol (DHCP) server and a DHCP relay agent. The DHCP server assigns and manages IP addresses from an address pools on the instance to DHCP clients. You can configure the DHCP server to assign the IP address of the Domain Name System (DNS) server, the default device, and other parameters. You can also set the IP address of a DHCP server to which the DHCP relay agent forwards client requests.
To configure DHCP settings:
- Click DHCP Server and enter information for the following fields.

Field Description IP Subnet (Required) Enter a valid IP prefix and length. The prefix length must be /25, for example, 172.16.4.0/25. IP Start Range (Required) Enter the lowest IP address in the DHCP address pool. IP End Range (Required) Enter the highest IP address in the DHCP address pool. DHCP Lease Profile (Required) Select the lease profile for the network level. To add a DHCP lease profile, click the  icon. For more information, see Add a DHCP Lease Profile.
Name Servers By default, primary and secondary DNS name servers are configured automatically.
To manually configure these servers, click Manual and enter the IP addresses of the primary and secondary DNS name servers.

Add a DHCP Lease Profile
A DHCP lease profile specifies the duration and properties of the lease profile.
To add a DHCP lease profile:
- Click DHCP Server field to activate configuration fields on the screen.
- Click the
icon. In the DHCP Lease Profile popup window, enter information for the following fields.
Field Description Lease Profile Name (Required) Enter a name for the lease profile. The name cannot include any spaces. Description Enter a text description for the lease profile. Life Time Enter how long the lease profile is valid.
Range: 60 through 31536000 seconds
Default: 11600 seconds
Renew Timer Enter the time during which a client can renew the lease profile. You can configure the renew timer to be less than or equal to 50 percent of the valid lifetime.
Range: 60 through 31536000 seconds
Default: 10000 seconds
Rebind Timer Enter the time during which a rebind request can be sent by a client after a period of inactivity. You can configure the rebind timer to be less than or equal to 80 percent of the valid lifetime.
Range: 60 through 31536000 seconds
Default: 20001 seconds
- Click Add. The lease profile displays.
- Click the Trash icon to delete a profile. Note that you cannot edit a lease profile.
- Click Continue.
Configure Custom DHCP Options
For Versa Portal, you can configure custom DHCP options on LAN interface. You can configure DHCP Options 42, 43, and 66. You can configure the options using the following types of values: Boolean, fully qualified domain name (FQDN), hexadecimal string, IPv4 address, and string.
To configure custom DHCP options:
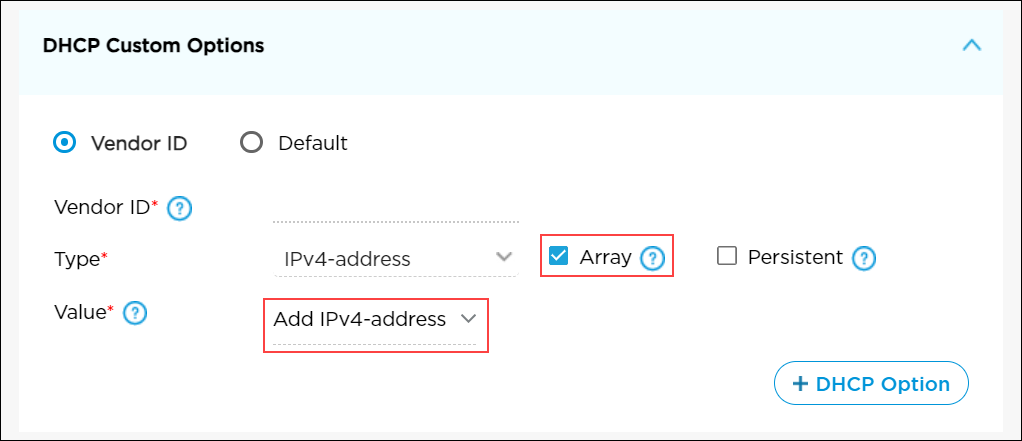
- Click DHCP Custom Options and enter information for the following fields.

Field Description Vendor ID Click if vendor information is exchanged between the DHCP server and the client. Default Click to make this custom DHCP option the default. Vendor ID (Required) When a DHCP client represents multiple vendors, enter the vendor ID for DHCP. This field is applicable for vendor ID option. You cannot edit the vendor ID after it has been configured. Code For default option, enter the DHCP option code:
- 42—NTP server
- 43—Vendor-specific
- 66—TFTP server
Type Select the DHCP option data type:
- Boolean
- FQDN
- Hexadecimal string
- IPv4 address
- String
Array Click to use an array to enter multiple DHCP custom option values in all DHCP messages. Persistent Click to include the custom DHCP option in all DHCP messages. Value Enter a value for the option code. If you select Array, click the list in the Value fields to add multiple options. For example, if the data type value is IPv4 Address:
- Click Add IPv4 Address.

- In the Add Multiple DHCP Options popup window, enter the IP address. To enter multiple IP addresses, click the
 Add icon.

- Click Continue.

- Click + DHCP Option to save the option to the DHCP screen. The new option displays on the screen.

- Click the Trash icon to delete a DHCP option.
- Click Save.
Configure DHCP Relay Settings
- Click the DHCP Relay checkbox.
- Enter the IP address of the DHCP relay agent. To enter multiple IP addresses, separate them by a comma.

Configure Port Forwarding
NAT port forwarding, also called port mapping, redirects packets from one address and port number pair to another while the packets are traversing the Versa Portal. You configure port forwarding rules to allow incoming traffic to reach its destination in the LAN.
Port forwarding is not enabled by default. To enable it, you configure a rule. When you create a port-forwarding rule, by default, the rule is created in the security firewall rule list, and it has a name in the format port_forwarding_rule_name_frd. You cannot edit or delete a system-generated default rule for port forwarding. However, you can disable or reorder a default rule to change its priority.
To configure a port forwarding rule:
- Hover over the instance in the honeycomb and click Configure to open the instance information window.
- Click the LAN box to open the Network > LAN screen.
- Click the Port Forwarding box to open the Network > LAN > Port Forwarding screen.

- In the Port Forwarding screen, click + Rule.

- In the Add Rule screen, enter information for the following fields.

Field Description Rule Name (Required) Enter a name for the rule. Type (Required) Choose the address translation method:
- Destination NAT
- No NAT
- Source NAT
- Static NAT
External Interface (Required) Choose an external WAN interface on which to enable NAT port forwarding. The menu lists only configured WAN interfaces.
When you create a port forwarding rule, the traffic flow for address translation method is as follows:
- If the NAT type is destination NAT, the external interface is the WAN (source) interface and the traffic flow is from the WAN interface to the LAN (destination) servers.
- If the NAT type is static NAT or source NAT, the external interface is the WAN interface and the traffic flow is from the LAN servers to the WAN interface.
- If the NAT type is no NAT, the traffic flow is from the LAN (source) to the WAN interface, and you can select an individual WAN interface or all WAN interfaces.
Precedence (Required) Enter a value for the priority of the rule. You can configure multiple rules and assign each a priority. A rule or rules with a higher priority value take precedence over rules with a lower priority value.
Range: 0 through 255
Default: 6Internal Port Enter the internal port or port range for the LAN interface. You can configure a single port number or a range of port numbers; for example, 200 or 200-300. The type of internal port you configure (single or range) must be the same as the type of external port. For static NAT, you cannot configure an internal port. Internal IP (Required) Enter an internal IP address or a range of IP addresses of the LAN servers to which to send NATed traffic. The internal IP addresses must fall within the start and end IP address range of any of the LAN ports. The internal IP type (single or range) must be the same as the external IP type. Internal and external IP ranges must match SNAT rules. External Port Enter the external port or port range for the WAN interface; for example, 2100 or 200-300. The type of external port you configure (single or range) must be the same as the type of internal port. For static NAT, you cannot configure an external port. External IP (Required) Enter an external IP address or a range of IP addresses for the WAN interface. The external IP addresses must fall within the start and end IP address range of any of the WAN ports. The external IP type (single or range) must be the same as the internal IP type. Internal and external IP ranges must match SNAT rules. Destination IP Enter a destination IP address. Destination IP is available only for static NAT and source NAT types. Internal Interface Choose an internal interface on which to enable NAT port forwarding. The menu lists only configured WAN interfaces and enterprise LANs.
When you create a port-forwarding rule, the traffic flow for address translation method is as follows:
- If the NAT type is destination NAT, the external interface is the WAN (source) interface and the traffic flow is from the WAN interface to the LAN (destination) servers.
- If the NAT type is static NAT or source NAT, the external interface is the WAN interface and the traffic flow is from the LAN to the WAN interface.
- If the NAT type is no NAT, the traffic flow is from the LAN (source) to the WAN interface, and you can select an individual WAN interface or all WAN interface. When you configure no NAT for any subtenant on a gateway, ensure that you add the security rule in provider organization to allow private IP addresses configured for no NAT.
Note that the internal interface option is displayed only when you configure port-forwarding rules for gateway devices. This option applies only to gateway devices.
Protocol (Required) Select the protocol:
- Any
- TCP
- UDP
- Click Add to add the rule to the Versa cloud.
- Click Save to save the new rule to the Versa cloud.
Reserve an IP Address for a License
You can permanently assign an IP address to a license by reserving a specific address that is part of the interface's IP address subnet. To reserve an IP address, you can either add a new device by creating a rule or you can click the Add Devices icon to add devices that are already connected. You can also reserve a MAC or an IP address from the WiFi network by associating a device IP reservation rule with WLAN interface ports.
To reserve a device IP address for a device:
- Hover over the device in the honeycomb and click Configure to open the site information window.
- Click Next to open the Configuration > Network screen.
- Click the LAN box to open the Network > LAN screen.
- Click the Device IP Address Reservation box to open the Device IP Address Reservation screen.

- In the Device IP Address Reservation screen, click +Rule.

- In the Add Rule screen, enter information for the following fields.

Field Description Rule Name (Required) Enter a name for the rule. Interface (Required) Select a LAN or WLAN interface name. IP Address (Required) Enter the IP address to reserve. MAC Address (Required) Enter the MAC address of the device for which you are reserving the IP address. - Click Save to save the new rule to the Versa cloud.
To update a rule:
- Click the rule name to edit the rule.
- Click X to delete the rule.
- Click Save to update the Versa cloud.
