Set the BIOS Password on CSG Platforms
This article provides step-by-step guidance on how to set the BIOS password on Versa Cloud Services Gateway (CSG) hardware platforms. Versa CSG appliances run on AMI Aptio UEFI firmware, which operates independently of Versa Operating SystemTM (VOSTM), Director credentials, and any operating system-level authentication. This firmware layer is accessible to anyone with physical or serial console access to the appliance. Without a BIOS password, the platform's software security posture can be bypassed at the hardware level considering the console connection is accessible physically.
Setting a BIOS password is a foundational physical hardening step that is recommended during initial deployment. Without a BIOS password, an attacker with physical console access can:
- Modify the boot sequence and boot from an external USB device, bypassing the predefined boot process. This may allow an attacker to access internal storage without any operating system-level authentication.
- Perform a bootkit or rootkit injection that modifies the boot loader or UEFI firmware on the internal storage. The malicious code executes before VOS loads on every boot, operates below operating system visibility, and in the case of firmware-level implants, persists through VOS reinstallation. This can enable credential harvesting, covert backdoors, or interception of the boot process itself.
- Alter any other BIOS and UEFI settings to undermine the appliance's hardware chain-of-trust.
You can configure an administrator password, user password, or both, depending on the physical security posture requirements of your organization. The best practice for improved physical security is to set the administrator password, but in data centers or other high-security locations, it is recommended that you set the user password as well for increased security.
The table below summarizes the behavior for each scenario.
| Scenario | Boot Behavior | BIOS Setup Access |
|---|---|---|
| Administrator password only | System boots freely | Password required to enter BIOS setup only |
| User password only | Password required at every power-on | User password needed when device boots. Full admin rights inside the BIOS setup. |
| Both passwords set | User password required at power-on | Either password is accepted. Access level inside setup depends on which was entered. |
Note: There is no self-service BIOS password recovery option, so make sure to carefully control this setting. In case of a forgotten password, contact the Versa Networks support team.
Access the BIOS Setup
To access the BIOS configuration setup:
- Connect to the CSG physical console port using the serial console cable.
- Select Connection > Serial in the left menu.
- Use the following settings for the serial console connection on your terminal (PuTTY, TeraTerm, or equivalent):
- Speed (baud)—115200
- Data bits—8
- Stop bits—1
- Parity—None
- Flow Control—None

- Select Session in the left menu. In the following screen, make sure the selected Connection type is Serial.

- Click Open to connect to a device shell.
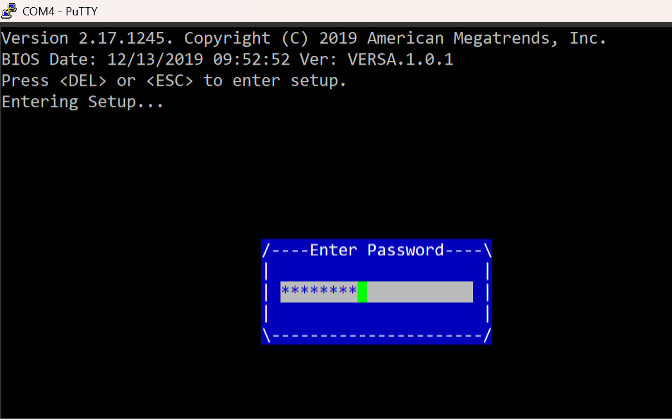
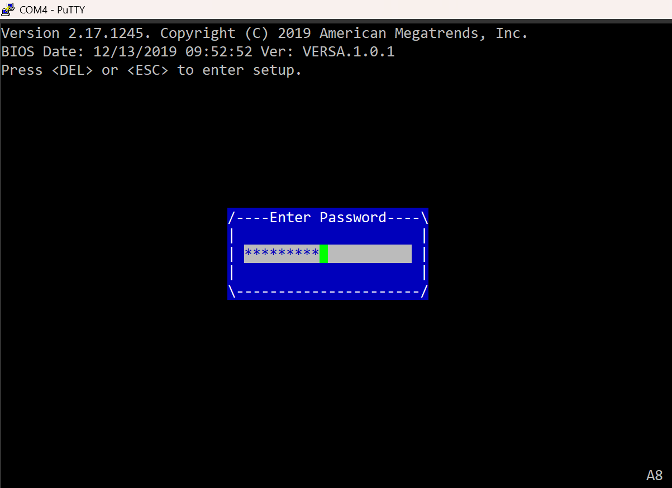
- Reboot the device using the sudo reboot shell command. Then press the DEL key for POST interception and to enter BIOS.
BIOS Date: 12/13/2019 09:52:52 Ver: VERSA.1.0.1
Press <DEL> or <ESC> to enter setup.
Entering Setup...
- In the BIOS configuration screen, navigate to the Security tab using the right-arrow (>) key.

- From here, you can set the administrator password, user password, or both. See the following sections:
Set the Administrator Password
The administrator password is enforced only when you need to access BIOS configuration settings. During a standard boot of the VOS software, providing a password is not required, which is convenient for remote installations where no onsite technical support is available.
- On the Security tab, navigate to Administrator Password using the down-arrow key, and then press Enter.

- In the Create New Administrator Password window, type a password, and then press Enter.
- In the Confirm New Administrator Password window, type the password again, and then press Enter.

-
Navigate to the Save & Exit tab.

- Select Save Changes and Exit, and then press Enter.
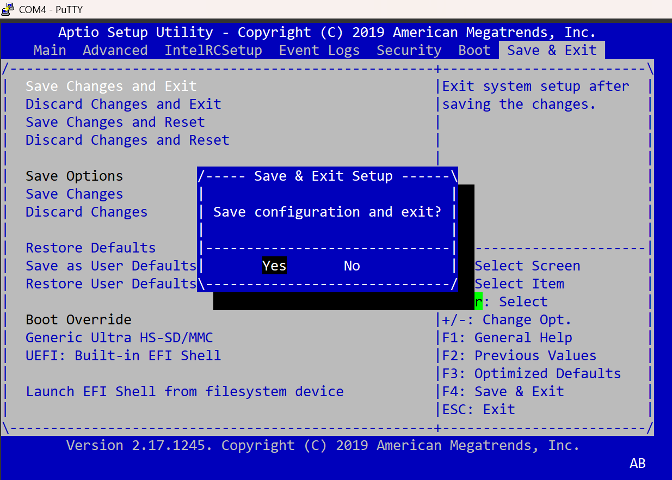
- Select Yes to save the configuration and exit BIOS configuration settings. The device will restart and boot the VOS software without requiring a password with normal reboot procedure, but to enter the BIOS setup again, the administrator needs to provide a password.
- To validate the BIOS password is properly set:
- During the boot process, press the DEL key for POST interception.
- In the Enter Password window, type the password.
- Press Enter to access BIOS configuration settings.
Set the User Password
The user password is enforced when your device starts booting process. It also used to access BIOS configuration settings.
Note: If device restarts, it will not boot without a password using the console connection. This setting should be used in highly restrictive areas, such as data centers, where on-site technical support is also available.
To set the user password:
- Access the BIOS configuration setup as described in Access the BIOS Setup, above.
- On the Security tab, navigate to User Password using the down-arrow key, and then press Enter.

- In the Create New User Password window, type a password, and then press Enter.

- In the Confirm New User Password window, type the password again, and then press Enter.

- Navigate to the Save & Exit tab.

- Select Save Changes and Exit, and then press Enter.
- Select Yes to save the configuration and exit the BIOS configuration setup. The device will continue to boot the VOS software without requiring a password with normal boot procedure because the POST check is passed.
- To validate boot password enforcement:
- Restart the VOS software from the shell using the sudo reboot command.
- Once device is restarted, after POST check it will prompt the administrator to enter a password to continue boot process.
- Provide a password and press Enter.
Note: Every time the device reboots, the password prompt will be enforced and the device will not continue the boot process without a password. The administrator must also provide a password to enter the BIOS configuration setup.
After providing a password VOS will boot following a standard process.
If you need to access BIOS configuration settings, press DEL button right after providing a password. Default wait timer is 1 second.
*NOTE: If Administrator password is NOT set then entering BIOS after User password prompt validation will grant full Administrator privileges in BIOS configuration setting. To limit access under BIOS configuration administrator should enforce both Administrator and User password as described in section 4.
Set Both the Administrator and User Passwords
The user password is enforced when your device starts the boot process. It also can be used to access BIOS configuration settings. In addition, the administrator can set the administrator password. When both passwords are set, either password can be used during a boot process for the “Enter Password” prompt. However, the administrator must use the administrator password for admin-level access. If the administrator enters the user password, it will only grant user-level access.
To set the user and administrator passwords, see the following sections:
After both passwords are set, validate the boot behavior by entering the user password during the boot process.
When the user password is provided, the device follows the standard boot process. If the POST process is interrupted by pressing the DEL key to enter the BIOS setup, user-level access is granted and the Administrator Password item is grayed-out, as shown below.

When the administrator password is provided, the administrator will have admin-level access, and the Administrator Password item is active, as shown below. For example, the administrator is able to modify or delete passwords.

Delete or Modify the BIOS Password
To delete or modify the BIOS administrator or user password:
- Reboot the CSG device and access the BIOS configuration setup as described in Access the BIOS Setup, above.
- On the Security tab, navigate to Administrator Password or User Password using the down-arrow key, and then press Enter.
- Enter the current password.

- After entering the current password, you can modify or delete the password:
- To modify the password:
- In the Create New User/Administrator Password window, type the new password, and then press Enter.
- Enter the new password again to confirm.

- To delete the password:
- Leave the Create New User/Administrator Password window blank, and then press Enter.
- Click Yes in response to the prompt shown below.

- To modify the password: