Connect a CSG3000 Series Appliance
This article describes how to connect a Cloud Services Gateway (CSG) 3000 series appliance to an AC power source and to a management console.
Versa Networks recommends that you use an uninterruptible power strategy that prevents power interruptions. A UPS can isolate unpredictable power outages or blackouts, brownouts, lightning, power surges, or spikes.
Step 1: Connect Earth Ground to a CSG3000 Series Appliance
- To ensure proper operation of a CSG3000 series appliance and to meet safety and electromagnetic interference (EMI) requirements, you must connect the appliance to earth ground before you connect power to the appliance. See Figure 1.
Figure 1: Connect Earth Ground to a CSG3000 Series Appliance
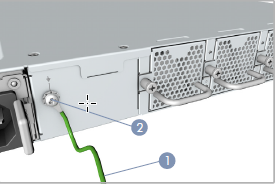
- Ensure that the rack is properly grounded and in compliance with ETSI ETS 300 253. Verify that there is a good electrical connection to the grounding point on the rack, and that the grounding point has no paint or isolating surface treatment.
- Attach the grounding wire (#18 AWG) to the grounding point on the device rear panel.
- Connect the other end of the wire to rack ground.
Caution: The earth ground connection must not be removed unless all supply connections are disconnected.
Step 2: Connect AC Power to a CSG3000 Series Appliance
Before you begin connecting AC power to a CSG3000 series appliance, ensure that you have:
- Electrostatic discharge (ESD) wrist strap.
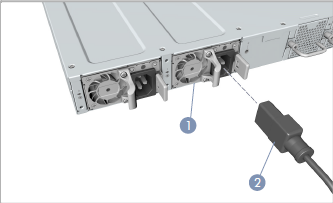
- AC power cord. An AC power cord is shipped with the appliances only for U.S. customers. Each power supply has a C14 plug that allows you to plug in standard power cords with C13 termination. The other end of the cord must have appropriate NEMA 5-15 local plug.
To connect a CSG3000 series appliance to an AC power source:
- Install two AC power supply units (PSU) in the device. Ensure that they are fully latched in place.
- Connect an external AC power source (C13) to each PSU.
- Plug the NEMA 5-15 end of the AC power cord into an AC power source outlet.
- Push the power button to power on the device.
Figure 2: Connect AC Power to a CSG3000 Series Appliance<
Step 3: Check that the CSG3000 Series Appliance Is Powered On
To check the CSG3000 series appliance is powered on, check that the Power LED is on. When operating normally, the power LED is green.
Figure 3: Check the CSG3000 Series Appliance Power Status

Step 4: Configure a Management Console To Connect to a CSG3000 Series Appliance
The CSG3000 series appliances are equipped with an RJ45 serial console port, and you use an RJ45 console cable to connect the console port. To communicate with the appliance, you must have a terminal emulation program, such as PuTTY, running on your system.
When you set up the connection, use the following default console port settings:
- Speed (baud)—115200
- Data bits—8
- Stop bits—1
- Parity—None
- Flow control—None
To connect a management console to a CSG3000 series appliance:
- Open the PuTTY application. The PuTTY configuration window displays.
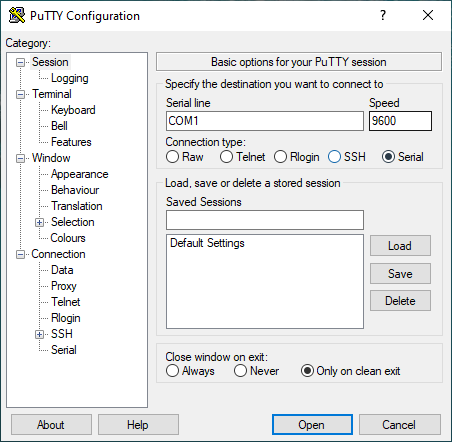
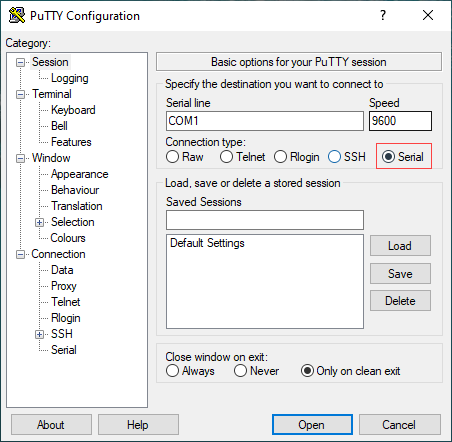
- In the Category navigation pane, click Session, and then in the Connection Type menu, click Serial.
- In the Category navigation pane, click Connection > Serial. The Options Controlling Local Serial Lines page displays.

- In the Serial Line To Connect To field, enter the COM port that your device is connected to. The default COM port is COM1.

- In the Configure the Serial Line section, enter the following information.
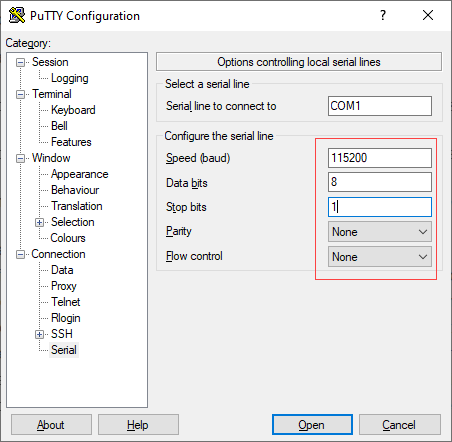
- In the Speed (Baud) field, enter the digital transmission speed. For CSG700 series appliances, the speed must be 115200.
- In the Data bits field, enter the number of data bits used for each character. The recommended value is 8.
- In the Stop bits field, enter the number of bits to be sent at the end of every character. The recommended value is 1.
- In the Parity field, select None. This is the method of detecting errors in transmission.
- In the Flow Control field, select None. This is the method of preventing data overflow.
- Optionally, in the Category navigation pane, click Session, and then in the Saved Sessions field, enter a name to save the session settings.

- Click Save.
- To open the session, click Open.

- Log in to the appliance CLI. Please consult Versa technical support for default credentials.
Step 5: Connect a CSG3000 Series Appliance to a Management Console
You can configure and manage a CSG3000 series appliance using a management console. To connect a CSG3000 series appliance to a management console, use the console port on the appliance.
To connect a CSG3000 series appliance to a management console:
- For RJ-45 ports, connect a Category 5e or better twisted-pair cable to the 1000BASE-T ports, and connect a Category 6, 6a, or 7 to the 10GBASE-T ports.
- Install the SFP/SFP+ transceivers, and then connect fiber optic cables to the transceiver ports. The following Finisar transceivers are supported by the SFP+ ports:
- 10GBASE-SR
- 10GBASE-LR
- 1000BASE-SX
- 1000BASE-LX
- Check the port status LEDs to confirm that the links are valid.
Figure 4: Connect a CSG3000 Series Appliance to a Management Console

